AWS Security Agent: Automated Pentesting AWSGoat (Serverless)
By Fabio Douek
Jump to section
- Overview
- How On-Demand Pentesting Works
- Pentesting Target Options
- The Demo: Pentesting AWSGoat
- Prerequisites
- Setting up Security Agent
- Deploying AWSGoat Module 1
- Enabling the Pentest
- Configuring Pentest target
- Launching the pentest from the web app
- Creating a pentest
- Running the Pentest
- What Security Agent Found
- Pricing
- Pentest Cost
- Verdict
- What Works
- What Can Be Improved
- Who Should Use It
- The Bigger Picture
- Cleaning Up
Explain (TLDR) like I am...
Imagine you built a fancy treehouse and want to make sure it is safe before your friends use it. You ask a robot to try to break in using every sneaky trick it knows, so you can fix the weak spots before anyone else finds them.
The clever part is that the robot reads the blueprints before it starts testing, so it spots hidden problems that a regular check-up would miss. Grown-ups use it to find weak spots in their websites before hackers do, and it costs far less than hiring a whole team of people for the same job.
Treat this as a new outside vendor performing offensive security work against applications the organization owns. Due diligence turns on a handful of questions: domain ownership is verified up front, credentials are stored in AWS Secrets Manager, and CloudWatch captures an audit trail of test activity. Scope, license terms, and data custody sit within a single AWS account.
The residual risk is process, not product. A $1,200 run makes pentesting cheap enough to start without a formal review, so teams can commit to findings, remediations, and auto-opened pull requests before legal has mapped the data flow. Compliance regimes that require human-signed reports (PCI DSS, CBEST) still need a manual engagement alongside this one.
Think of this as a targeted intervention for a specific symptom: applications shipping with exploitable web vulnerabilities because manual pentests are too slow and expensive to run often. The mechanism is a multi-agent sweep that reads source code and runtime behaviour together, covering OWASP Top 10 and business logic flaws with CVSS-scored findings.
Evidence is early but consistent: a Module 1 run surfaced 17 findings including an unauthenticated database dump and a file-scheme LFI. Side effects to monitor are the roughly 1-in-5 miss rate on unassisted runs and a slow troubleshooting loop when scope or IAM is misconfigured. Good candidates are teams with web apps on verified domains; poor candidates are those needing signed reports.
Notice what shifts when a team that does zero pentesting because it is too expensive suddenly has a tool that fits inside an afternoon. Relief surfaces first: the backlog of "we should probably test this" stops weighing on the security lead, and developers can see findings against their own code rather than a vendor report that lands months later.
The new friction is trust. A 21-hour autonomous agent working against your app raises quiet anxiety about what it touched, whether the findings are real, and what still needs a human pentester. The work is not just running the tool, it is agreeing as a team which findings auto-ship as PRs and which need eyes.
Treat this like a session player who shows up with charts already read. It holds the repetitive groove of authentication, reconnaissance, and OWASP sweeps on its own, and the code-aware pass means it is not sight-reading the app from the outside like a DAST scanner would.
The feel takes tuning. Getting domain verification, IAM, and scope right is the soundcheck, and if you miss a cue the whole set restarts from the top, which on a 5-hour run costs real task-hours. Once the ensemble locks in, the tempo of the release cycle picks up, because the repetitive security parts stop stealing attention from the solos that actually need a human.
The story is time-to-value on a line item that used to need a procurement cycle. A standard pentest lands at around $1,200 in about five hours, instead of $15,000 over two weeks, with 17 findings and reproduction steps ready for the engineering backlog. First run fits inside a sprint.
Positioning is continuous testing, not replace-the-pentester. Teams that ran one annual assessment on their top application can now test every app after every release, and the before-and-after lands cleanly in a case study. Buyers in regulated industries still need a human-signed report, so the framing is baseline coverage rather than full replacement.

Overview
AWS Security Agent is an AI-powered “frontier agent” that automates security testing across the full software development lifecycle. It went generally available for on-demand penetration testing on March 31, 2026, after a public preview that launched at re:Invent 2025 in December. It is a standalone service, separate from AWS Inspector, GuardDuty, or Security Hub, with its own web application and console.
The tool offers three capabilities: on-demand penetration testing ($50/task-hour), secure design reviews (free, up to 200/month), and secure code reviews (free, up to 1,000/month). The pentesting capability is the headline feature. Instead of hiring a firm for a $15,000 to $50,000 engagement that takes weeks to schedule and complete, you point Security Agent at your application and it runs an autonomous pentest that typically finishes in hours. It deploys a multi-agent architecture with specialized “swarm” agents covering 13 risk categories, including OWASP Top 10 vulnerabilities and business logic flaws. It provides CVSS scores, reproducible exploit paths, and remediation guidance.
In this post, I walk through setting up and running a pentest against AWSGoat from INE Labs, deploying Module 1 (a serverless blog application) manually via Terraform from my laptop. The pentest completed in 5 hours 20 minutes of wall time (21.82 task-hours, about $1,091 at list price) and produced 17 findings: 2 Critical, 6 High, 9 Medium. I forked upstream AWSGoat into the companion repo and customized Module 1 to deploy behind a custom domain on API Gateway. The custom domain is a prerequisite for AWS Security Agent, which requires an HTTPS target with a verified domain. I also applied a handful of minor workarounds. Finally, I include a comparison of pentesting reference environments for readers who want to test Security Agent themselves.
How On-Demand Pentesting Works
Security Agent deploys specialized AI agents to discover, validate, and report vulnerabilities in running applications. Unlike traditional DAST scanners that probe for known patterns, Security Agent reads your source code, API specifications, and documentation to build a customized attack plan. It then executes multi-step attack scenarios, validates findings through actual exploitation, and reports results with CVSS scores, impact analysis, and remediation guidance.
The multi-agent architecture works in phases:
- Authentication: An intelligent sign-in component locates login pages, attempts credentials, and maintains authenticated sessions
- Baseline scanning: Static scans to establish initial coverage
- Reconnaissance: Mapping the application surface and discovering endpoints
- Guided exploration: An LLM-based planner generates a contextual pentesting plan, identifying unexplored resources and potential vulnerability chains
- Specialized agent swarm: Dispatches work to agents configured for specific risk types, equipped with code executors, web fuzzers, NVD vulnerability database tools, and vulnerability-specific toolkits
- Validation: Findings undergo both deterministic validation and LLM-based exploitation attempts, with LLM-driven CVSS scoring
The key differentiator from traditional DAST tools like Burp Suite or OWASP ZAP is context awareness. Burp Suite probes a running application for vulnerabilities. Security Agent reads your code and understands your architecture, allowing it to find business logic flaws that pattern-based scanners miss.
The key differentiator from AWS Inspector is scope. Inspector scans for known CVEs in software packages and network exposure. Security Agent actively pentests applications for exploitable vulnerabilities, including authentication bypasses, injection attacks, and logic flaws. They are complementary.
Pricing: $50/task-hour, metered per second. See the Pricing section below for the full breakdown, including the two-month free trial.
Multi-cloud support: Security Agent can test applications on AWS, Azure, GCP, on-premises, and SaaS environments. The application does not need to be AWS-hosted.
Pentesting Target Options
Before running the demo, I evaluated several “vulnerable by design” AWS environments. These are intentionally insecure applications and infrastructure designed for security testing and learning. Here are the top options:
| App | Creator | Architecture | Deployment | Stars | Last Updated | Best For |
|---|---|---|---|---|---|---|
| OWASP DVSA | OWASP | Lambda + API GW + DynamoDB + S3 + Cognito | CloudFormation / Serverless App Repo | 544 | Sep 2023 | Serverless-specific vulns (10 lessons mapping to OWASP Serverless Top 10) |
| CloudGoat | Rhino Security Labs | Multi-scenario (IAM, EC2, Lambda, S3, ECS, Bedrock) | Terraform (custom CLI) | 3,534 | Apr 2026 | CTF-style IAM/privilege escalation scenarios (24+ scenarios) |
| AWSGoat | INE Labs | Module 1: Lambda + S3 + API GW + DynamoDB | Terraform + GitHub Actions | 1,999 | May 2025 | Broad OWASP Top 10 with realistic app scenarios |
| CloudFoxable | Bishop Fox | Modular AWS misconfigurations (18 challenges) | Terraform | 441 | Feb 2026 | Cloud enumeration and post-exploitation paths |
| IAM Vulnerable | Bishop Fox | 31 IAM privilege escalation paths | Terraform | 561 | Mar 2026 | IAM-specific privilege escalation testing |
| OWASP DVSA (Serverless) | OWASP | Video game store (Lambda) | CloudFormation | 544 | Sep 2023 | Event injection, broken auth, over-privileged functions |
I chose AWSGoat Module 1, the serverless blog application, as the pentest target for this post:
- Module 1: serverless blog application. React frontend plus a Node.js 18.x Lambda behind API Gateway, with DynamoDB and S3. It deliberately ships OWASP Top 10 (2021) issues: reflected and stored XSS, SQL injection, SSRF, IDOR on user profile reads, CORS misconfiguration, and over-permissive Lambda execution roles. This is the direct equivalent of what DVSA used to test.
AWSGoat also ships a second module (ECS-hosted HR payroll app with RDS, ALB, hardcoded creds, and IAM priv-esc paths) that exercises the container attack surface. I do not cover it here.
I picked AWSGoat over OWASP DVSA for three reasons. First, maintenance: AWSGoat’s last push is May 2025, while DVSA has not been touched since September 2023 and pins Node 8.x / Python 2 runtimes that are painful on current AWS. Second, scope: Module 1 alone covers the serverless OWASP Top 10 surface I wanted to put in front of Security Agent, and Module 2 is available as a separate run when the container/RDS angle matters. Third, deployment ergonomics: AWSGoat ships as clean Terraform that I can apply from my laptop. AWSGoat was also presented at BlackHat USA 2022 and DEF CON 30, so the attack paths are well-documented.
The Demo: Pentesting AWSGoat
Prerequisites
For Security Agent:
- An AWS account in a supported region. The six GA regions are: US East (N. Virginia), US West (Oregon), Europe (Ireland), Europe (Frankfurt), Asia Pacific (Sydney), and Asia Pacific (Tokyo). I used
us-east-1. - IAM permissions to create Security Agent resources.
- A public domain you own, with a Route 53 public hosted zone in the same AWS account. Security Agent verifies target-domain ownership before a pentest can start, and the raw
*.execute-api.amazonaws.comhostname AWSGoat emits by default cannot be verified.
For the AWSGoat target:
- Terraform installed.
- AWS CLI configured with admin credentials (
aws configure). Module 1 expectsus-east-1.
Setting up Security Agent
Setting up Security Agent is straightforward. The process is similar to the DevOps Agent setup but uses a different console.
Step 1: Create an Agent Space
Navigate to the AWS Security Agent console and click Set up AWS Security Agent. An Agent Space is the organizational boundary for each application or project you want to secure. It isolates configurations, scopes, reviews, and findings while sharing organization-wide security requirements.
Fill in a name and optional description. I used awsgoat-demo. AWS recommends one Agent Space per application or project.
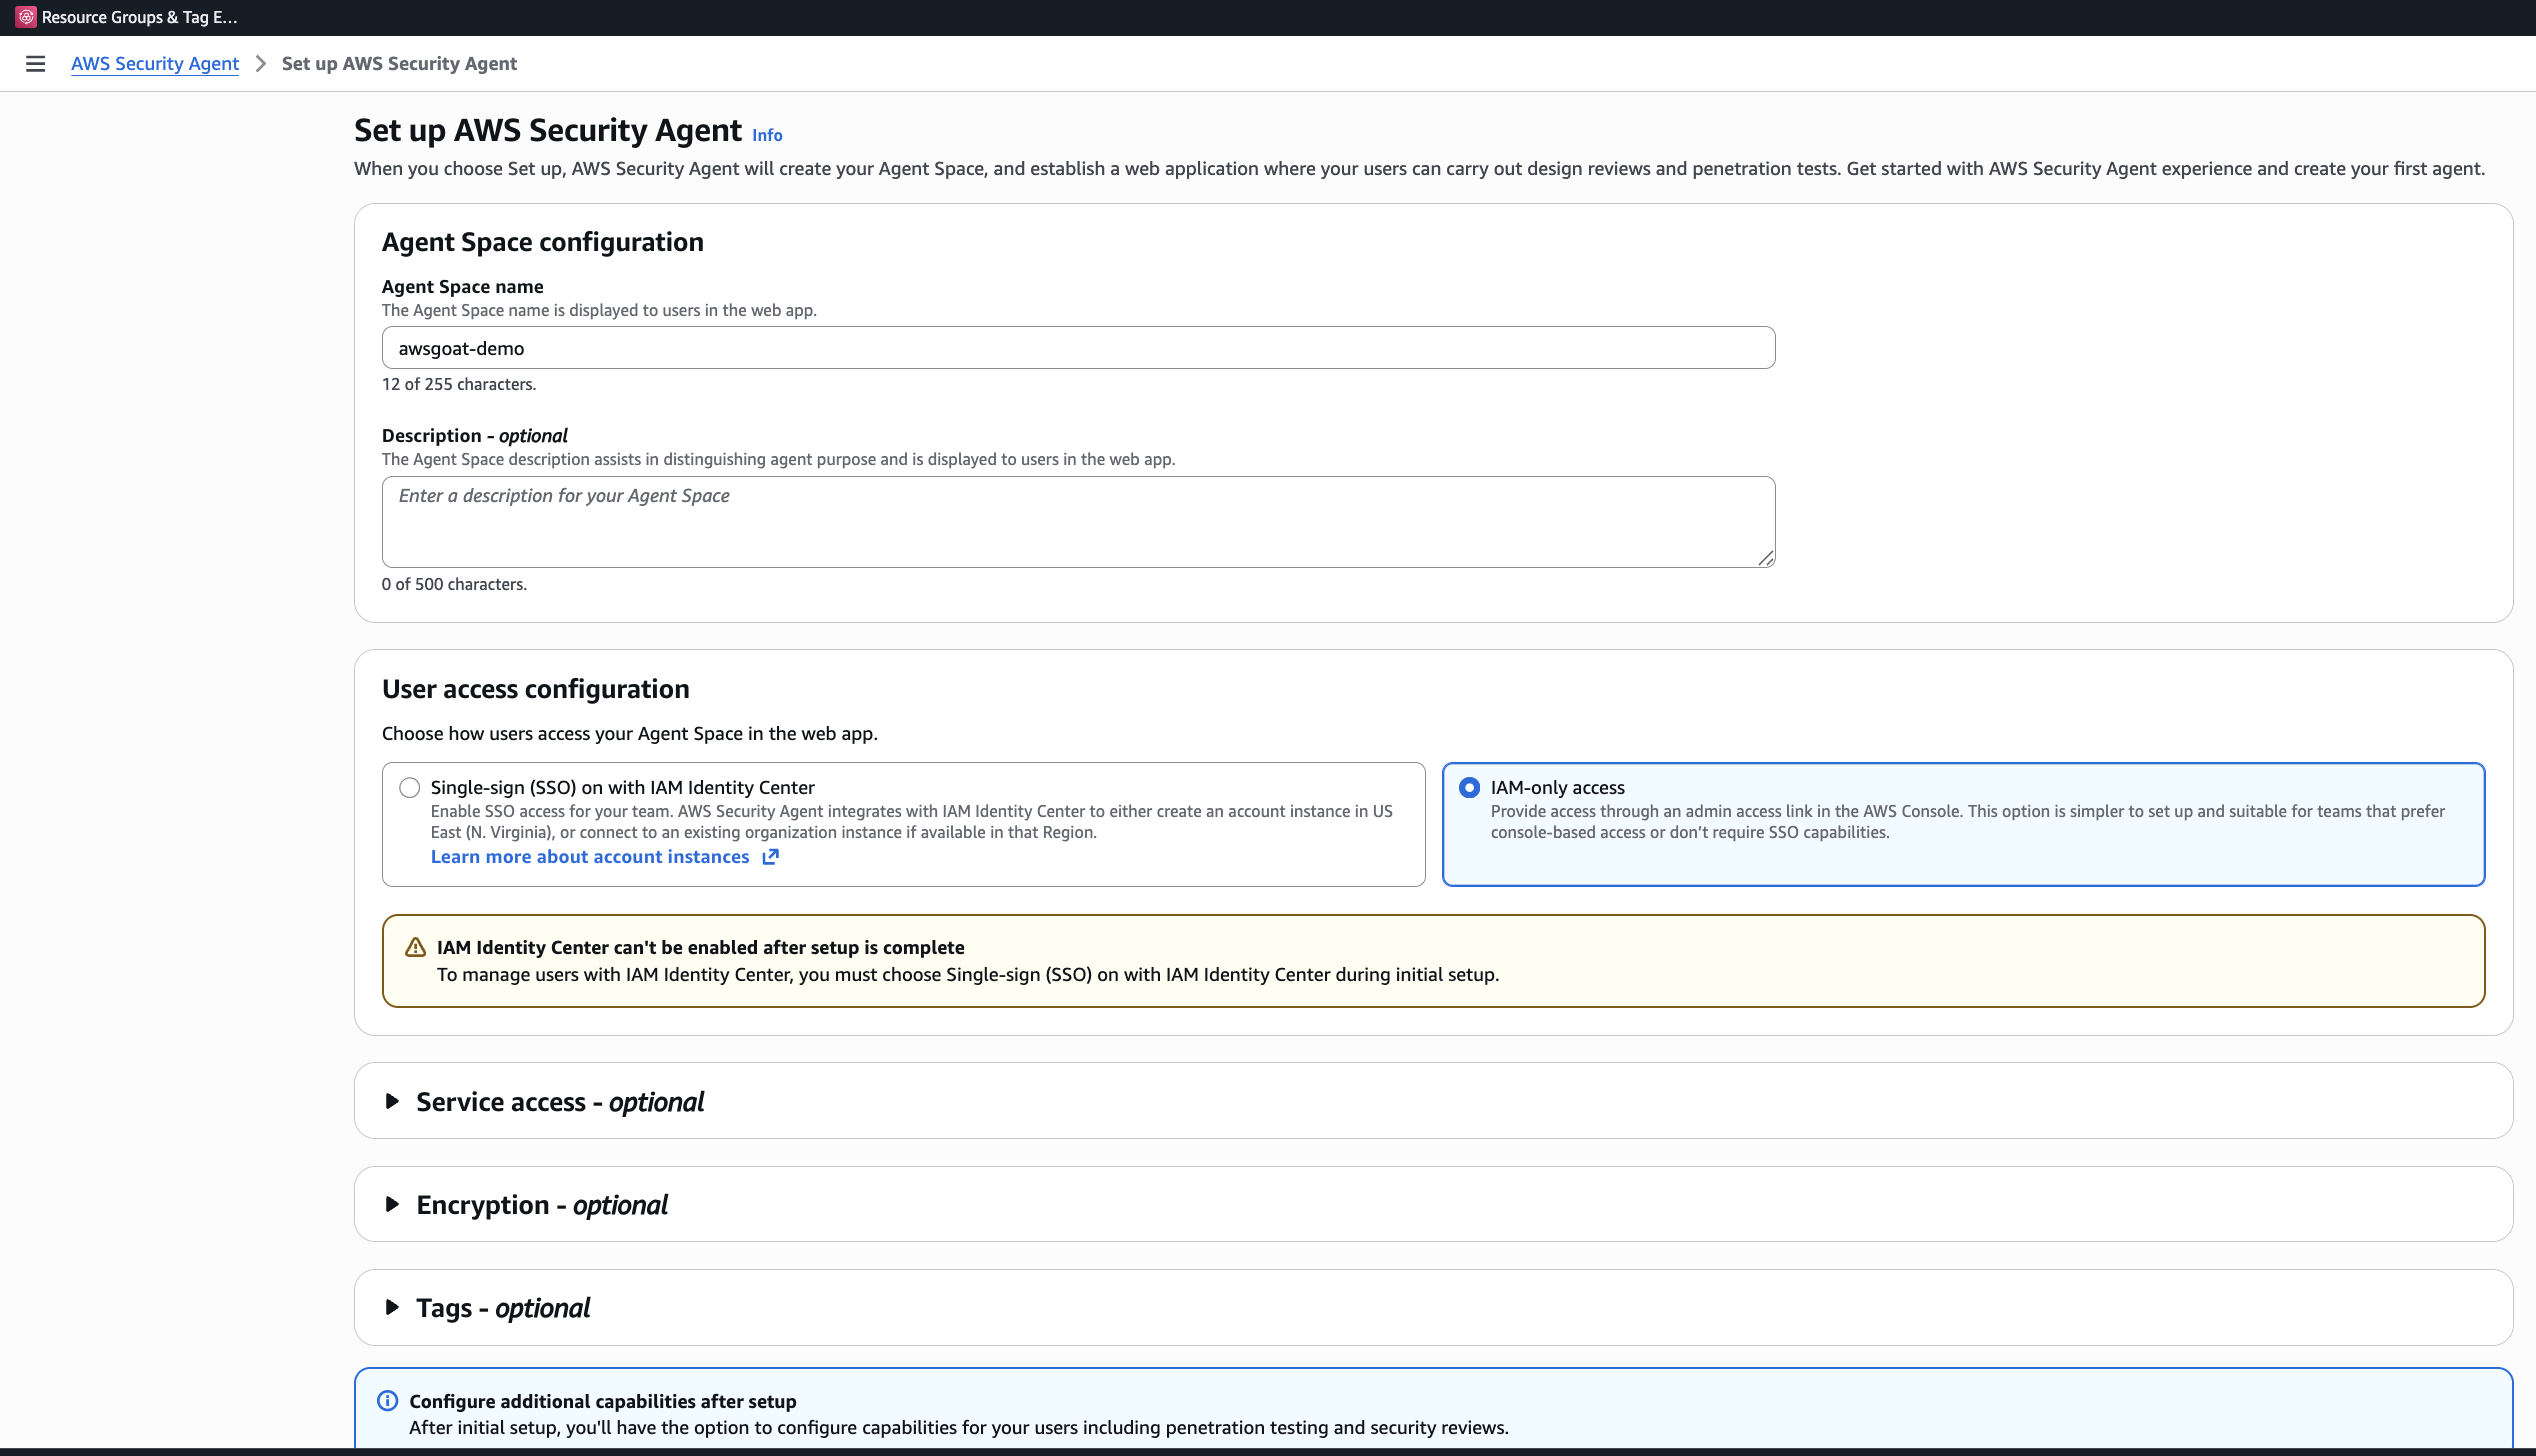
Step 2: Choose Access Method
You have two options:
- IAM Identity Center (SSO): Centralized user management with direct web app access. Requires IAM Identity Center in the same region as your Agent Space.
- IAM-only access: Simpler setup, access via admin link in the console.
Choose carefully. The decision is permanent until you delete and restart setup. I chose IAM-only access for this demo: simpler setup, and I did not need centralised user management for a single-operator walkthrough.
Step 3: Configure Permissions
Optionally create a default IAM role or use an existing role. The auto-created role provides the permissions Security Agent needs to operate.
Step 4: Access the Web Application
After setup completes, you can access the Security Agent web application through the console. The web app is where you configure pentests and review findings.
Deploying AWSGoat Module 1
AWSGoat’s repo includes a GitHub Actions workflow, but I wanted full control from my laptop. Module 1 ships as a self-contained Terraform stack, so the manual path is clean.
The companion repo extends upstream AWSGoat with a Route 53 custom-domain option (so the target has a verifiable hostname that Security Agent will accept) and switches the React router off hash-based URLs so the login path is a real path the agent can hit directly. It also includes a few minor macOS build fixes.
Companion repo: the walkthrough below clones my2cents.ai’s companion repo, which vendors AWSGoat with the custom-domain extension described above.
Clone once, then apply Module 1. The route53_zone_name and custom_domain_name values below are placeholders. test.thingsnotfound.com is the hosted zone on my own domain, and m1.test.thingsnotfound.com is the subdomain I used. Substitute your own hosted zone and chosen subdomain:
git clone https://github.com/fabiodouek/my2centsai-blog-samples.git
cd my2centsai-blog-samples/aws-security-agent-demo

# Module 1: serverless blog (Lambda + API Gateway + DynamoDB + S3)
cd modules/module-1
terraform init
terraform plan \
  -var route53_zone_name=test.thingsnotfound.com \
  -var custom_domain_name=m1.test.thingsnotfound.com
terraform apply -auto-approve \
  -var route53_zone_name=test.thingsnotfound.com \
  -var custom_domain_name=m1.test.thingsnotfound.com
# Capture the custom_app_url output (https://m1.test.thingsnotfound.com/react)
Apply complete! Resources: 358 added, 0 changed, 0 destroyed.
Outputs:
app_url = "https://v7usimip14.execute-api.us-east-1.amazonaws.com/prod/react"
custom_api_url = "https://m1-api.test.thingsnotfound.com"
custom_app_url = "https://m1.test.thingsnotfound.com/react"
s3_bucket_dev = "dev-blog-awsgoat-bucket-111111111111"
s3_bucket_production = "production-blog-awsgoat-bucket-111111111111"
s3_bucket_temp = "ec2-temp-bucket-111111111111"
s3_website_url = "https://production-blog-awsgoat-bucket-111111111111.s3.us-east-1.amazonaws.com/build"Module 1 finishes in 3 to 4 minutes and runs at roughly $0.0125/hr outside of free tier.
After apply, open the URL in a browser and confirm you see the React blog. If the first request returns a Forbidden / 403 error, wait a couple of minutes and retry. The Route 53 record and ACM-backed API Gateway custom domain can take a minute or two to propagate before the custom hostname starts resolving.
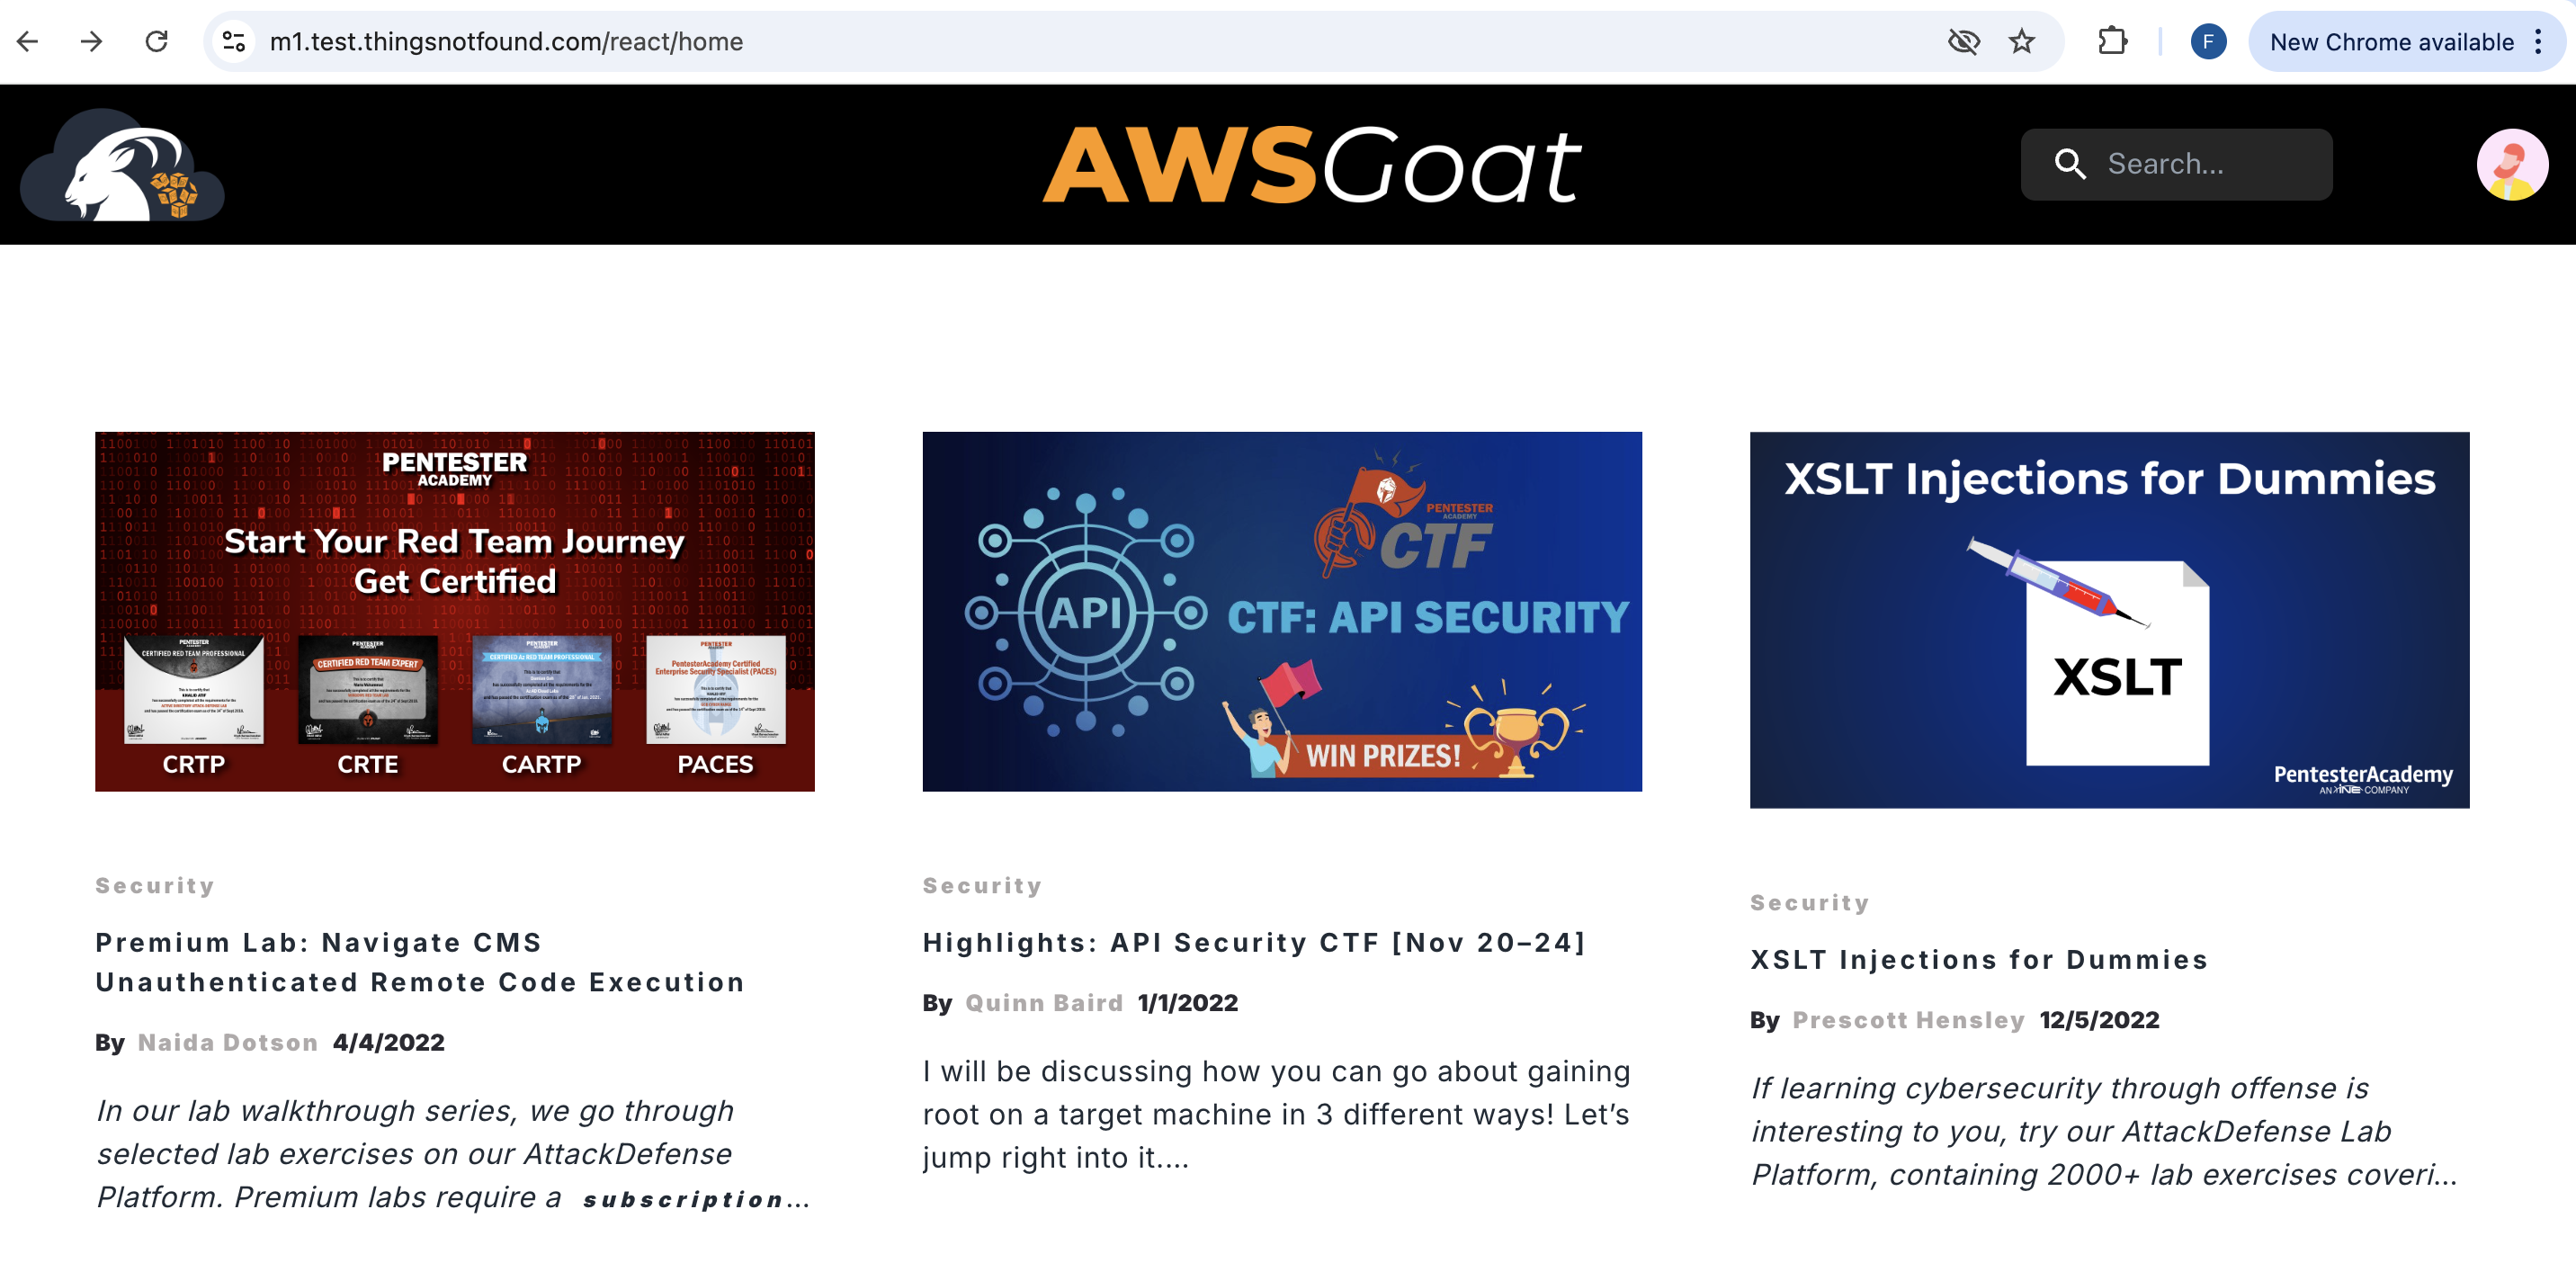
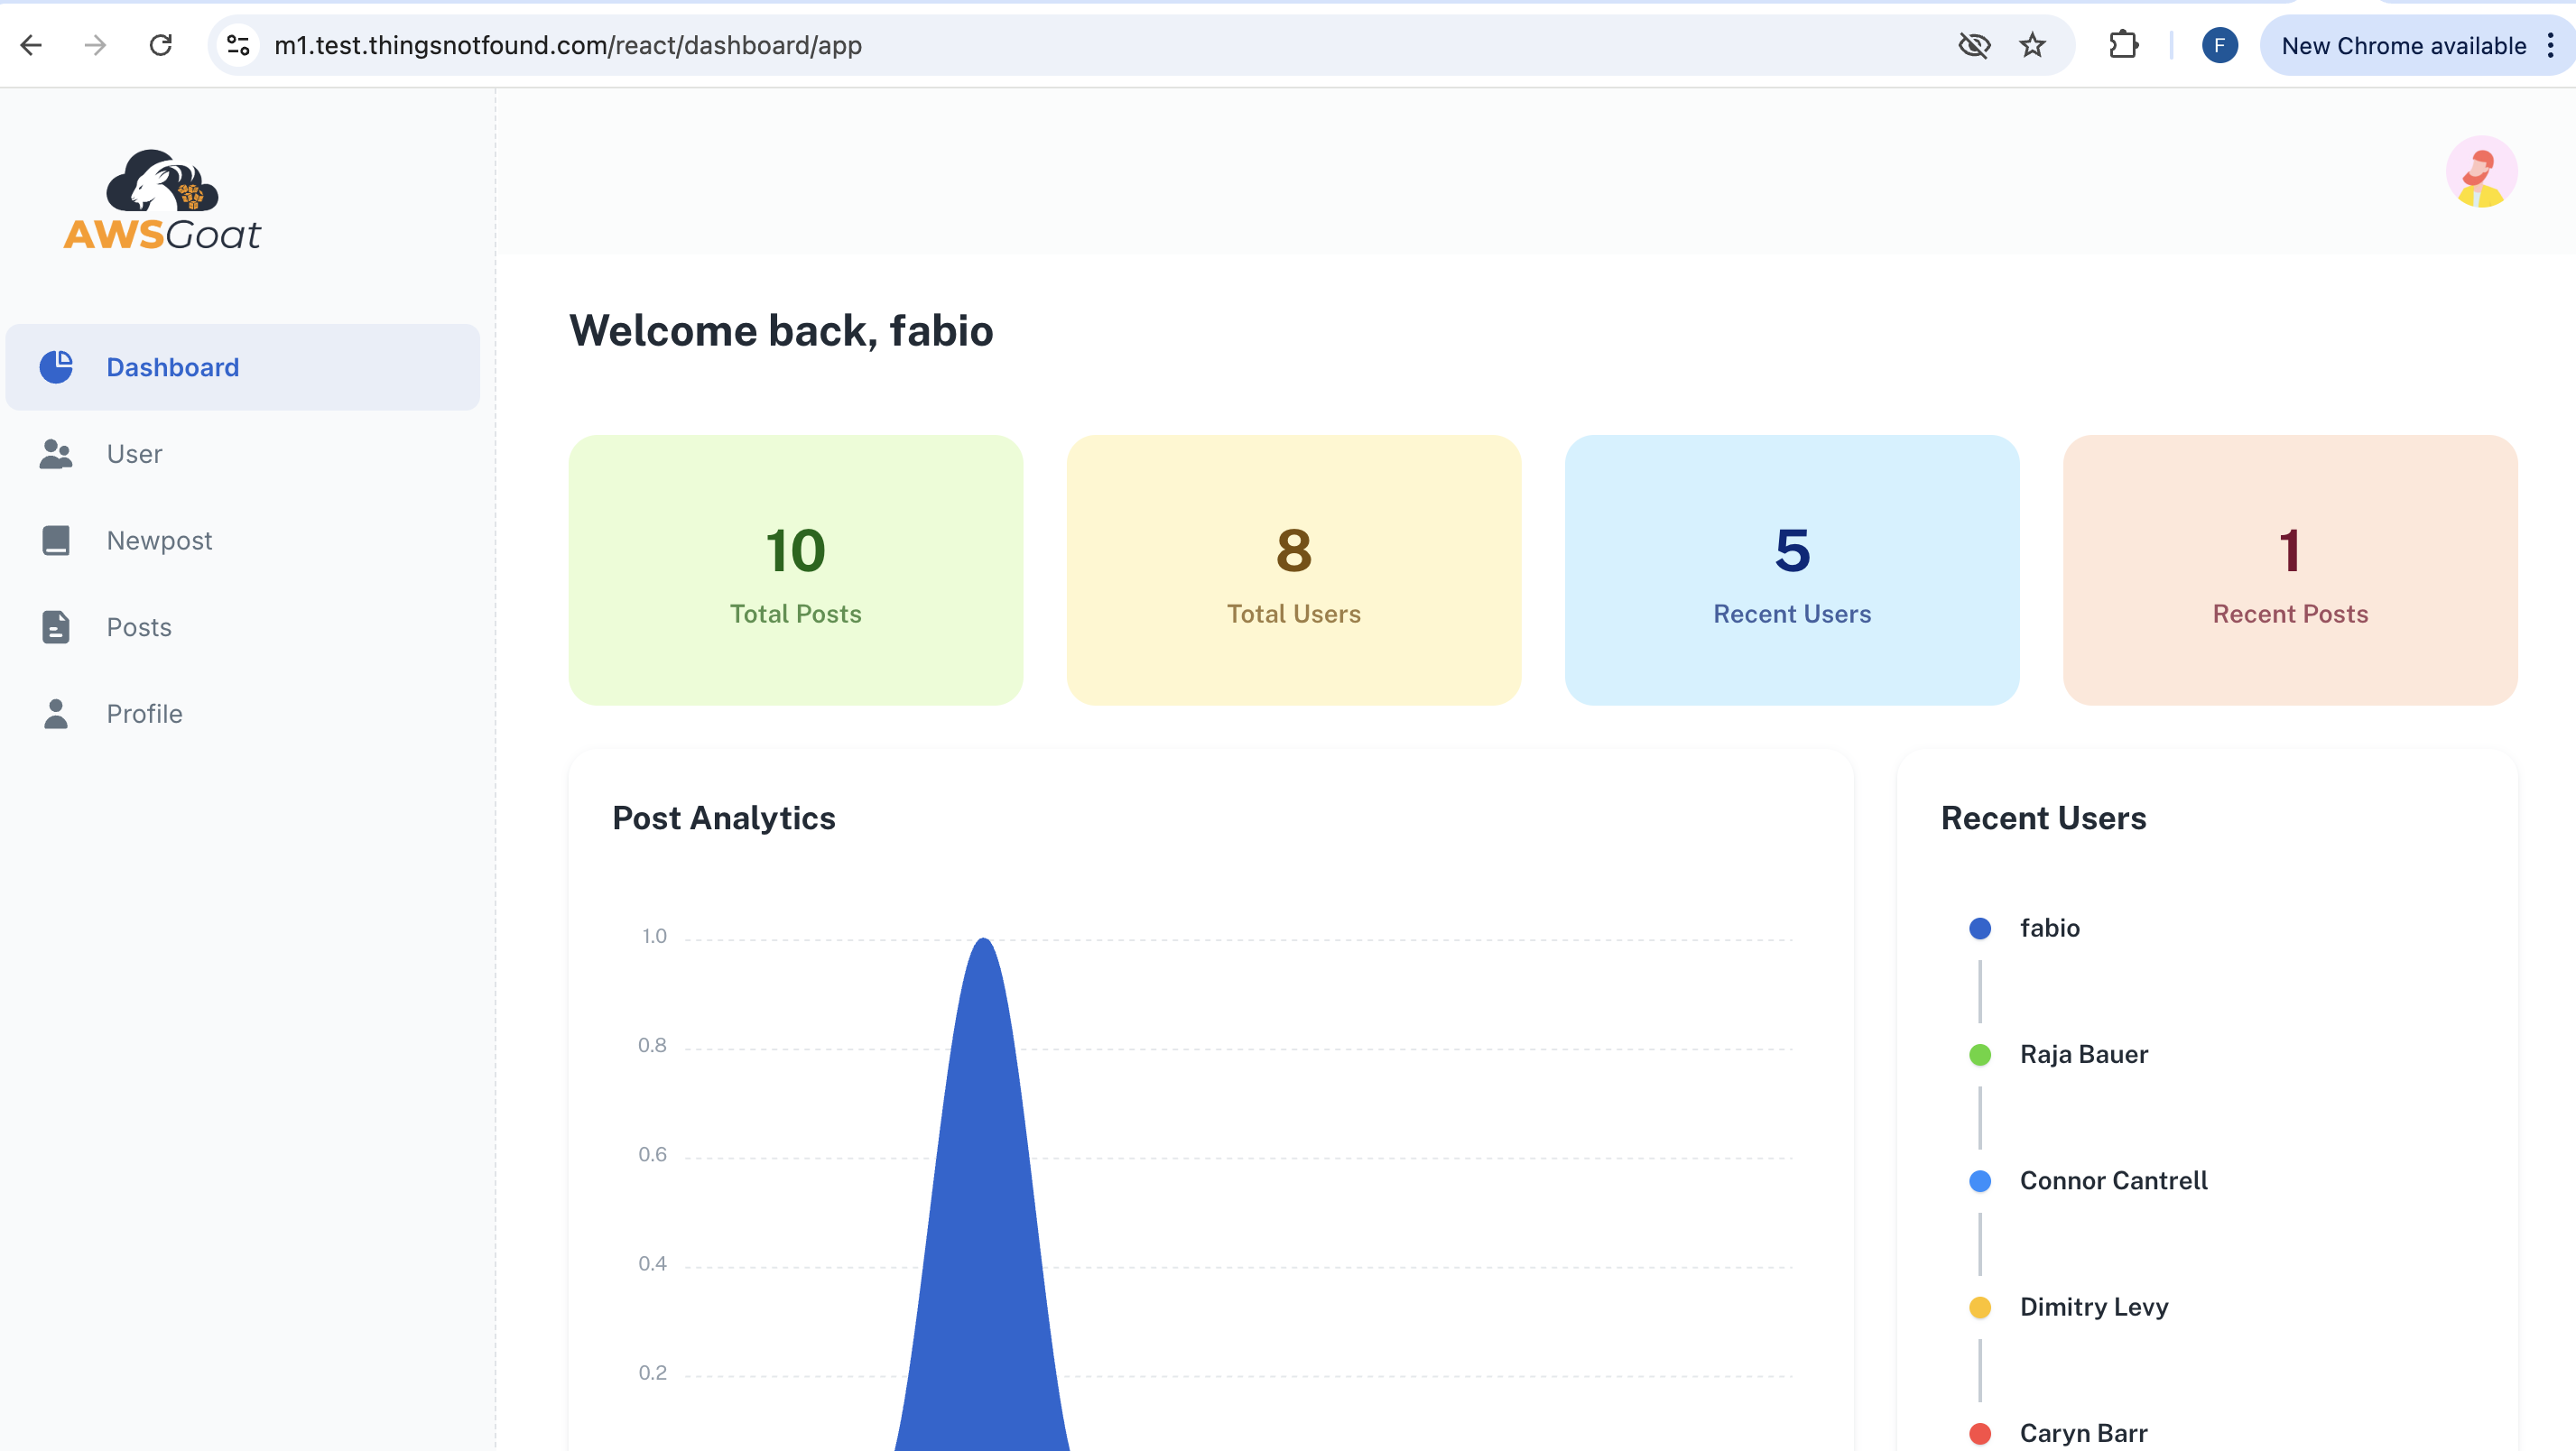
Register a test user. You will need those credentials later when configuring Security Agent’s authentication. The pentest run logs in as this user to exercise the authenticated surface of the app, which is where most of AWSGoat’s interesting vulnerabilities live.
Log in with that user and confirm the dashboard renders correctly. It should match the screenshot below. If the dashboard loads empty or 401s, the /list-posts, /get-dashboard, and other authenticated XHR calls are not reaching the backend, and Security Agent will fall back to the unauthenticated surface only.
Enabling the Pentest
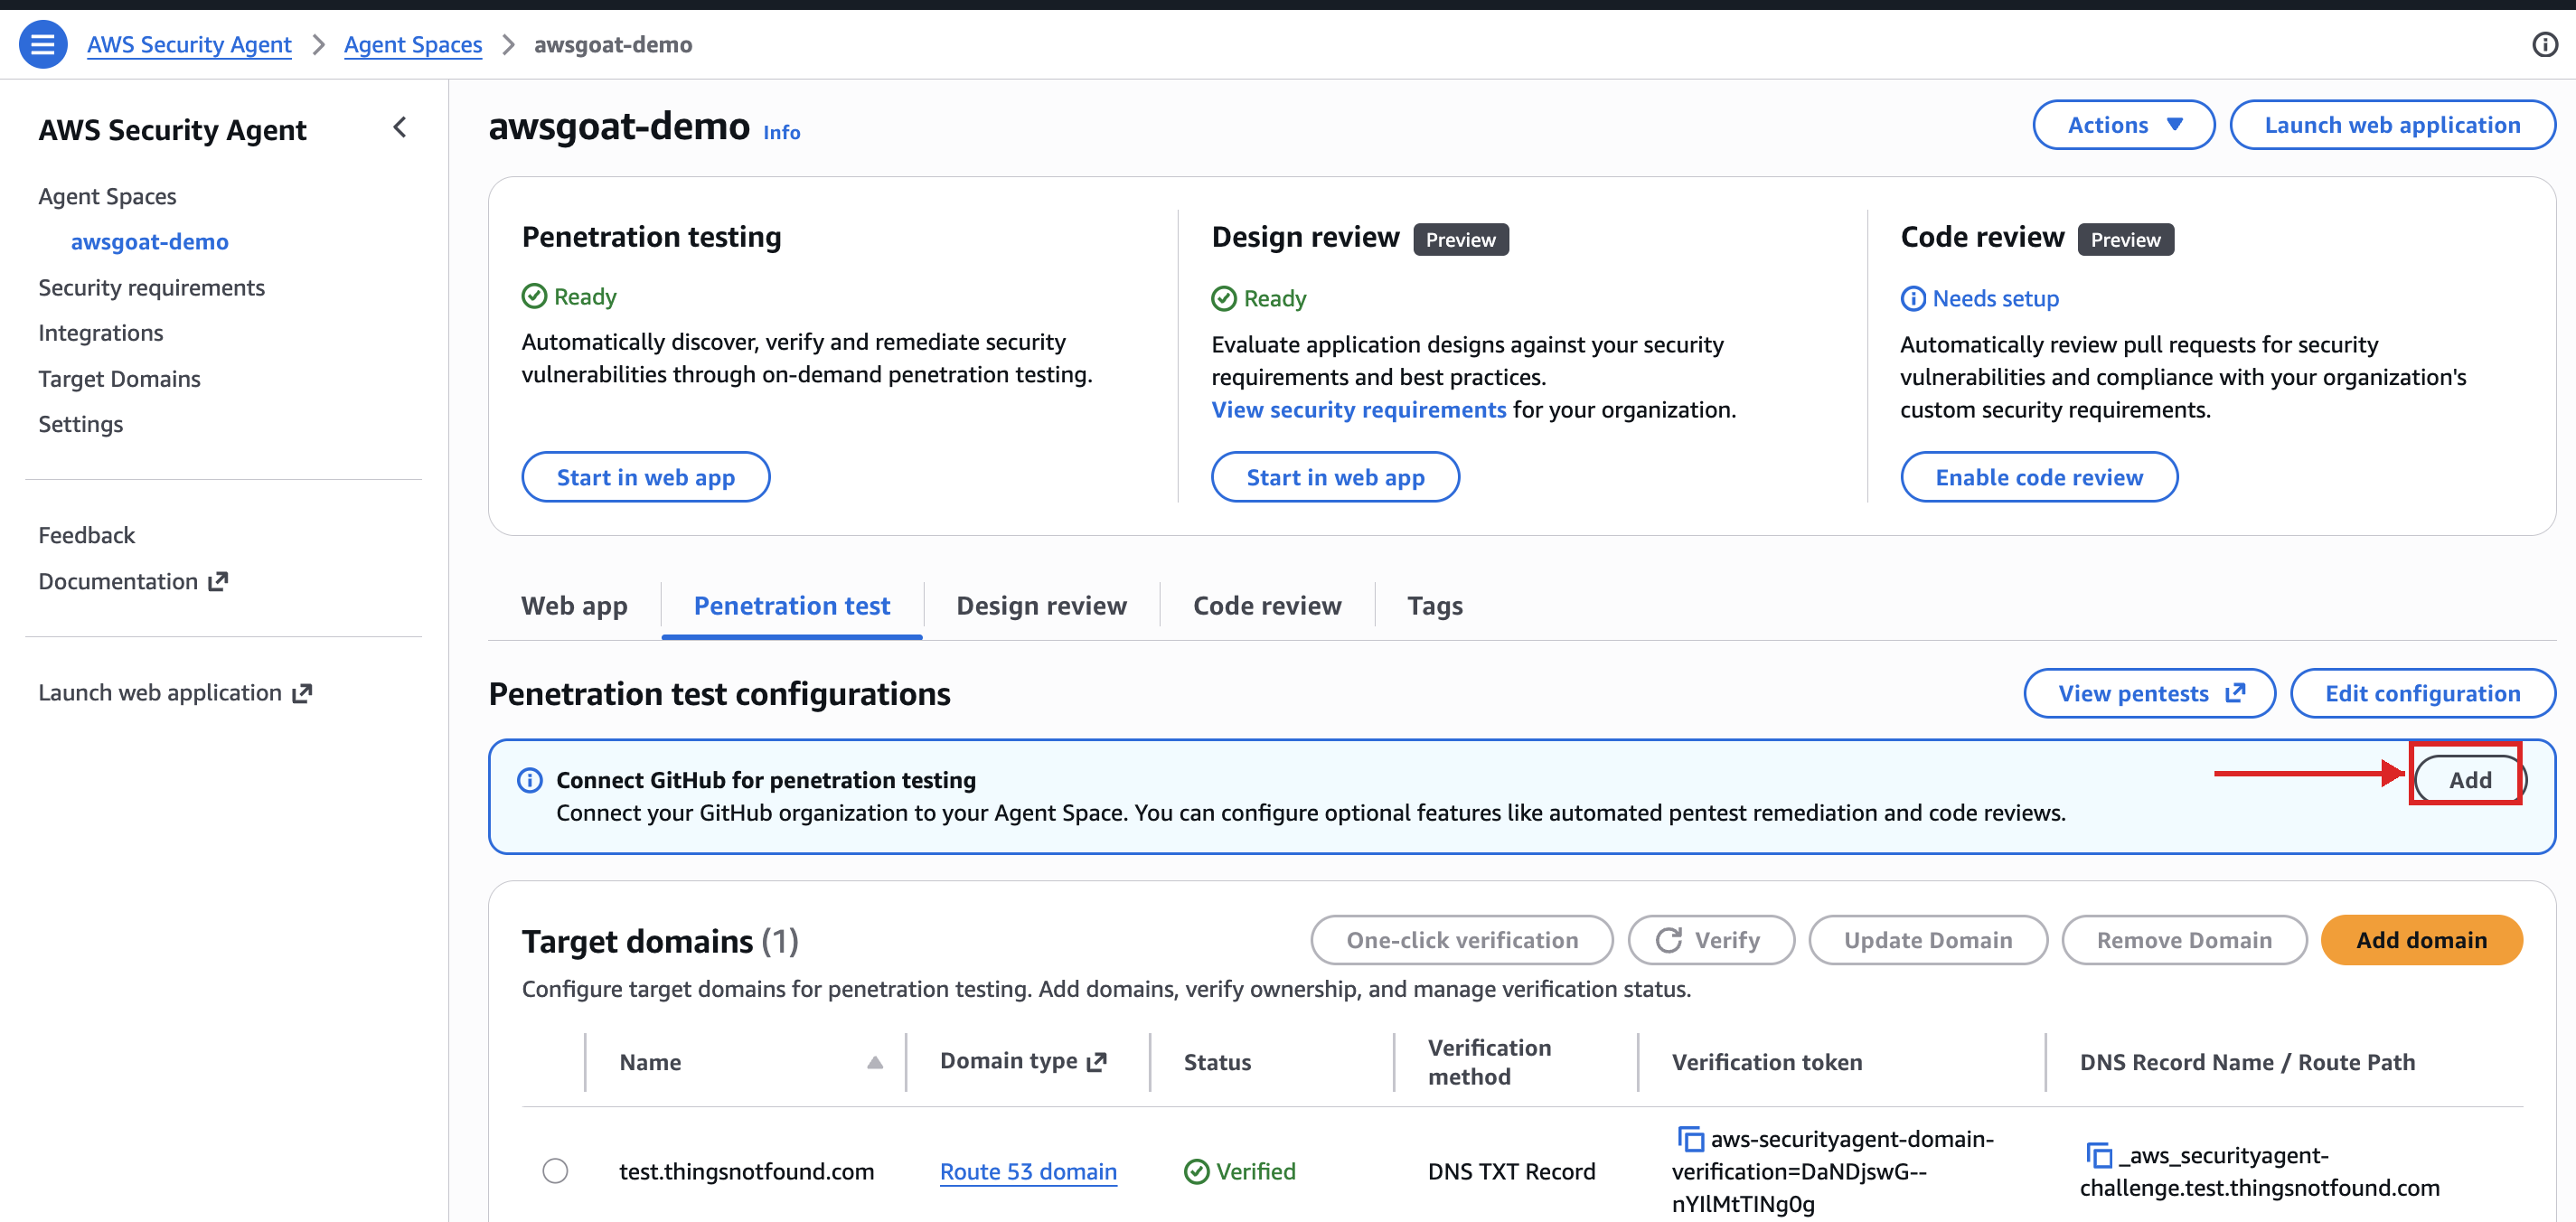
In the Security Agent web Console, navigate to your Agent Space and enable penetration test.
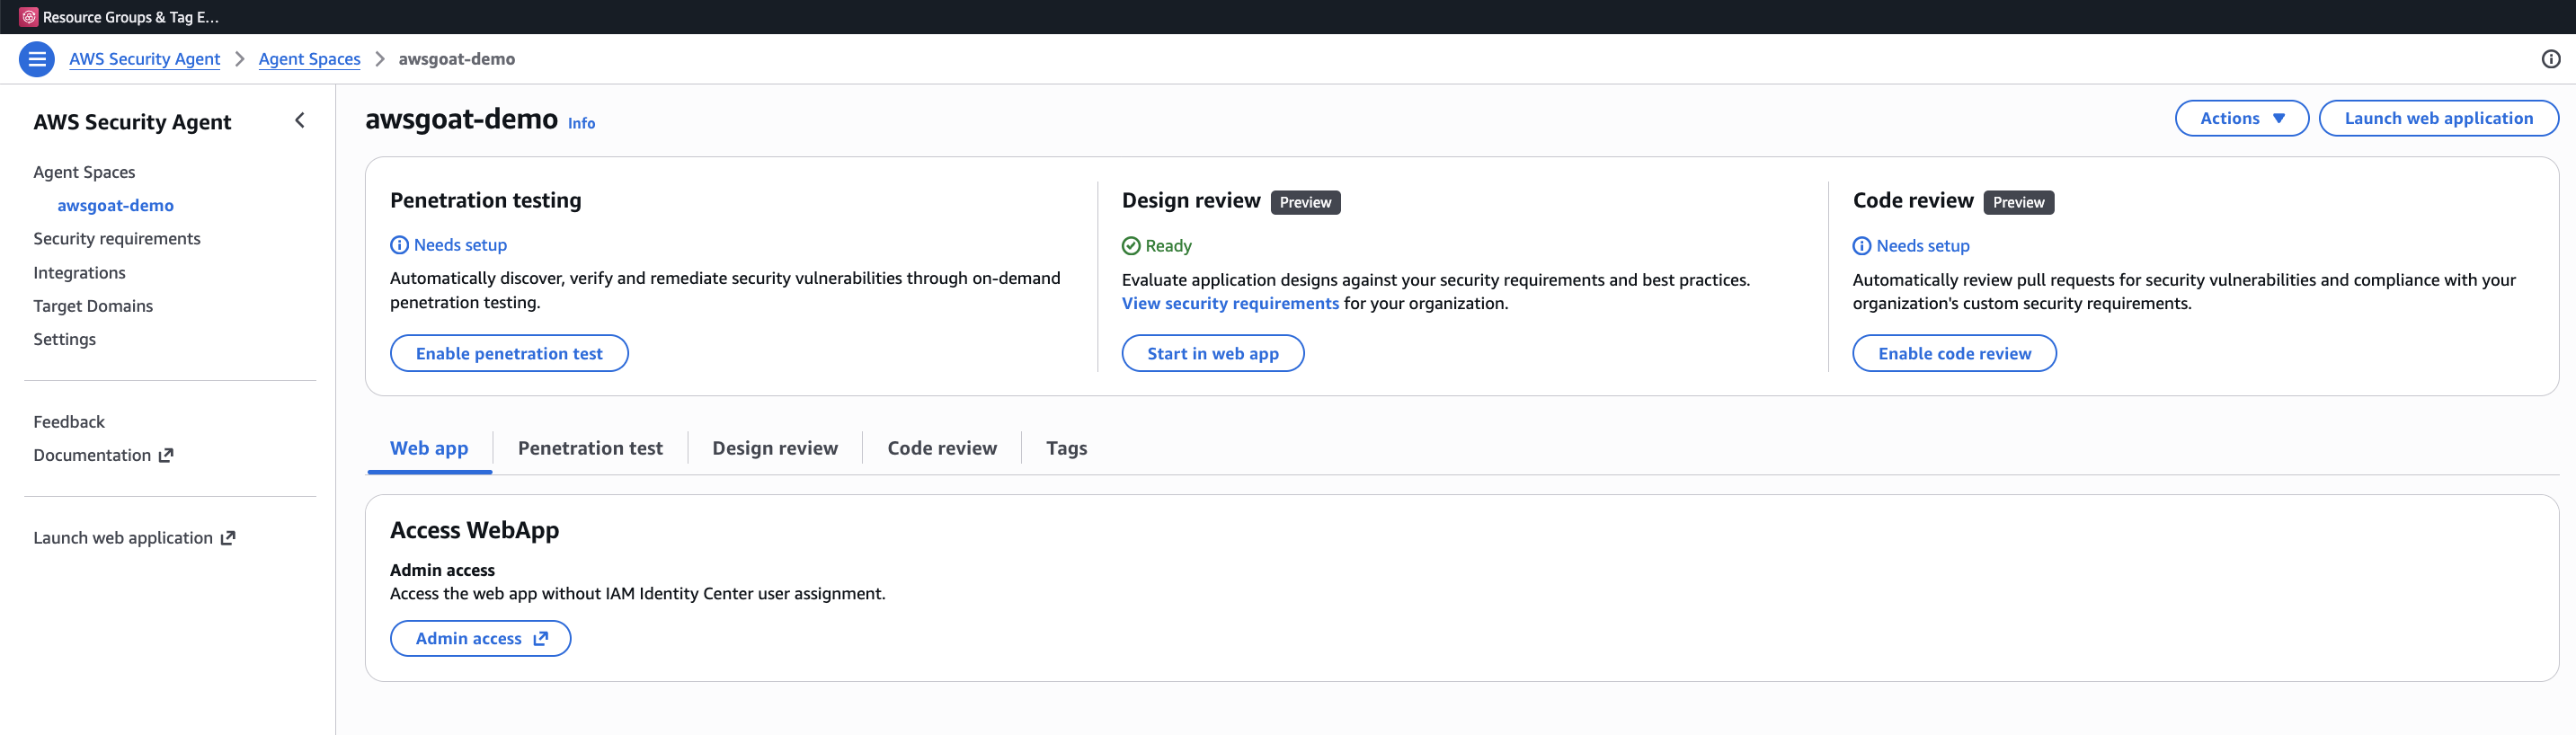
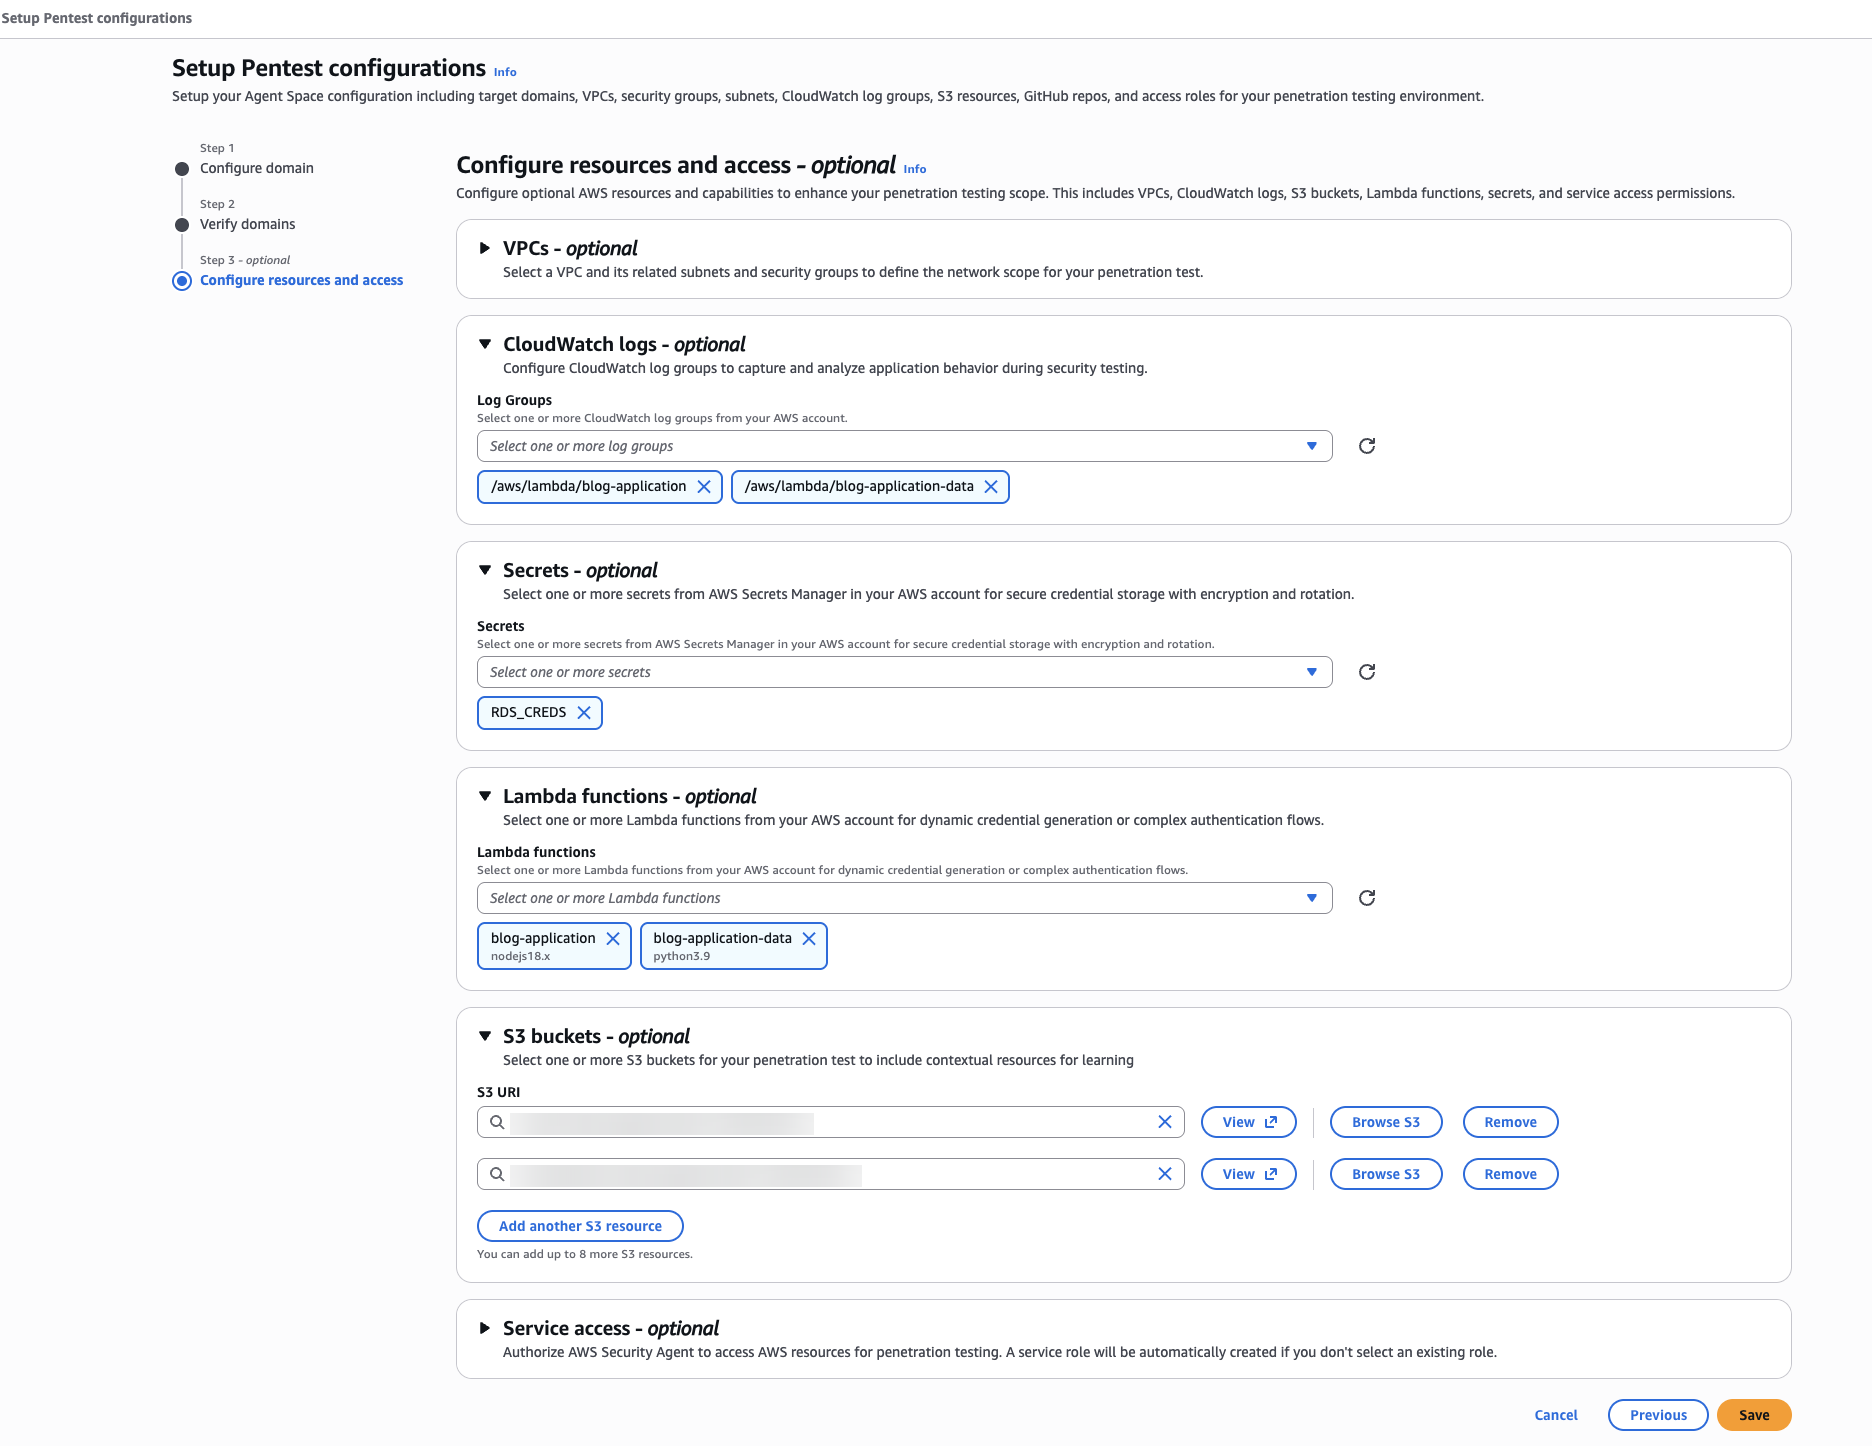
From the Agent Space, click Set up penetration testing to open the configuration form. This is the single screen where you declare everything Security Agent needs to attack a target: the verified domain, Secrets, CloudWatch Logs, S3 Buckets, VPCs.
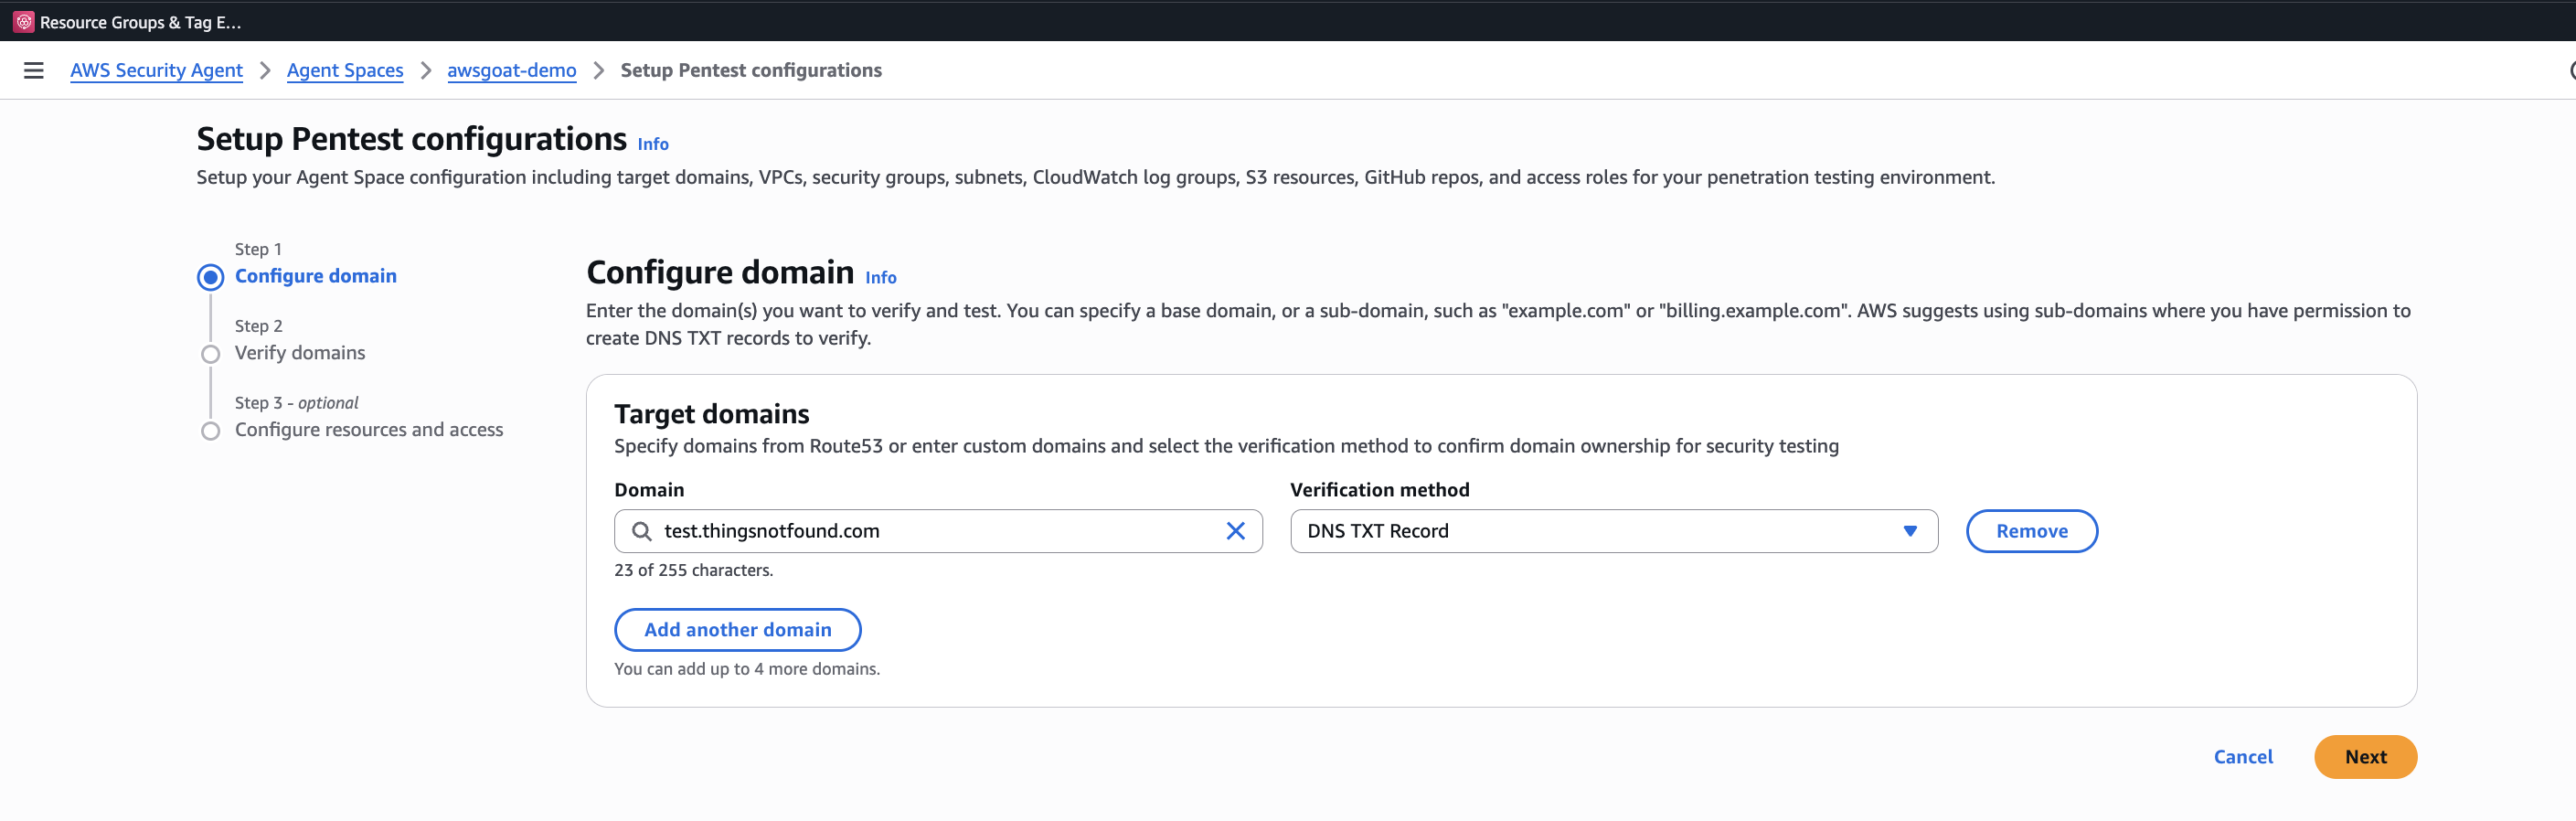
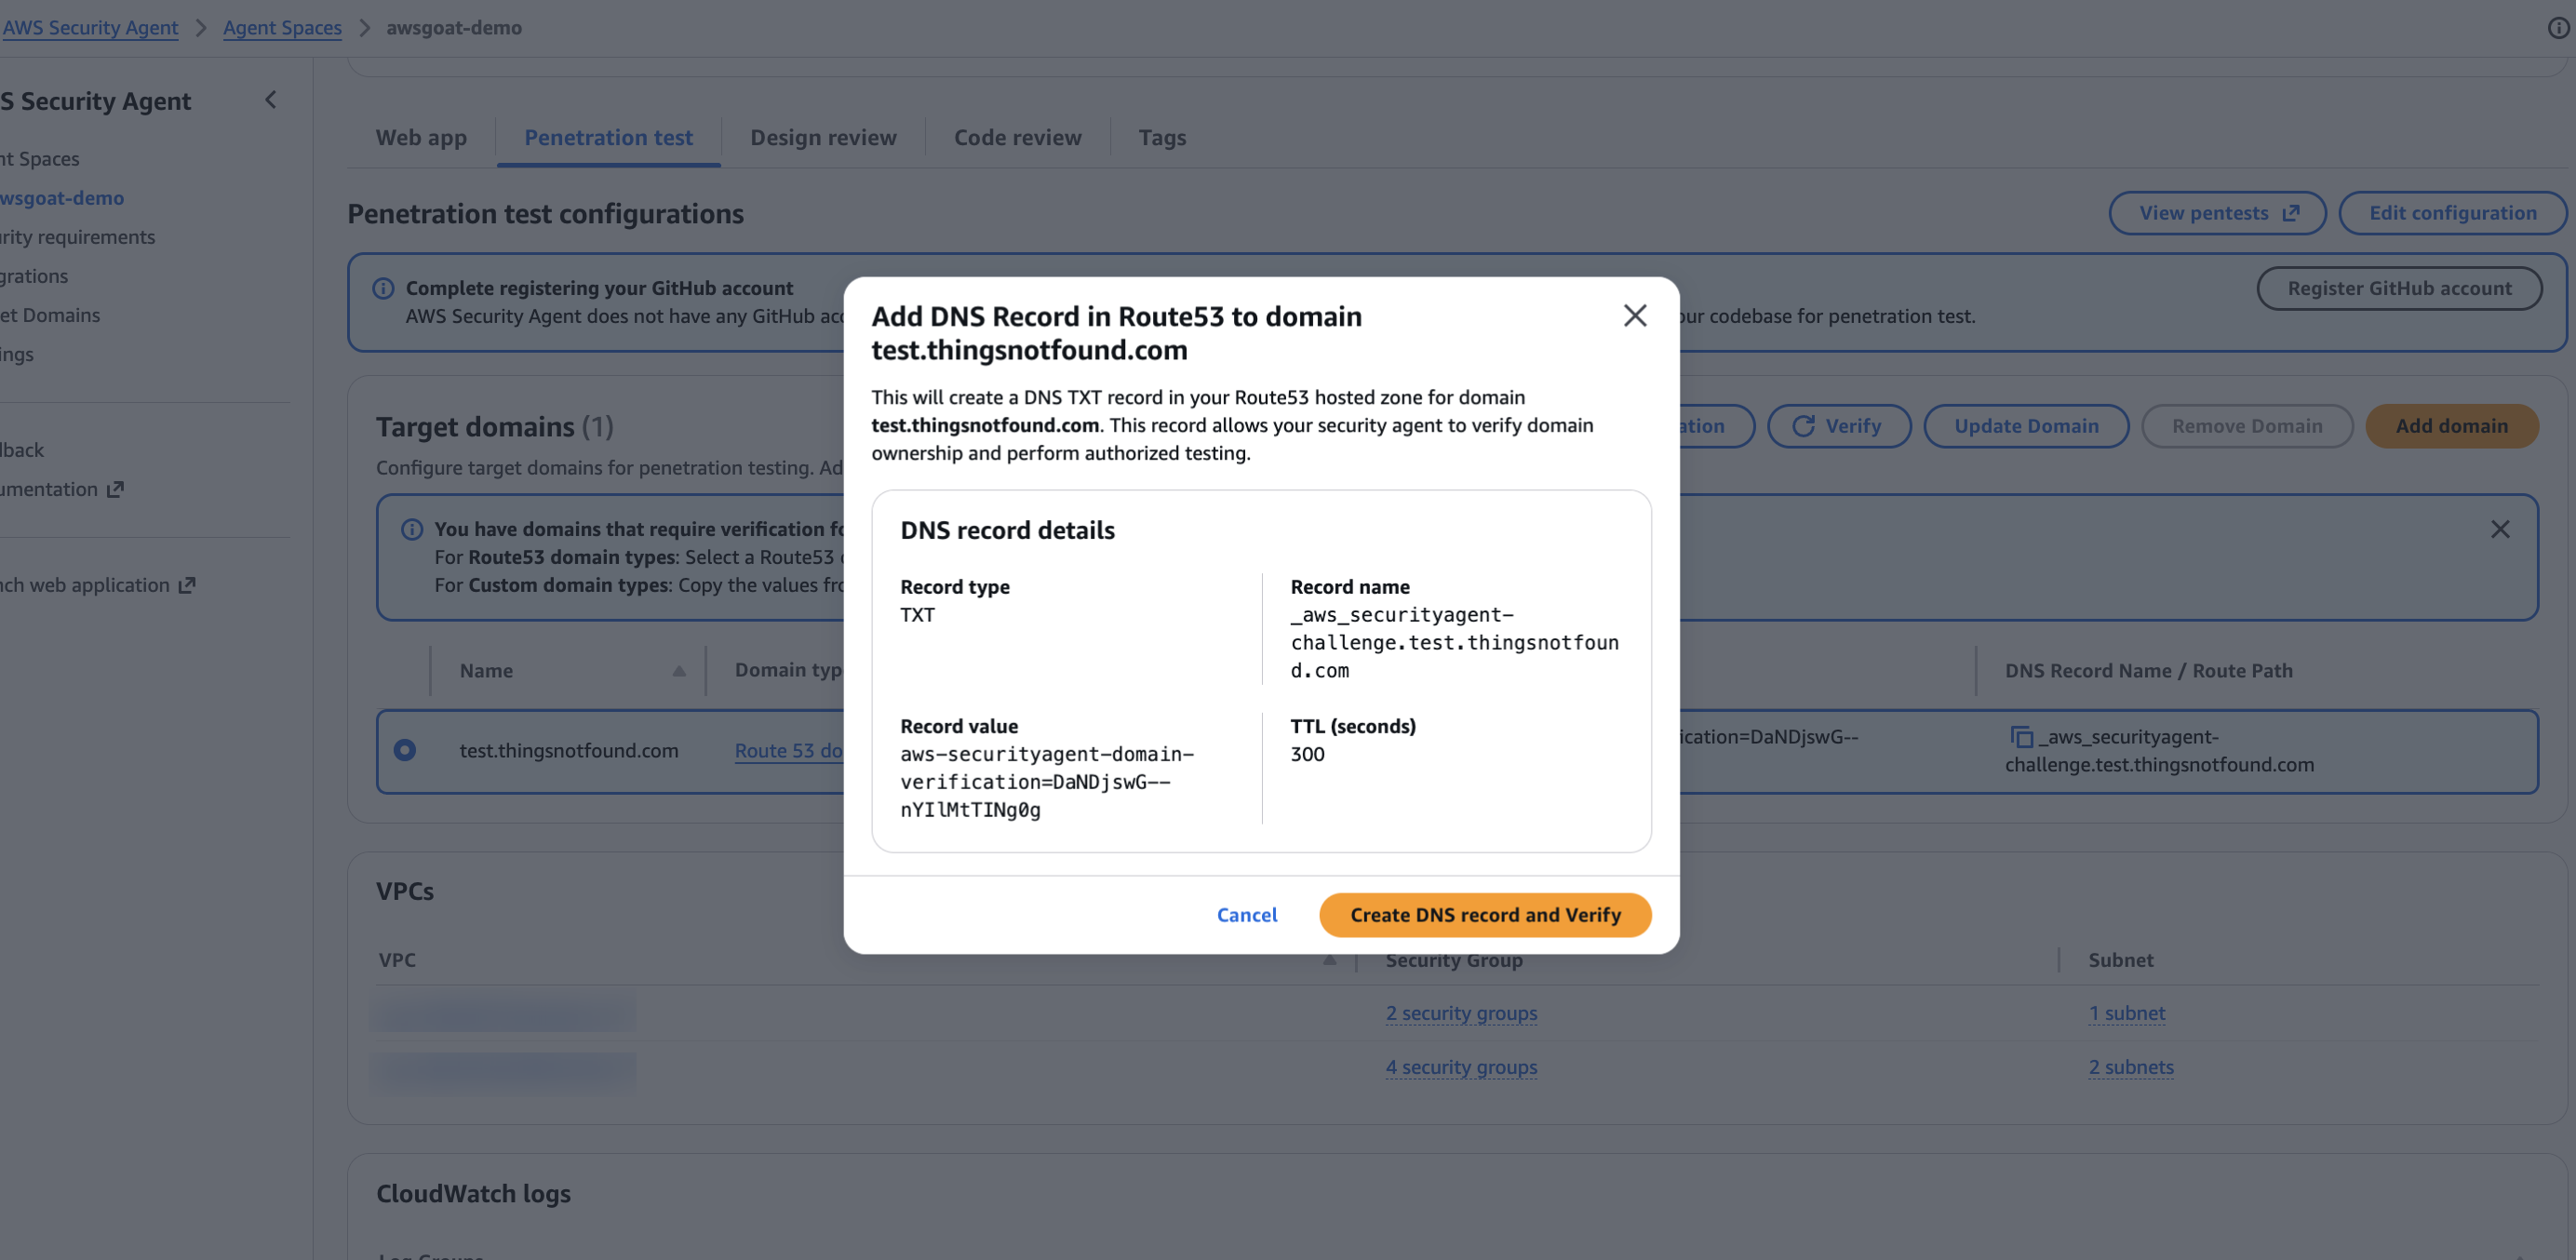
- Domain verification: Verify ownership of for AWSGoat target via DNS or HTTP verification. We will do the validation via DNS. This is a safety mechanism to ensure you only pentest applications you own.
- Application context: Optionally connect to your GitHub repository where your application source code is.
- CloudWatch logging: Enable CloudWatch logging to capture test activity in your account.
Step 1 is the reason I extended the Terraform to front each module with a custom domain in the first place. Because the Route 53 hosted zone (test.thingsnotfound.com) lives in the same AWS account as the Agent Space, Security Agent can verify ownership against Route 53 directly. No DNS TXT records to create, no HTTP file to drop. Click Verify, and it flips to verified in a second.
Beyond the form above, Security Agent asks you to declare the AWS resources in scope for the test. This is how the agent correlates findings in the running app with the underlying infrastructure it is allowed to inspect. For AWSGoat Module 1 I selected every CloudWatch log group, S3 bucket, and Lambda function the module references: the full blast radius of Module 1’s Terraform, and nothing outside it.
For step 2 (Application context), connect a GitHub repository so Security Agent can read the source alongside the running app. This is what elevates it above a black-box DAST scanner: the code-aware agents can trace a request from HTTP surface down to the Lambda handler or PHP file that serves it. You authorize the GitHub App once per Agent Space, then pick the repo and branch that matches the deployed target. In my case that is fabiodouek/my2centsai-blog-samples on main, so the agent sees the same vendored AWSGoat tree that Terraform just deployed.
Configuring Pentest target
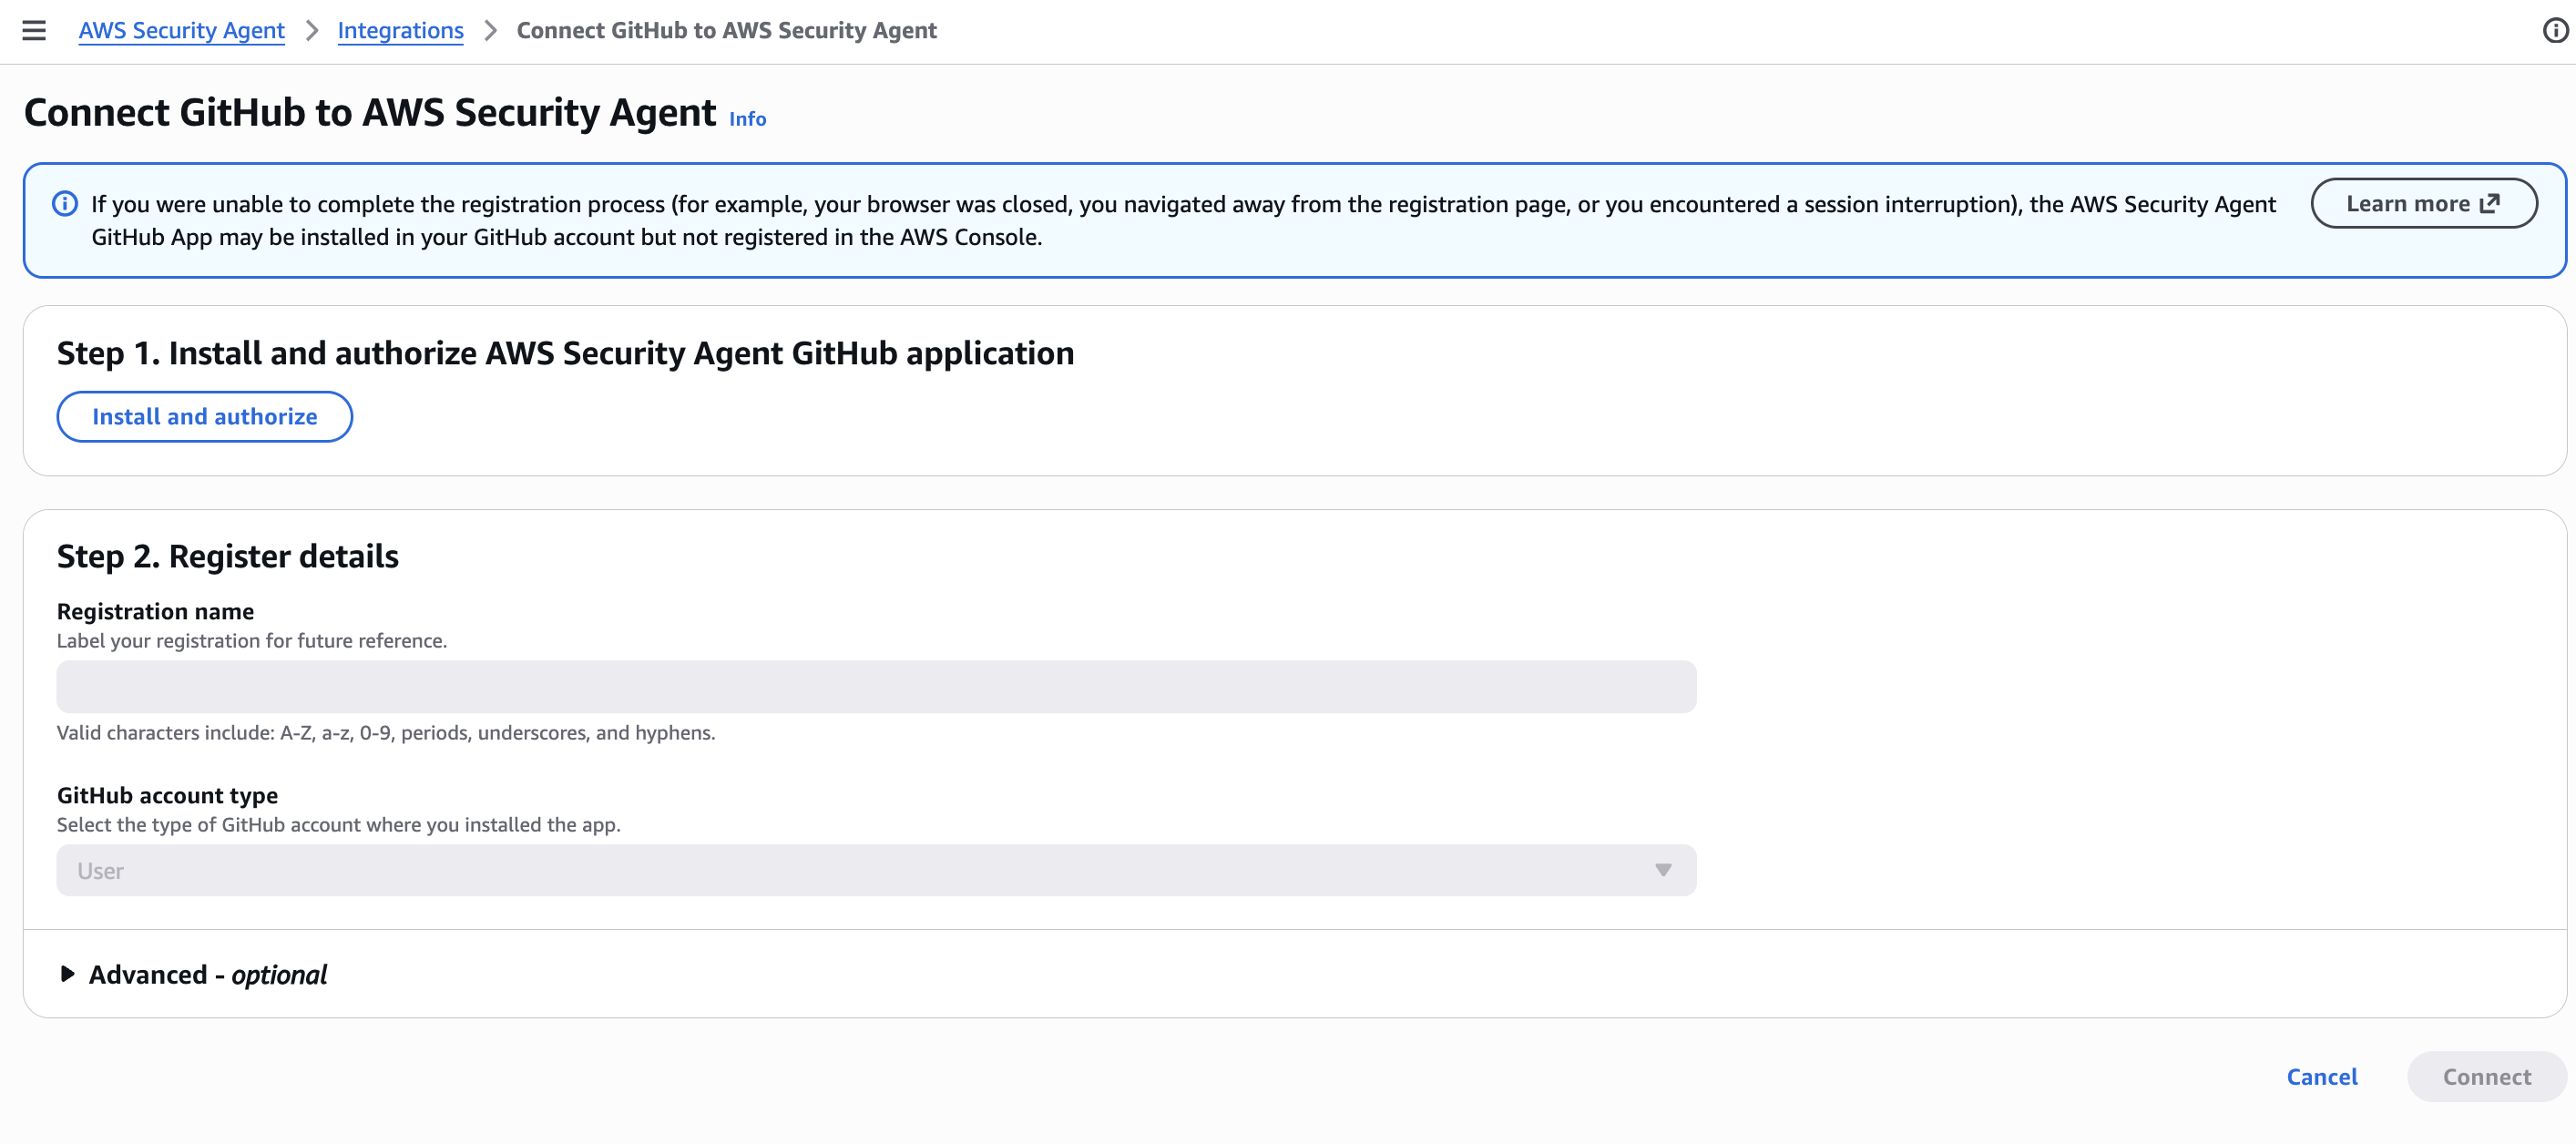
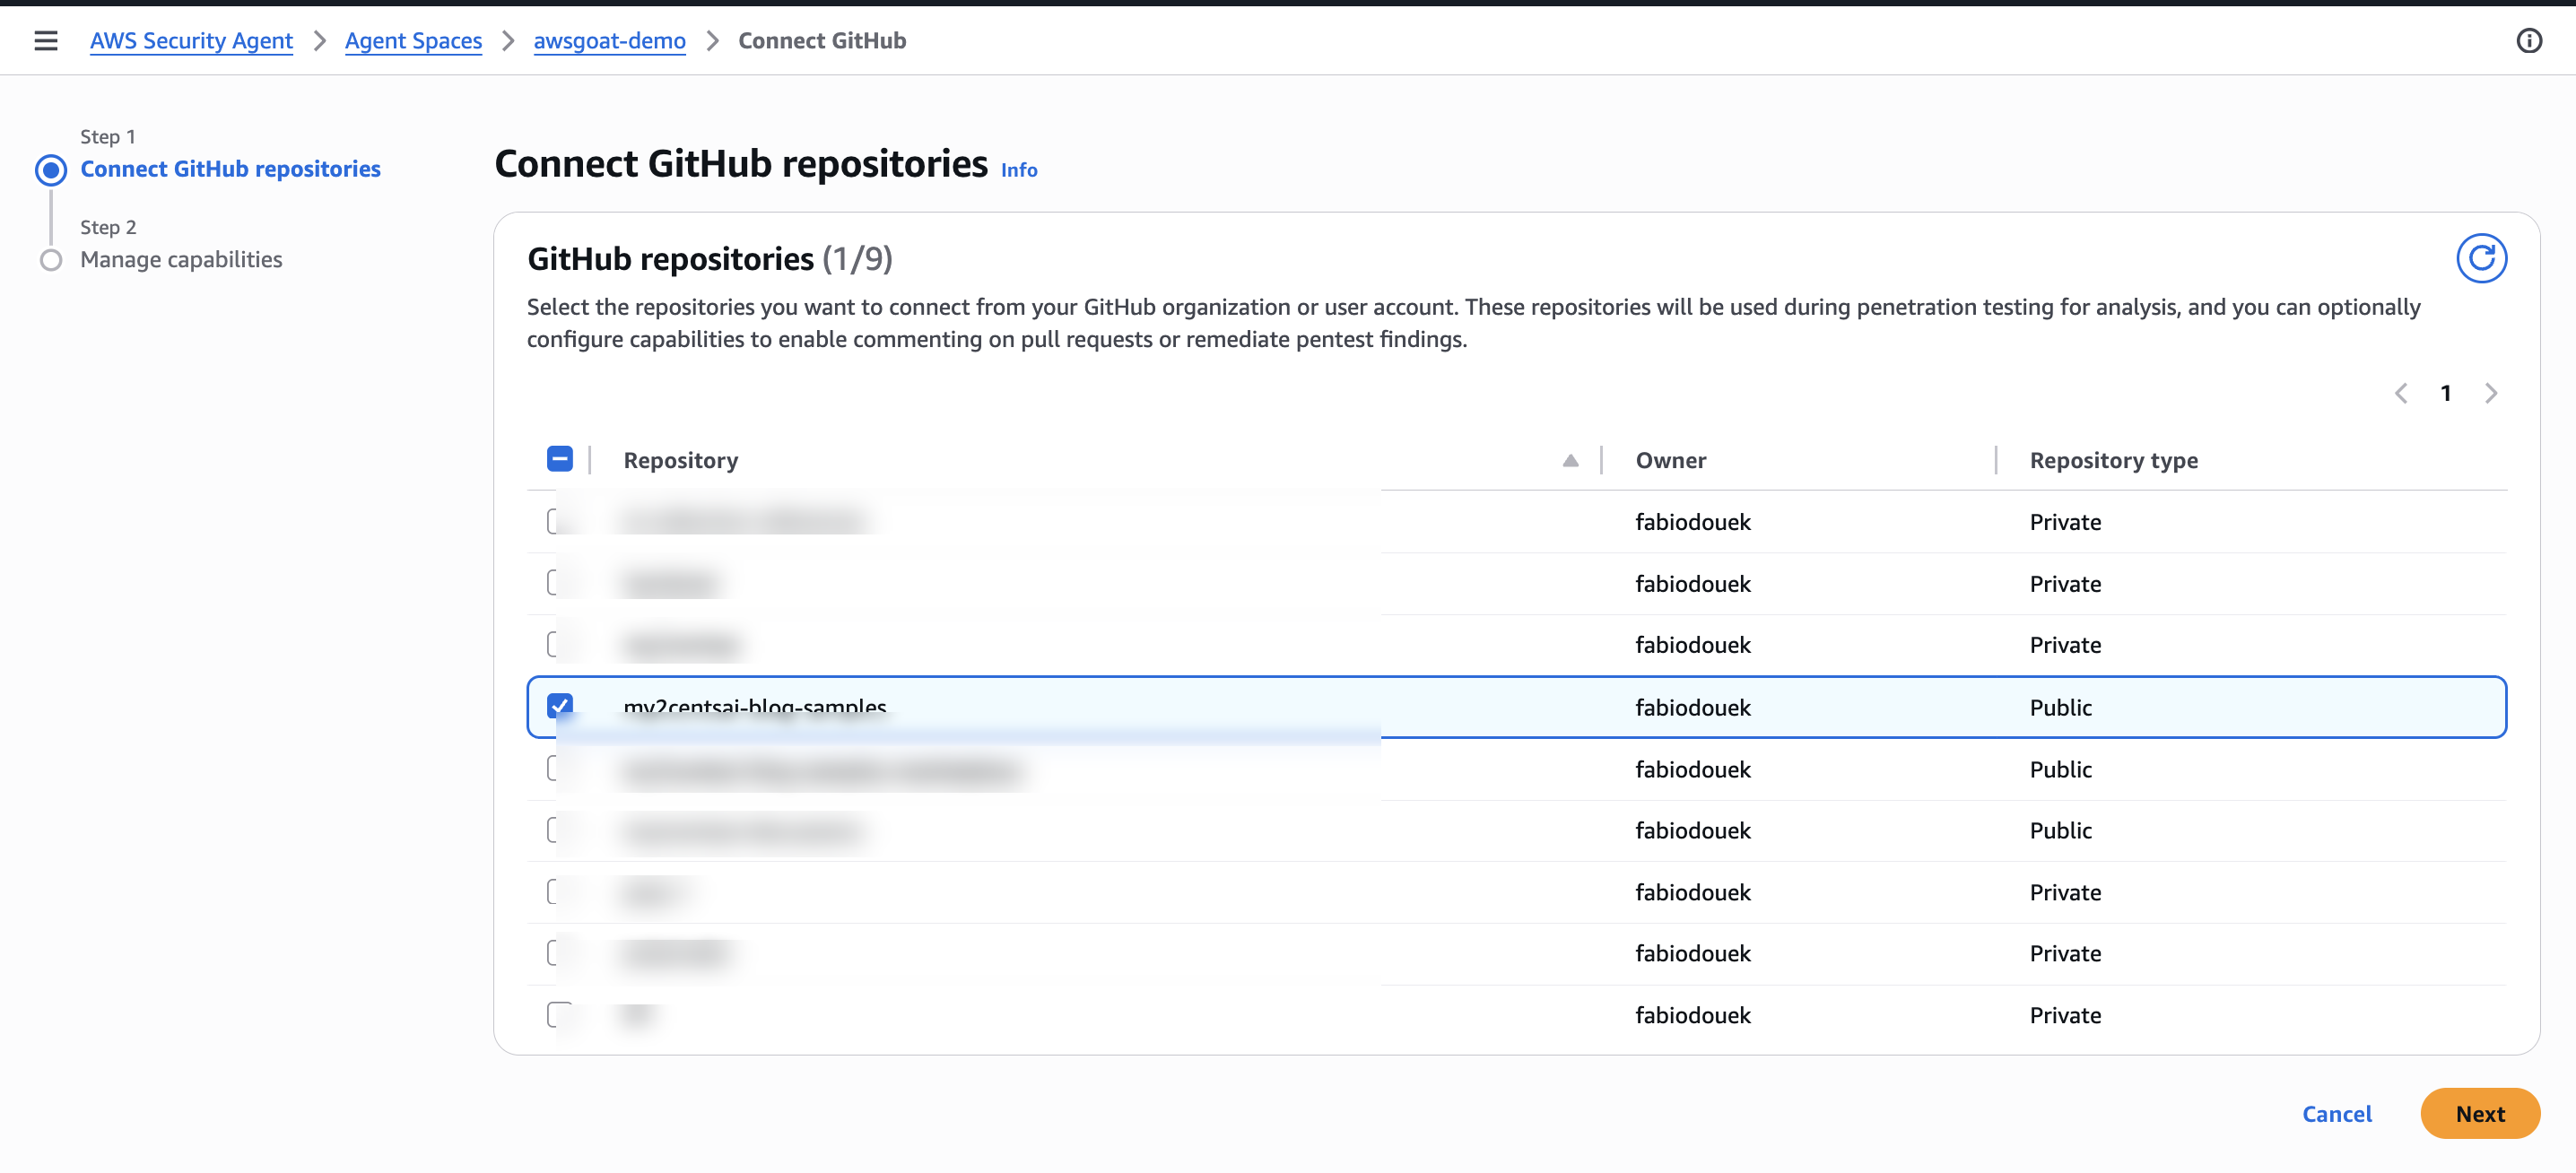
One gotcha at the end of this flow: authorizing the GitHub App is not the same as attaching a repo. After the app installation lands you back in the Agent Space pentest view, you still have to click the Add button in the GitHub repositories panel and select the repo + branch. If you skip this, Security Agent shows the GitHub integration as “connected” but the source-code-aware agents have nothing to read and silently fall back to black-box mode. I missed this the first time through.
Clicking Add opens the two-step Connect GitHub wizard. Step 1 lists every repository the GitHub App has access to. Tick the one that matches the deployed target (my2centsai-blog-samples in my case) and hit Next.
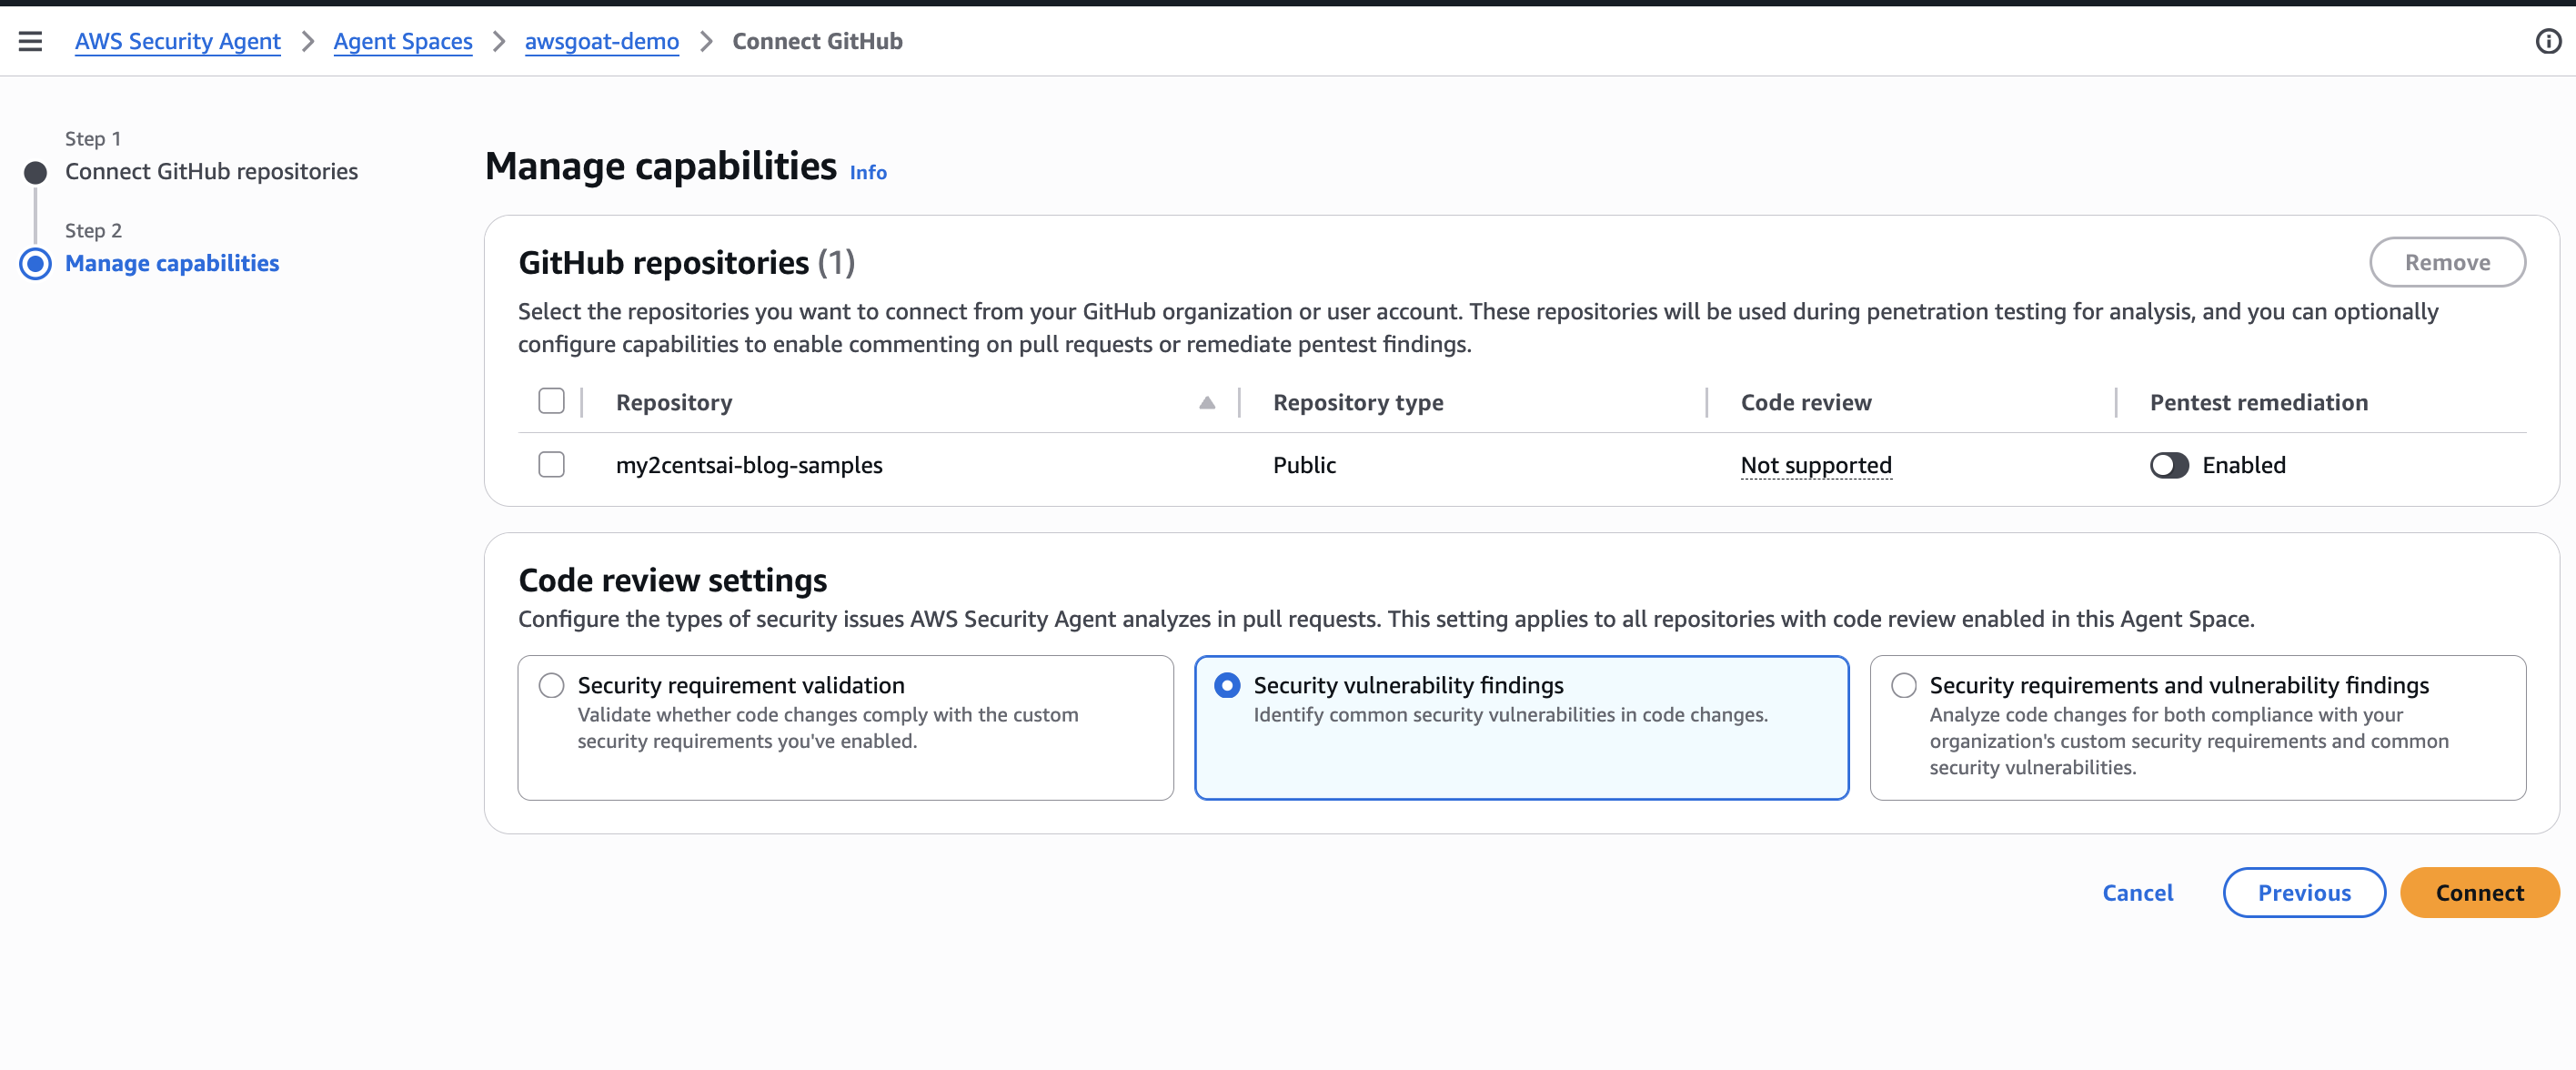
Step 2 is Manage capabilities. For each selected repo you pick what Security Agent is allowed to do with the source: Code review on pull requests (not supported on this Public repo in this account, so the toggle stays greyed out) and Pentest remediation, which lets the agent open remediation PRs against the repo once a pentest finishes. I left Pentest remediation disabled (I do not want the agent opening remediation PRs against this repo automatically) and left the Code review settings on Security vulnerability findings (the default that scopes PR analysis to common vuln patterns rather than custom org rules). Hit Connect to finish wiring the repo into the Agent Space.
Launching the pentest from the web app
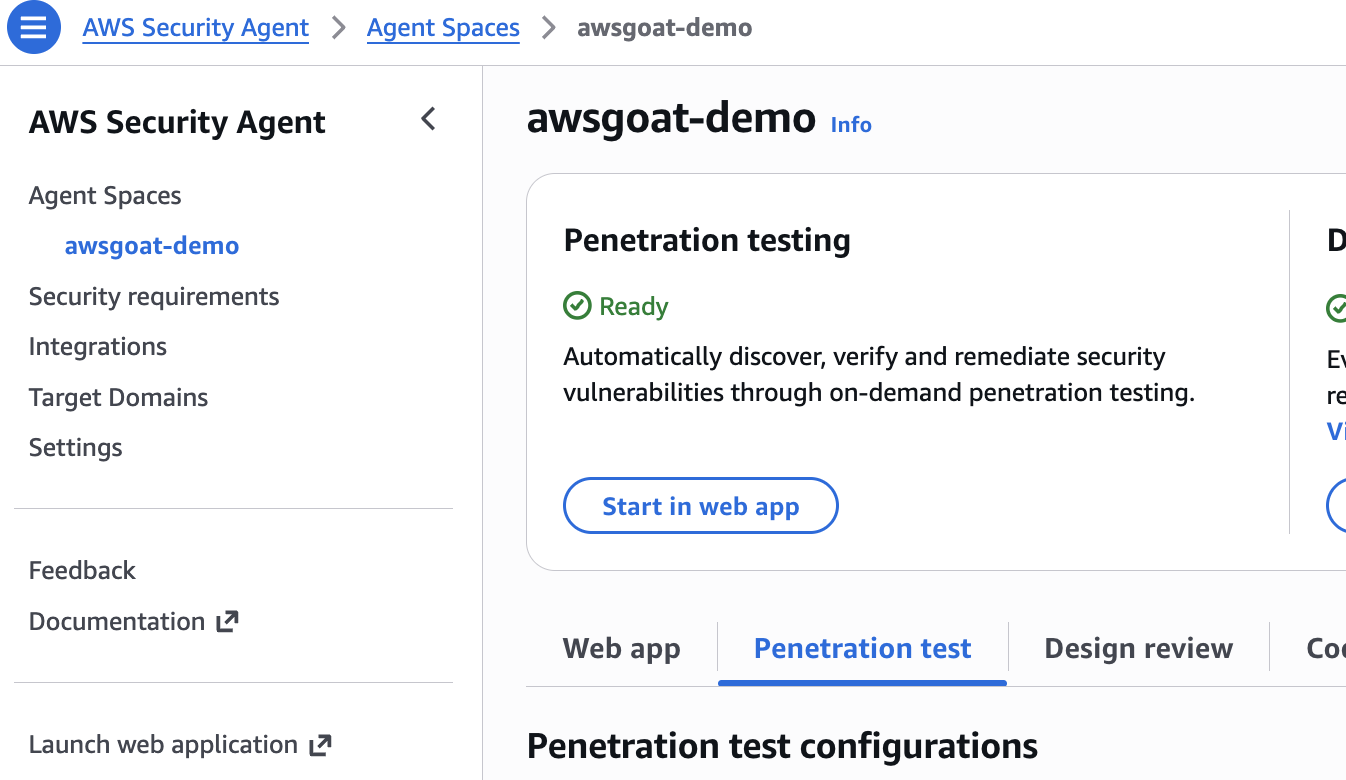
With the Agent Space configured, go back to the Agent Space overview in the Security Agent console. The Penetration testing tile now shows status Ready. Click Start in web app to jump into the Security Agent web application, where you kick off the run and watch findings stream in.
Creating a pentest
The web app drops you on the Penetration tests view for the Agent Space. On a fresh Agent Space the list is empty. Click Create your first penetration test (or Create a penetration test below the empty list) to start a new run.
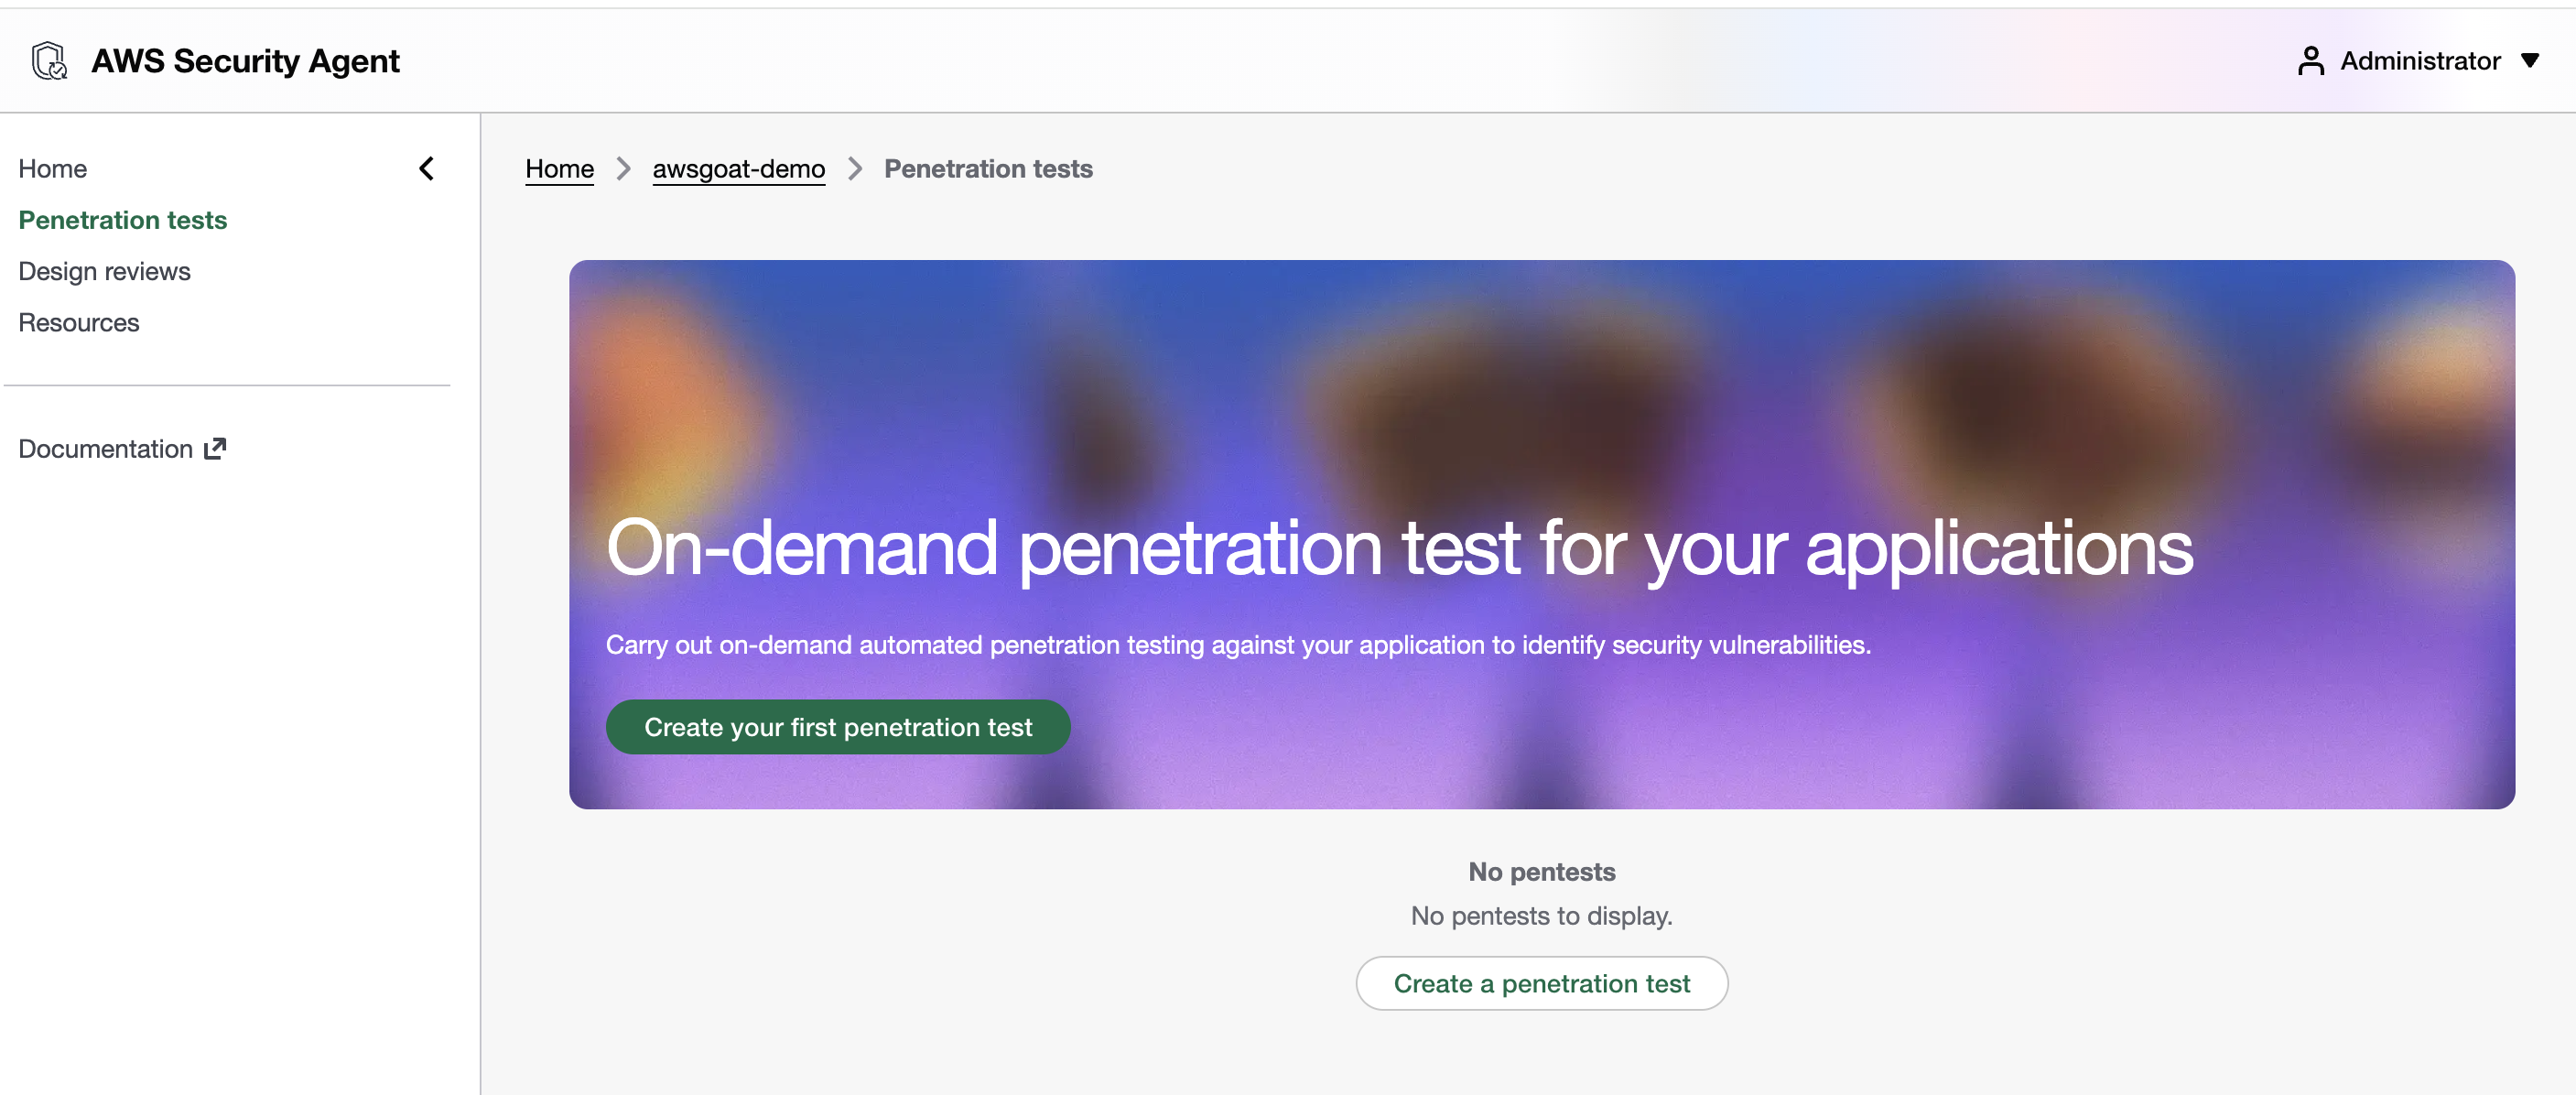
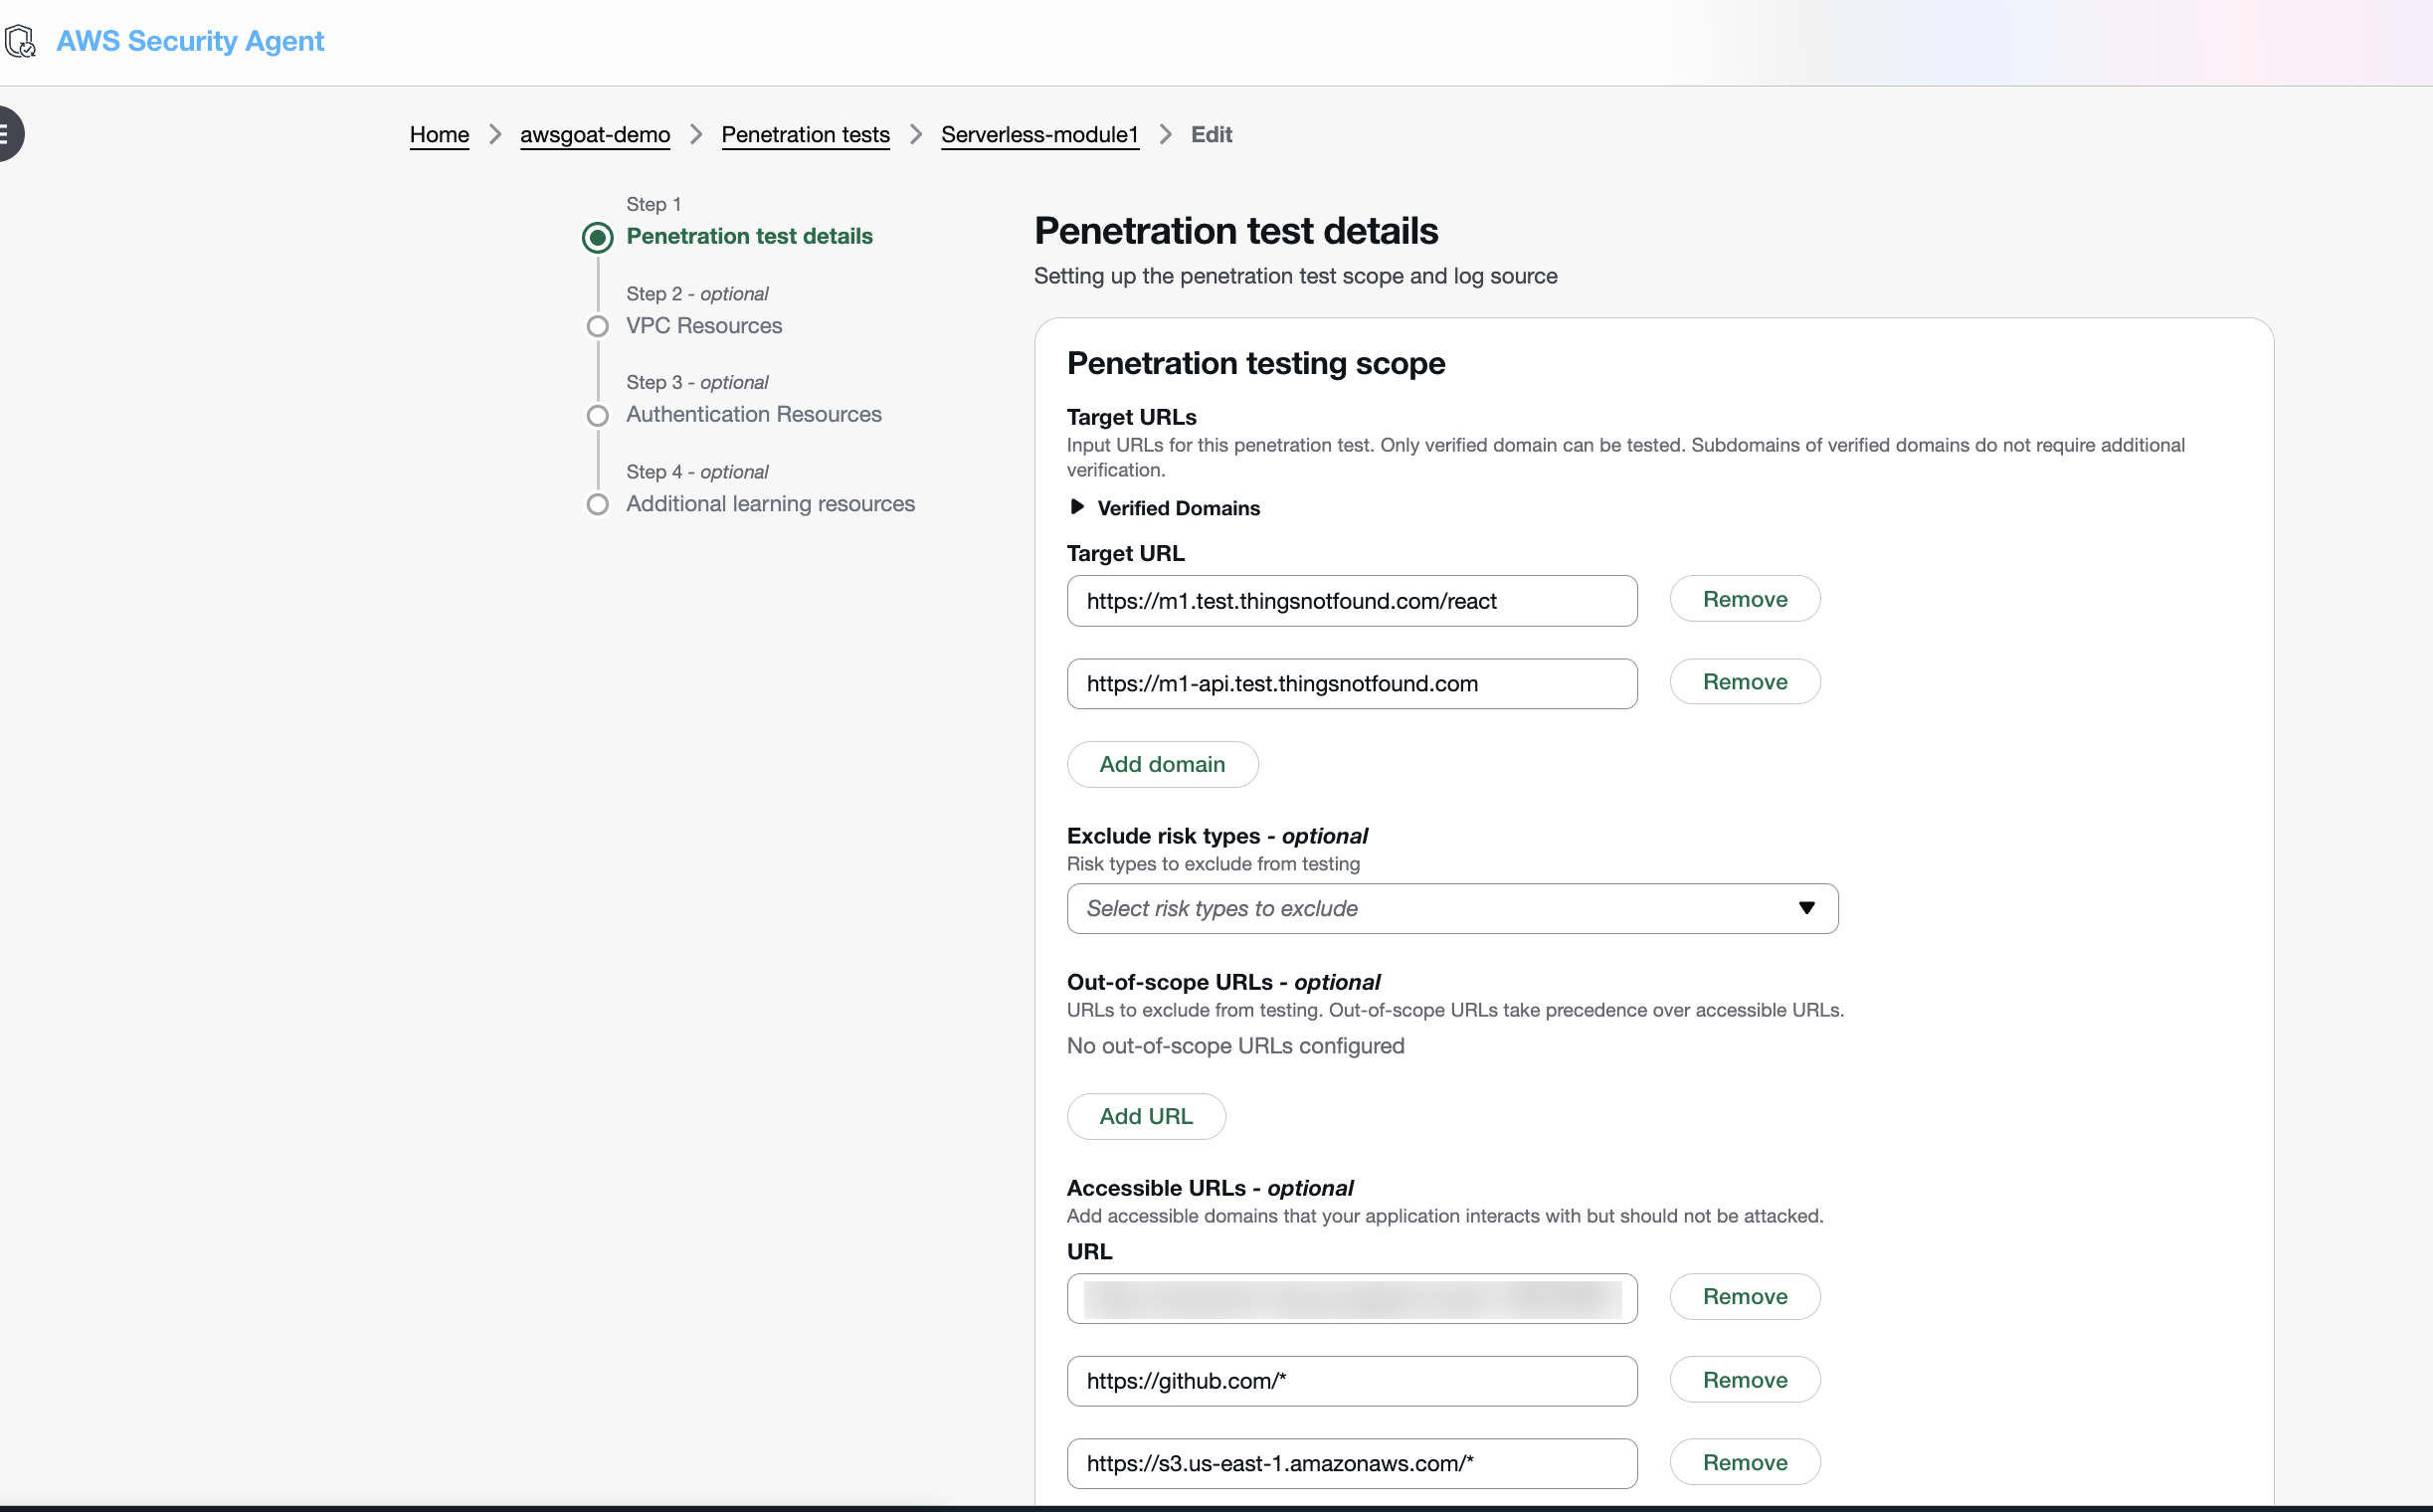
The Create penetration test form opens in Step 1, Penetration test details. This is where you scope a single pentest run. I am targeting Module 1, the Lambda/API Gateway/DynamoDB serverless blog, so I named the run Serverless-module1 and configured the scope as follows:
-
Testing scope (the URLs the agent is allowed to attack):
https://m1.test.thingsnotfound.com/react, the React blog fronted by the custom domainhttps://m1-api.test.thingsnotfound.com, the API Gateway custom domain backing the app’s REST calls
Only verified domains are accepted here, which is why the Route 53 setup earlier was a prerequisite. Listing the API custom domain explicitly gives the agent a direct entry point to the backend instead of having it infer the API surface from the React bundle.
-
Accessible URLs (endpoints the agent may read from, but not attack):
https://production-blog-awsgoat-bucket-111111111111.s3.us-east-1.amazonaws.com/*andhttps://production-blog-awsgoat-bucket-111111111111.s3.us-east-1.amazonaws.com, the S3 bucket that serves the production React build, in both wildcard and bare-host form, so the agent can resolve every static asset referenced by the apphttps://s3.us-east-1.amazonaws.com/*for path-style S3 requests the React bundle emits for the same buckethttps://m1-api.test.thingsnotfound.com, re-declared as accessible so the agent can follow API responses that link back to the API host (it is already in the testing scope above)https://fonts.googleapis.comandhttps://fonts.gstatic.comfor Google Fonts, pulled in by the React app’s CSS and font files; whitelisting them keeps the agent from flagging unreachable-resource noisehttps://github.com/*, so the code-aware agents can fetch the companion repo as additional context
Risk-type exclusions and out-of-scope URLs are left empty: I want the full OWASP sweep against AWSGoat, with no URL carve-outs.
Step 2 is VPC Resources (optional). Picking a VPC, subnet, and security groups would let Security Agent execute pentest probes from inside the target’s network, which is useful when the app has private endpoints only reachable from within the VPC. Module 1 is fully serverless (Lambda, API Gateway, DynamoDB, S3), so there is no VPC to attach. I left this step empty.
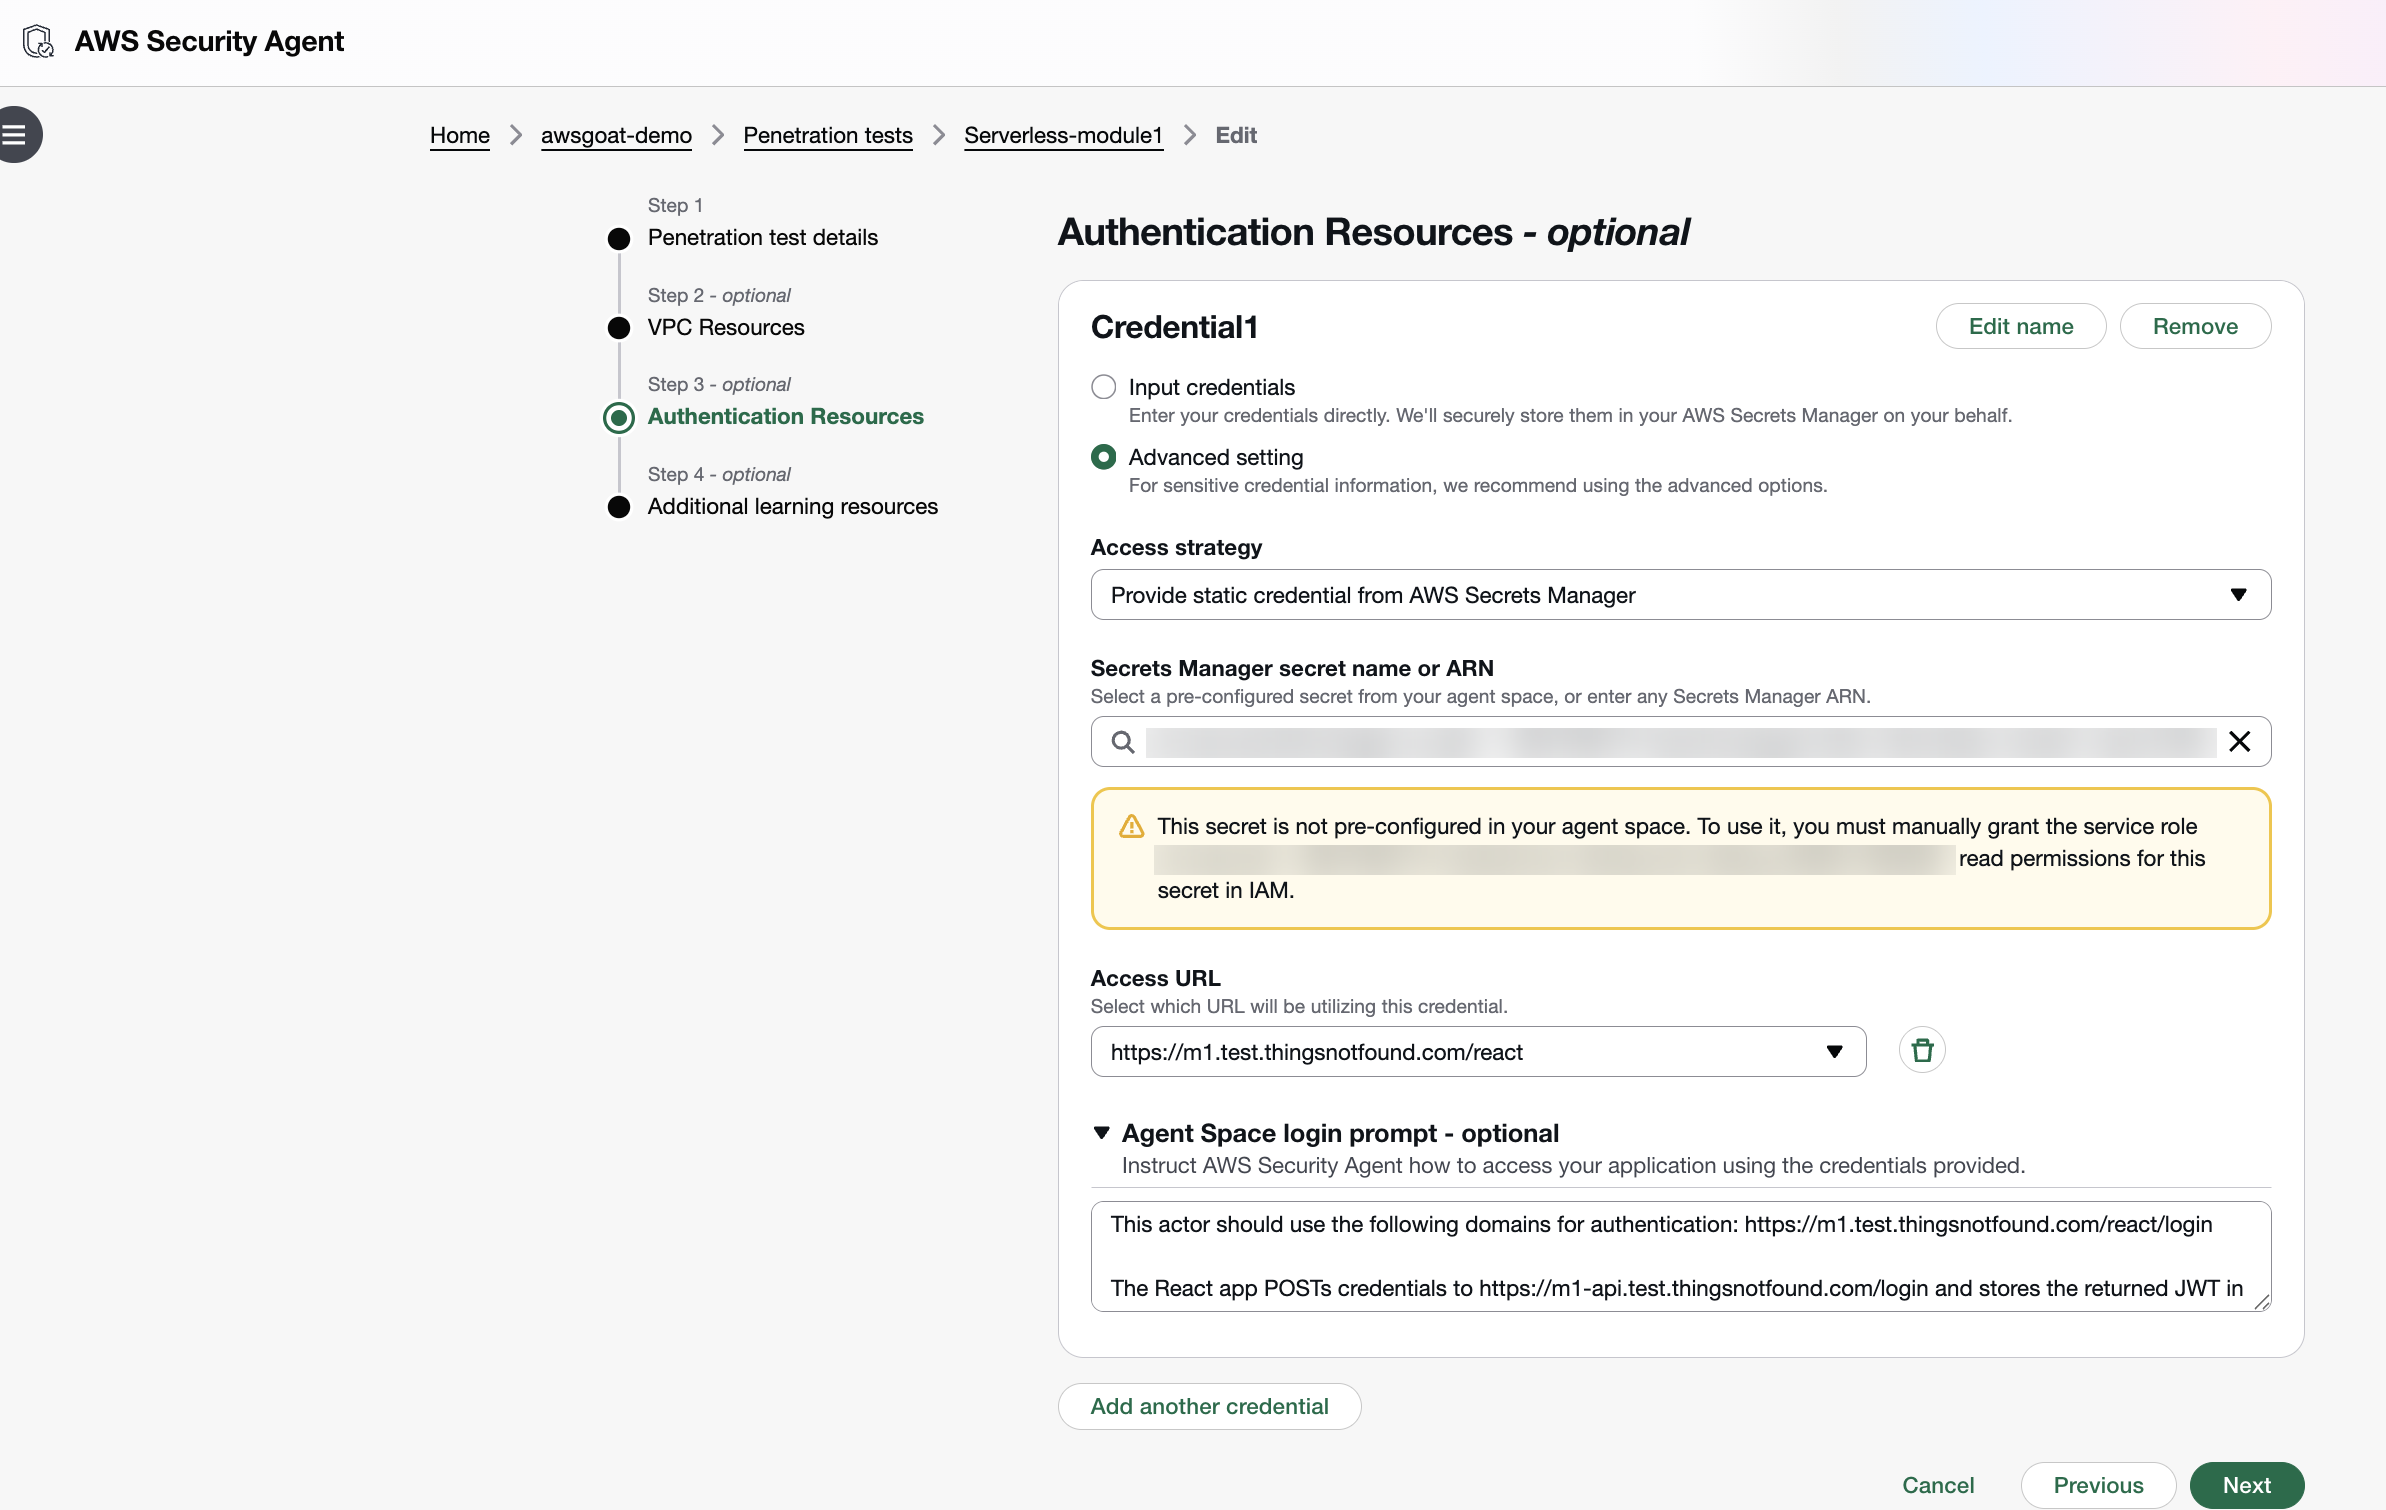
Step 3 is Authentication Resources (optional). Without credentials the agent only sees the unauthenticated surface; adding an actor lets it sign in and exercise the logged-in flows, which is where most of AWSGoat’s interesting vulnerabilities live. I added a single actor (Credential1) using Input credentials. Username and password are typed into the form and, behind the scenes, Security Agent stores them in a new AWS Secrets Manager entry rather than keeping them in the pentest config. 2FA is left blank (AWSGoat’s auth is password-only). The Access URL points at the app root (https://m1.test.thingsnotfound.com/react), which is the page the agent browses to first. The actual login path lives inside the login prompt below. Under Agent Space login prompt I gave the agent a short natural-language description of how the AWSGoat auth flow actually works:
This actor should use the following domains for authentication:
https://m1.test.thingsnotfound.com/react/loginThe React app POSTs credentials to
https://m1-api.test.thingsnotfound.com/loginand stores the returned JWT in localStorage undertoken; includeAuthorization: Bearer <token>on subsequent/*calls.
Without that hint the authentication agent would have to infer the token-handling pattern by watching the browser’s network traffic. Spelling it out up front saves the first few iterations of trial-and-error and keeps the credential scoped to the right hosts.
Because the credentials now live in Secrets Manager, the agent’s IAM role needs secretsmanager:GetSecretValue on that secret. The Step 3 panel shows the exact inline policy statement you need to attach. Until that permission is granted, the authentication agent cannot retrieve the password at run time and the login navigation fails silently, which kills every logged-in attack path in the test.
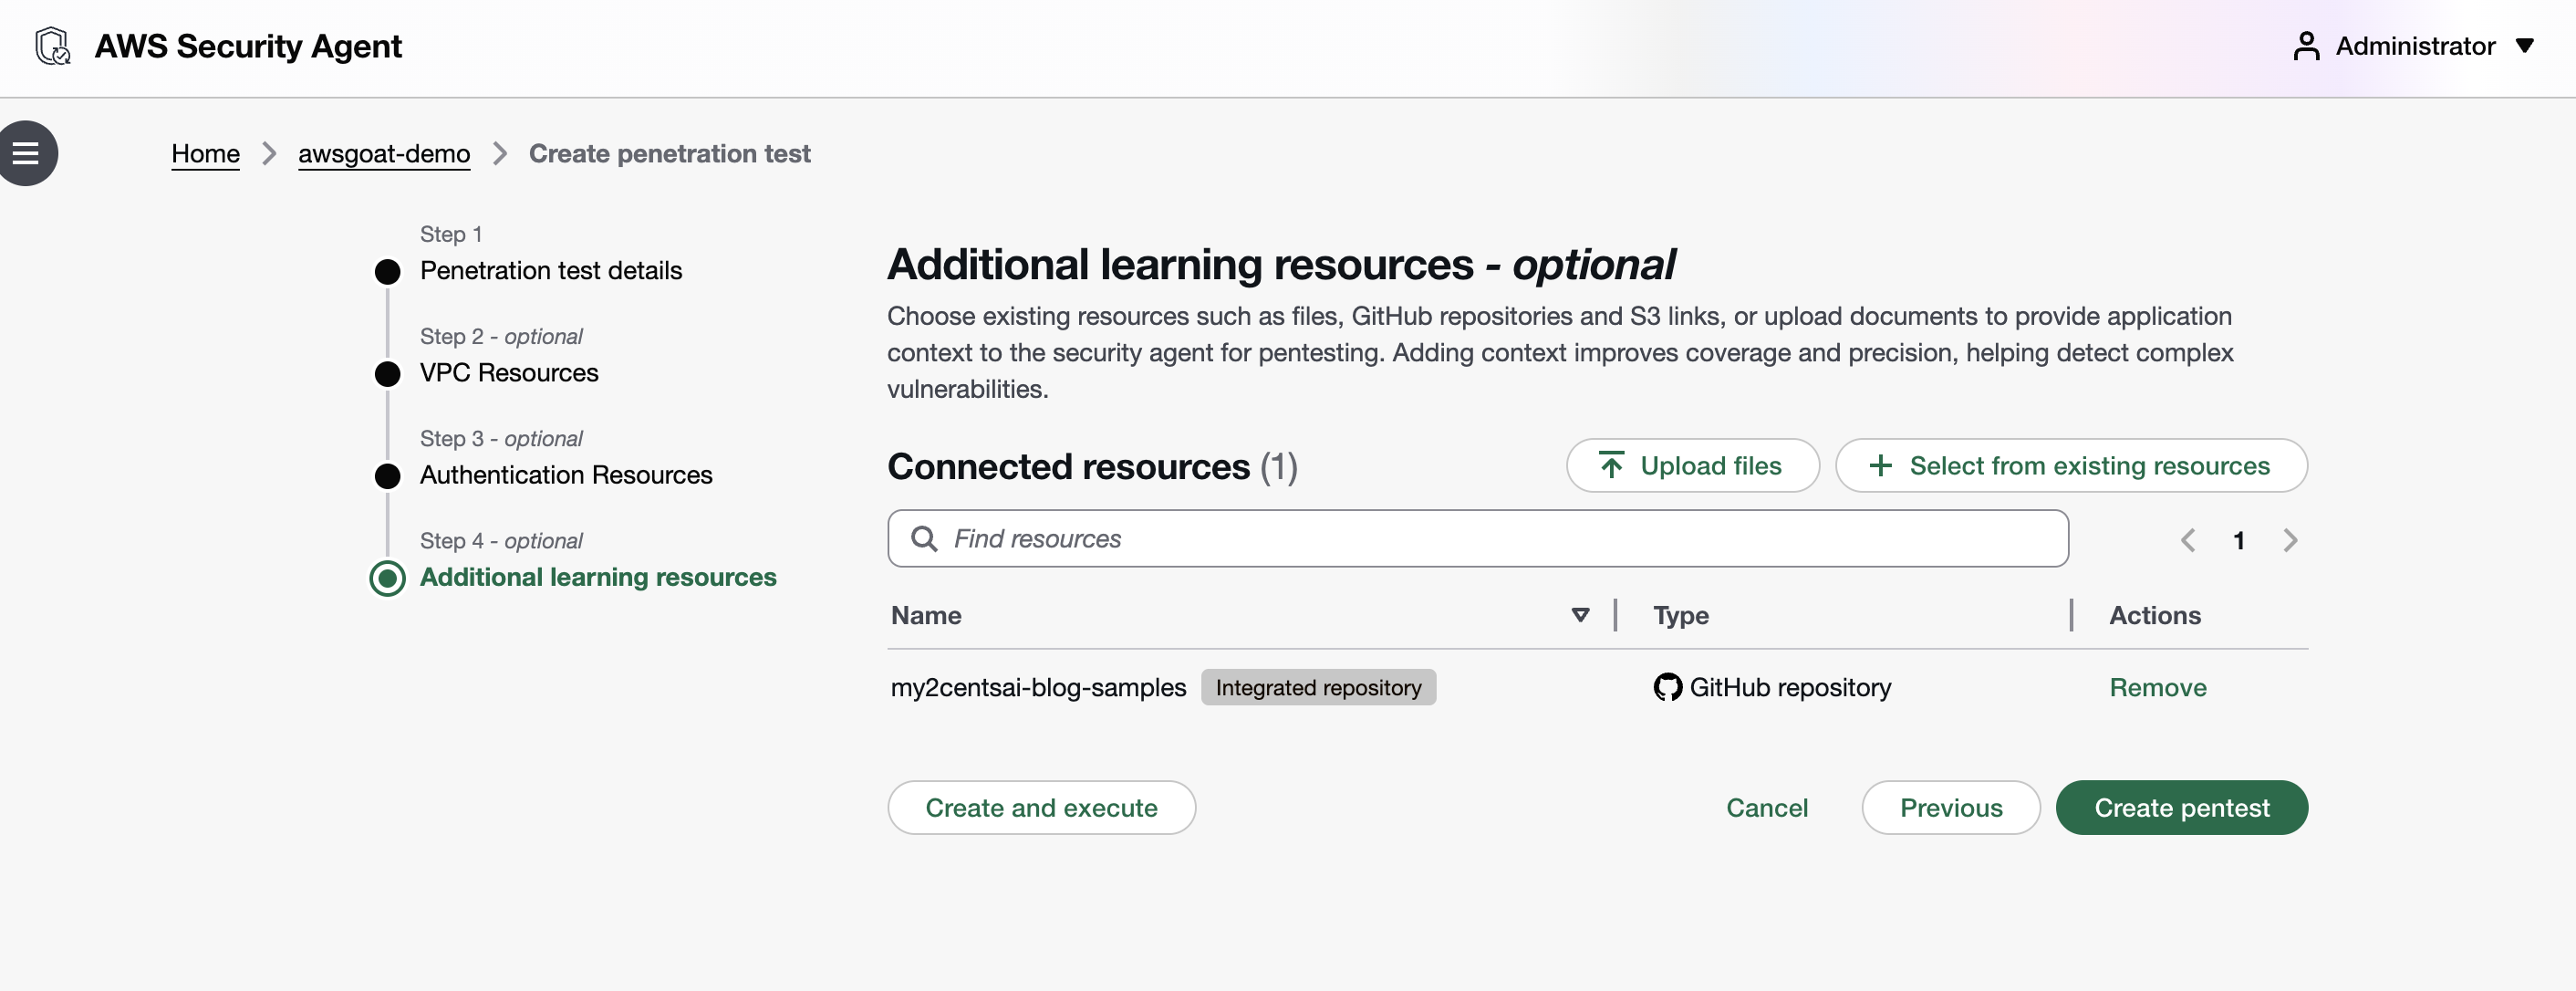
Step 4 is Additional learning resources (optional). This is where you hand the agent extra context (uploaded files, S3 links, or GitHub repositories) to improve coverage and precision. The GitHub repo wired into the Agent Space earlier shows up here as my2centsai-blog-samples with the Integrated repository badge; I left it attached as the single learning resource for this run so the source-aware agents can correlate runtime findings against the vendored AWSGoat tree. From here, Create pentest saves the config without starting it (useful when you want to review or tweak before spending task-hours), while Create and execute commits the config and kicks off the run in one click.
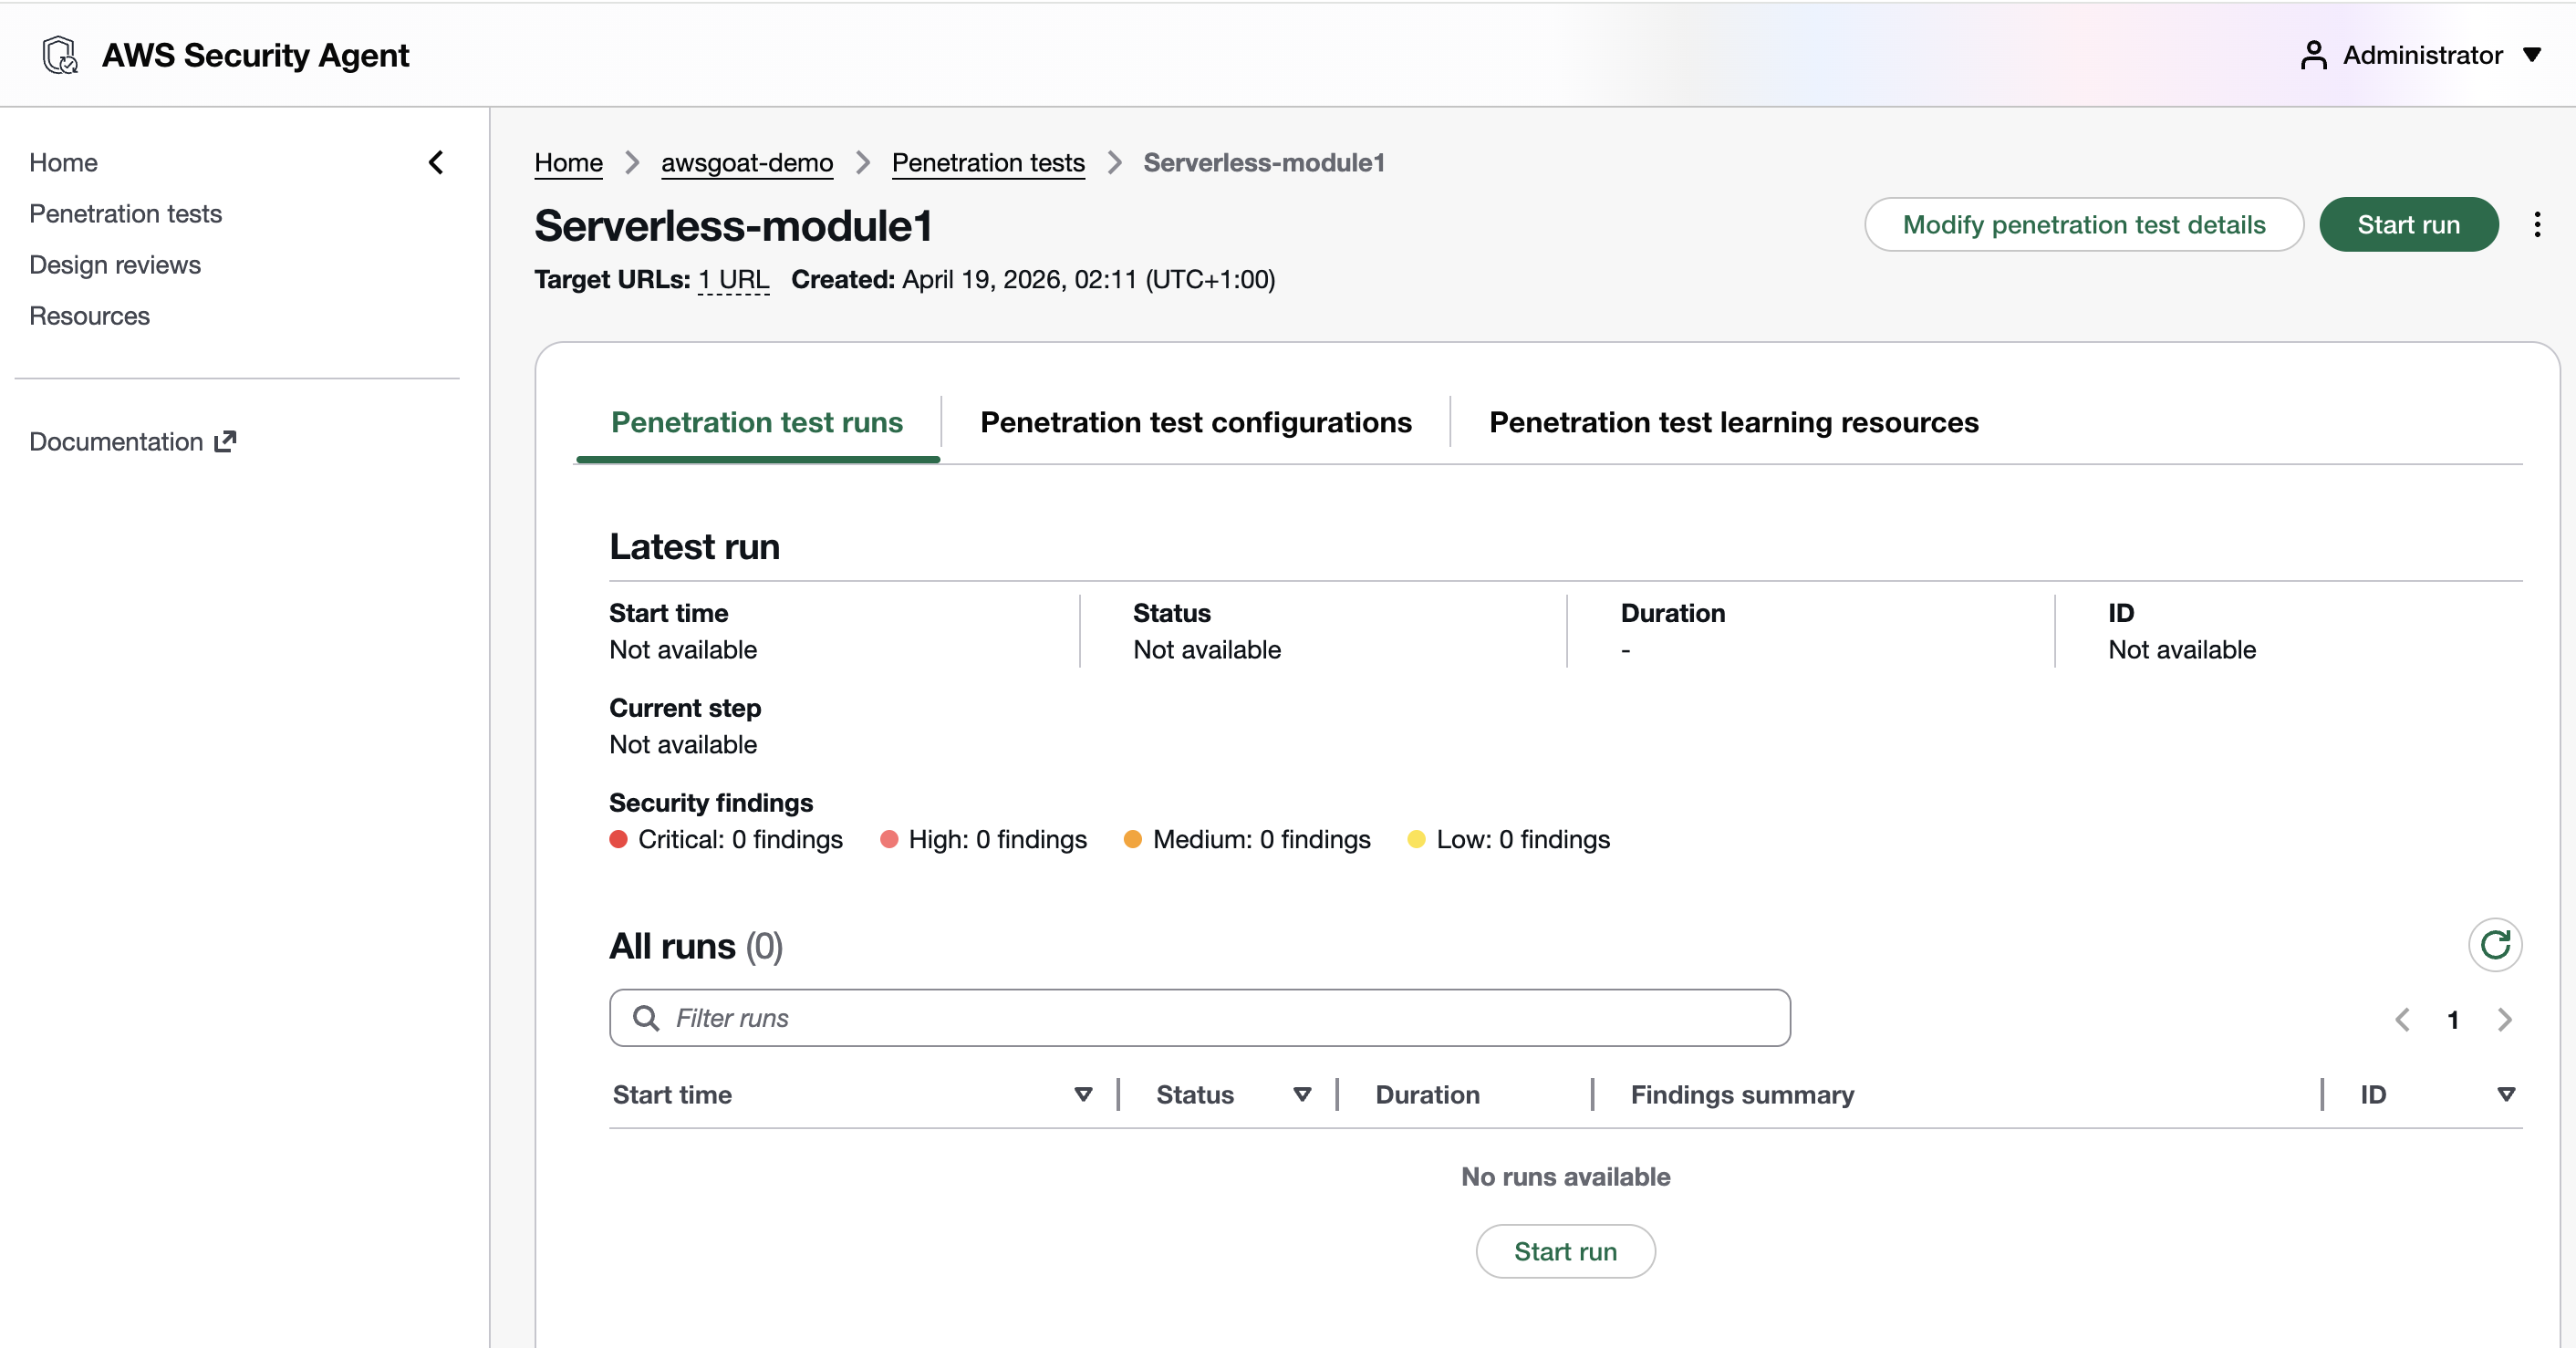
Hitting Create pentest (save without executing) lands you on the pentest detail page. The Serverless-module1 run is now configured and idle: Penetration test runs tab is selected, Latest run is empty, and All runs reports (0), with no task-hours burned yet. Three tabs along the top let you drill into Penetration test runs (history + live status), Penetration test configurations (the form you just filled in, editable), and Penetration test learning resources (the GitHub repo context). The green Start run button top-right (or the matching one below the empty All runs table) is what actually spends money. Click it when you are ready to kick off the agent swarm.
Running the Pentest
Click Start penetration test. The agent begins working through its multi-phase pipeline: authenticating, scanning, reconnoitering, planning, and dispatching specialized agents.
The investigation timeline updates as the agent progresses. You can see which endpoints it has discovered, what attack vectors it is testing, and preliminary findings as they are validated.
The AWS pricing page shows a small API test at about 3.5 task-hours ($173) and a standard application at about 24 task-hours ($1,200). My Module 1 run landed at 21.82 task-hours over 5 hours 20 minutes of wall time, much closer to the “standard application” profile than the “small API” one despite Module 1 being a single Lambda with a handful of endpoints.
What Security Agent Found
Security Agent completed all four phases (Preflight, Static Analysis, Penetration Testing, Finalizing) without manual intervention and produced a report with 17 findings across the Module 1 surface: 2 Critical, 6 High, 9 Medium.
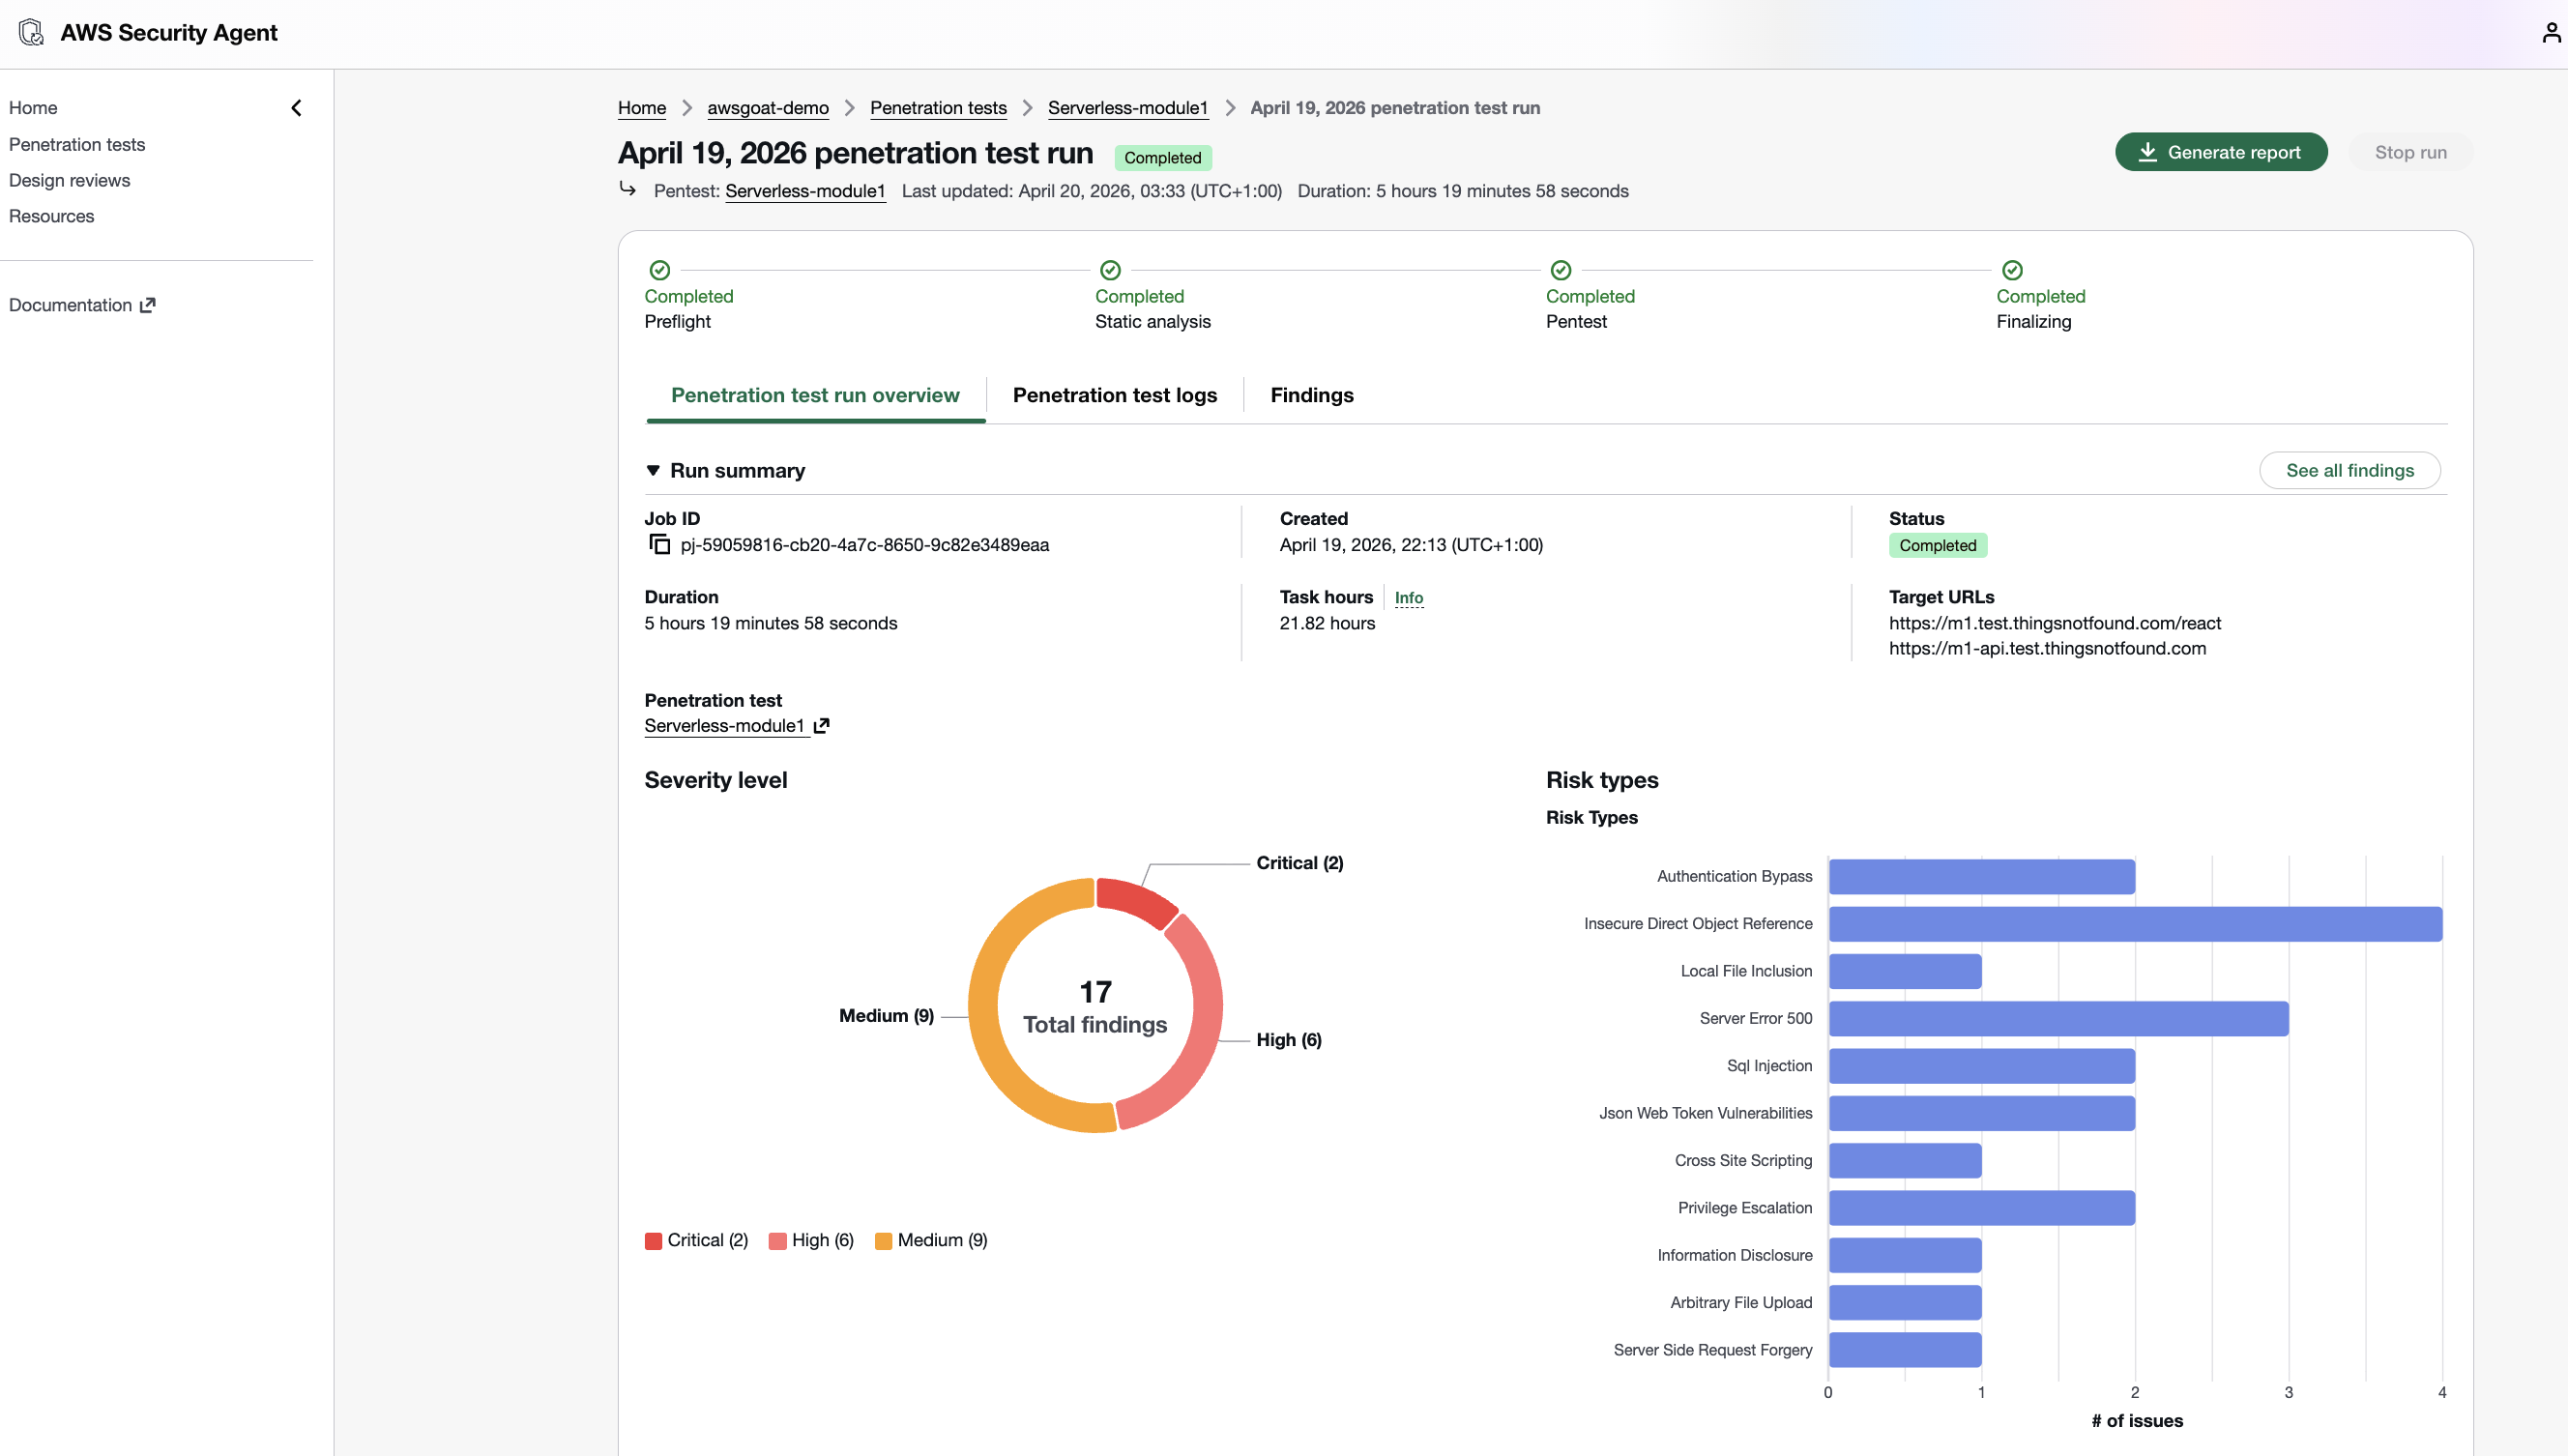
Every finding in the report includes severity, OWASP category, a CVSS v3.1 vector, confidence rating, step-by-step reproduction, impact analysis, and remediation guidance. The agent can also generate automated remediation PRs against the connected GitHub repository.
The two criticals
Local File Inclusion via file:// in /save-content (CVSS 9.9). The endpoint fetches a user-supplied URL with Python’s urllib.request.urlopen() and performs no scheme validation, so file:///proc/self/environ leaks the Lambda’s AWS IAM temporary credentials and the JWT_SECRET. The Lambda’s execution role carries s3:*, dynamodb:*, and lambda:* wildcards, which turns a single authenticated GET into full AWS account compromise. Exploitation needs nothing more than a low-privilege JWT (authLevel=200).
Unauthenticated database dump at /dump (CVSS 9.1). A single anonymous GET returns both DynamoDB tables (47 KB of JSON), including bcrypt password hashes, plaintext security-question answers, and PII. The secret answers feed directly into /reset-password to take over any account, including the authLevel=0 admins.
Highs and mediums at a glance
| Severity | Endpoint / Vector | Finding | Impact |
|---|---|---|---|
| High | POST /change-profile | IDOR via email in body, no ownership check | Any authenticated user rewrites any other user’s profile |
| High | POST /change-password | IDOR via email in body, no ownership check | Any authenticated user resets any other account’s password |
| High | POST /change-auth | Body-based authLevel bypass | Vertical privilege escalation to admin |
| High | Multiple endpoints | Client-supplied authLevel trusted over JWT | Authorization bypass across the API |
| High | JWT | Weak hardcoded HMAC secret, cracked at runtime | Forge tokens for any user and any authLevel |
| High | GET /save-content | SSRF (same missing scheme validation as the LFI) | Arbitrary outbound HTTP(S) from the Lambda |
| Medium | /user-details-modal | IDOR | Leaks cross-user posts including pending and rejected content |
| Medium | /save-post | IDOR via email field | Attributes posts to other users |
| Medium | POST /search-author | PartiQL injection | Full DB extraction |
| Medium | JWT | Missing revocation | Banned and deleted users retain access |
| Medium | /search-author | Stack-trace information disclosure | Server-side detail leak |
| Medium | /save-post | Unicode surrogate serialization crash | Server crash path |
| Medium | /get-dashboard | 502 on all request formats | Server crash path |
Coverage versus Module 1’s intentional surface
AWSGoat Module 1 ships XSS, SQLi (PartiQL), SSRF, IDOR, CORS, and over-permissive Lambda roles on purpose. Security Agent caught all of those except the XSS cases. It exercised the XSS task category exhaustively (multiple stored, reflected, and DOM-based probes across postTitle, postContent, getRequestImageData, and profile fields) but did not promote any XSS finding into the High-confidence Active set that ships in the final report. The over-permissive IAM role showed up as an amplifier of the LFI finding’s CVSS rather than as a standalone finding, which is reasonable. The IAM blast radius is exactly where the impact lives.
Mapping to AWSGoat’s Module-1 attack manuals
AWSGoat ships its own attack manuals for Module 1 enumerating seven canonical attacks. The report covers 5 of 7 directly, 1 partially, leaves 1 as a real gap (Reflected XSS), and 1 as out-of-scope (IAM privilege escalation via EC2 pivot). On top of the baseline it produces 10 additional findings, mostly JWT and authorization flaws plus IDOR variants the manual does not document. Two attacks in the manual (SQLi and Sensitive Data Exposure) are matched by stronger equivalents in the report.
| # | Manual attack | Coverage | Report finding(s) | Notes |
|---|---|---|---|---|
| 1 | Reflected XSS (search field, <img src=x onerror=...>) | ❌ Gap | (none) | The manual’s reflected XSS on the search input is not reproduced in the report. React auto-escaping is the likely reason, and it is worth re-running with the exact manual payload. Separately, the report’s methodology table (PDF p.8, Cross-Site Scripting row) states verbatim “While postContent uses dangerouslySetInnerHTML (confirmed XSS)…” and describes a session-theft exfil chain through that sink, yet no corresponding finding was filed. That is a missing finding in the report itself, orthogonal to manual #1. |
| 2 | SQL Injection (search with ' or '1'='1) | ✅ Covered (stronger) | F12: PartiQL Injection in POST /search-author via value | DynamoDB/PartiQL equivalent of the manual’s RDBMS scenario. Confirmed full DB extraction. |
| 3 | IDOR on change-password via user-controlled id | ✅ Covered (stronger) | F4: IDOR on /change-password | Exact match. Report also shows currentPassword is not validated. Plus 3 additional IDOR findings (F3, F9, F10). |
| 4 | Sensitive Data Exposure (fuzz list-posts) | ✅ Covered (stronger) | F2: Unauth DB dump via /dump | Manual talks about leaked user data via a specific endpoint. The report finds an unauthenticated /dump endpoint that returns the entire blog-users and blog-posts DynamoDB scan (47 KB, bcrypt hashes, plaintext secretQ/A, PII). |
| 5 | SSRF Part 1 (file:// via image upload) | ✅ Covered | F1: LFI via file:// on GET /save-content | Same root cause (urllib.request.urlopen with no scheme validation). Report adds /etc/passwd, full Lambda source, and confirms /proc/self/environ is reachable (AWS IAM creds plus JWT_SECRET). |
| 6 | SSRF Part 2 (IMDS → IAM creds → DynamoDB admin insert) | ⚠️ Partial | F6: SSRF via /save-content to arbitrary URLs | F6’s body only demonstrates SSRF to arbitrary external URLs. However, PDF p.13 lists two SSRF tasks as Completed whose results are not in F6. The first is “Test SSRF via GET /save-content targeting AWS instance metadata service to extract IAM role credentials” hitting 169.254.169.254/latest/meta-data/iam/security-credentials/<role>. The second is “targeting the Lambda Runtime API at the internal IP discovered through LFI (169.254.100.1:9001)”, the same localhost:9001 path AWSGoat Manual #6 canonically uses (/2018-06-01/runtime/invocation/next). Tasks completed, outcomes not reported. This is not simply “capability only”. |
| 7 | IAM Privilege Escalation (EC2 → attach *:* policy → hacker admin) | 🚫 Out-of-scope | (none) | This attack requires an EC2 pivot via a leaked .pem key in a dev S3 bucket. The report’s in-scope assets are only the web app and API, with no EC2 host listed. Not attempted. |
Pricing
Source: AWS Security Agent pricing page and pricing FAQs.
| Capability | Cost | Free Tier |
|---|---|---|
| On-demand pentesting | $50/task-hour (metered per second) | 2-month free trial: 200 task-hours/month |
| Secure design reviews | Free | Up to 200/month per account |
| Secure code reviews | Free | Up to 1,000/month per account |
Pentest Cost
My Module 1 run consumed 21.82 task-hours over 5 hours 20 minutes of wall time. Task-hours are metered per second across the multi-agent swarm, so total task-hours run higher than wall time when several specialised agents work in parallel.
List-price cost: 21.82 task-hours × $50/task-hour ≈ $1,091
The run stayed under the 200-hour/month free-trial cap, so out-of-pocket was $0. At list price, the run tracks close to AWS’s “standard application” example ($1,200) rather than the “small API” one ($173) despite Module 1’s small surface area. Real-world cost planning should assume standard-application economics even for modest targets.
You also pay AWSGoat’s own infrastructure while the target is running (about $0.0125/hr for Module 1), which is negligible next to the pentest spend.
For comparison:
- A manual pentest of a similar application would cost $5,000 to $15,000 and take 1 to 2 weeks
- Running Burp Suite DAST requires a $6,995/year minimum subscription
- OWASP ZAP is free but requires significant manual configuration and lacks context-aware analysis
If you are testing during the 2-month free trial (200 task-hours/month, starting from your first pentest), the cost is $0.
Verdict
What Works
Pricing is genuinely disruptive. A standard pentest at $1,200 versus $15,000 to $50,000 for a manual engagement is a 10x to 40x cost reduction. This makes continuous testing feasible for organizations of any size.
The multi-agent architecture is sophisticated. The pipeline from authentication through guided exploration to specialized agent swarm is well-designed. Context-aware testing that reads source code and documentation, rather than just probing endpoints, is a real differentiator from traditional DAST tools.
Setup is minimal. Ten minutes from zero to running pentests. No agents to install, no infrastructure to manage. If you are already on AWS, you can start testing immediately.
Multi-cloud support is a surprise. The agent can test applications on AWS, Azure, GCP, on-premises, and SaaS. This is not just an AWS-only tool.
What Can Be Improved
Slow troubleshooting process. Security Agent launches its own infrastructure in a sandbox before each run, which can take a while. During my initial runs I missed allow-listing some of the URLs the application actually depends on, and in other cases the IAM role was missing the permissions the authentication agent needed (most notably secretsmanager:GetSecretValue on the auto-created credentials secret). Fixing the issue and starting over was, in some cases, a 40-minute cycle. It would be a real quality-of-life win if a future release let you patch the misconfiguration and resume from the last failure point rather than restarting the whole sandbox, and some initial fail-fast validation (reachability checks on the in-scope URLs, IAM permission dry-runs on the configured secrets, etc.) would catch most of these before the pentest even starts.
Who Should Use It
Yes: Teams running web applications that can afford $1,200 per test. If you currently do zero pentesting because manual assessments are too expensive, this changes the equation entirely.
Maybe: Small teams with simple applications. The free trial is worth trying, but if you have one application and test it once a year, the savings over a manual pentest may not justify learning a new tool.
Not yet: Teams with strict compliance requirements (PCI DSS, CBEST) that need human-signed pentest reports. Teams in unsupported regions.
The Bigger Picture
AWS is positioning Security Agent as part of a shift from periodic, expensive pentesting to continuous, affordable security testing. The economics support this: if a pentest costs $1,200 instead of $15,000, you can test every application after every release rather than testing your top 5 applications once a year.
The harder question is how much to trust AI-driven pentesting. The 80% unassisted success rate (not the marketed 92.5% assisted rate) means approximately 1 in 5 vulnerabilities may be missed. For novel business logic flaws specific to your application, the miss rate is likely higher. The non-deterministic nature of findings adds another layer of uncertainty.
My take: use it as a baseline. Run Security Agent continuously to catch the 80% of vulnerabilities that automated testing can find. Layer it with Prowler or Inspector for infrastructure scanning. And keep manual pentesting in your rotation for critical applications and compliance requirements. At $1,200 per test, the cost of running it alongside human pentesters is still dramatically lower than relying on manual testing alone.
Cleaning Up
When you are done with the demo, tear down Module 1 with Terraform:
cd my2centsai-blog-samples/aws-security-agent-demo/modules/module-1
terraform destroy --auto-approve
You can also delete the Agent Space from the Security Agent console if you no longer need it. The free trial clock starts from your first pentest, not from Agent Space creation.