AWS DevOps Agent: Hands-On with Automated Root Cause Analysis
By Fabio Douek
Overview
AWS DevOps Agent is an AI-powered operations agent that investigates incidents, identifies root causes, and recommends fixes. AWS calls it a “frontier agent” for operational excellence. It went generally available on March 31, 2026, after a public preview that started at re:Invent 2025 in December. It is a separate, more advanced product from the free Amazon CloudWatch Investigations feature that launched earlier in 2025.
The pitch is straightforward: instead of an SRE manually digging through CloudWatch logs, correlating metrics across services, and checking recent deployments, the agent does it autonomously. It builds a topology graph of your resources, connects to your observability stack (CloudWatch, Datadog, Dynatrace, New Relic, Splunk, Grafana), pulls in CI/CD data from GitHub or GitLab, and follows the thread from symptom to root cause. It posts its findings to Slack, ServiceNow, or PagerDuty, and provides specific mitigation steps. It does not auto-remediate. A human still needs to approve and execute the fix.
In this post, I put DevOps Agent through a hands-on test against a serverless stack. I deployed a simple Lambda + API Gateway + DynamoDB CRUD API using CloudFormation, wrote a chaos engineering script to simulate a realistic production failure (DynamoDB capacity starvation), and let DevOps Agent investigate the cascading outage. The goal: see if the agent can trace a chain of API Gateway 5xx errors back through Lambda failures to a DynamoDB configuration change, measure how long the investigation takes, and calculate what it actually costs. I walk through the full setup, the chaos injection, the investigation results, and whether the tool delivers on its promises.
Setup
Setting up DevOps Agent takes about 15 minutes. Here is the process step by step.
Prerequisites
- An AWS account in a supported region. I used
us-east-1. The six GA regions are: US East (N. Virginia), US West (Oregon), Asia Pacific (Sydney), Asia Pacific (Tokyo), Europe (Frankfurt), and Europe (Ireland). - IAM permissions to create service-linked roles and manage
aidevops:*actions.
Step 1: Enable DevOps Agent
Navigate to the AWS DevOps Agent console and click Begin Setup, which will bring you to the Agent Space creation page.
Step 2: Create an Agent Space
An Agent Space is the core organizational concept. It defines what the agent can access: which AWS accounts, which third-party integrations, and who can interact with investigations.
Click Create Agent Space and fill in:
- Agent Space Name: Something descriptive. I used
serverless-demo. - Description (optional): A sentence about what this space monitors.
- Agent response language: The language for generated findings and recommendations. Defaults to English (US).
- AWS resource access: Under “Configure primary account role,” choose “Auto-create a new DevOps Agent role” (selected by default). This creates a role named
DevOpsAgentRole-AgentSpace-<id>with read-only access to 150+ AWS services. - Enable web app: At the bottom, enable the web app and auto-create a DevOps Squad role for operator access.
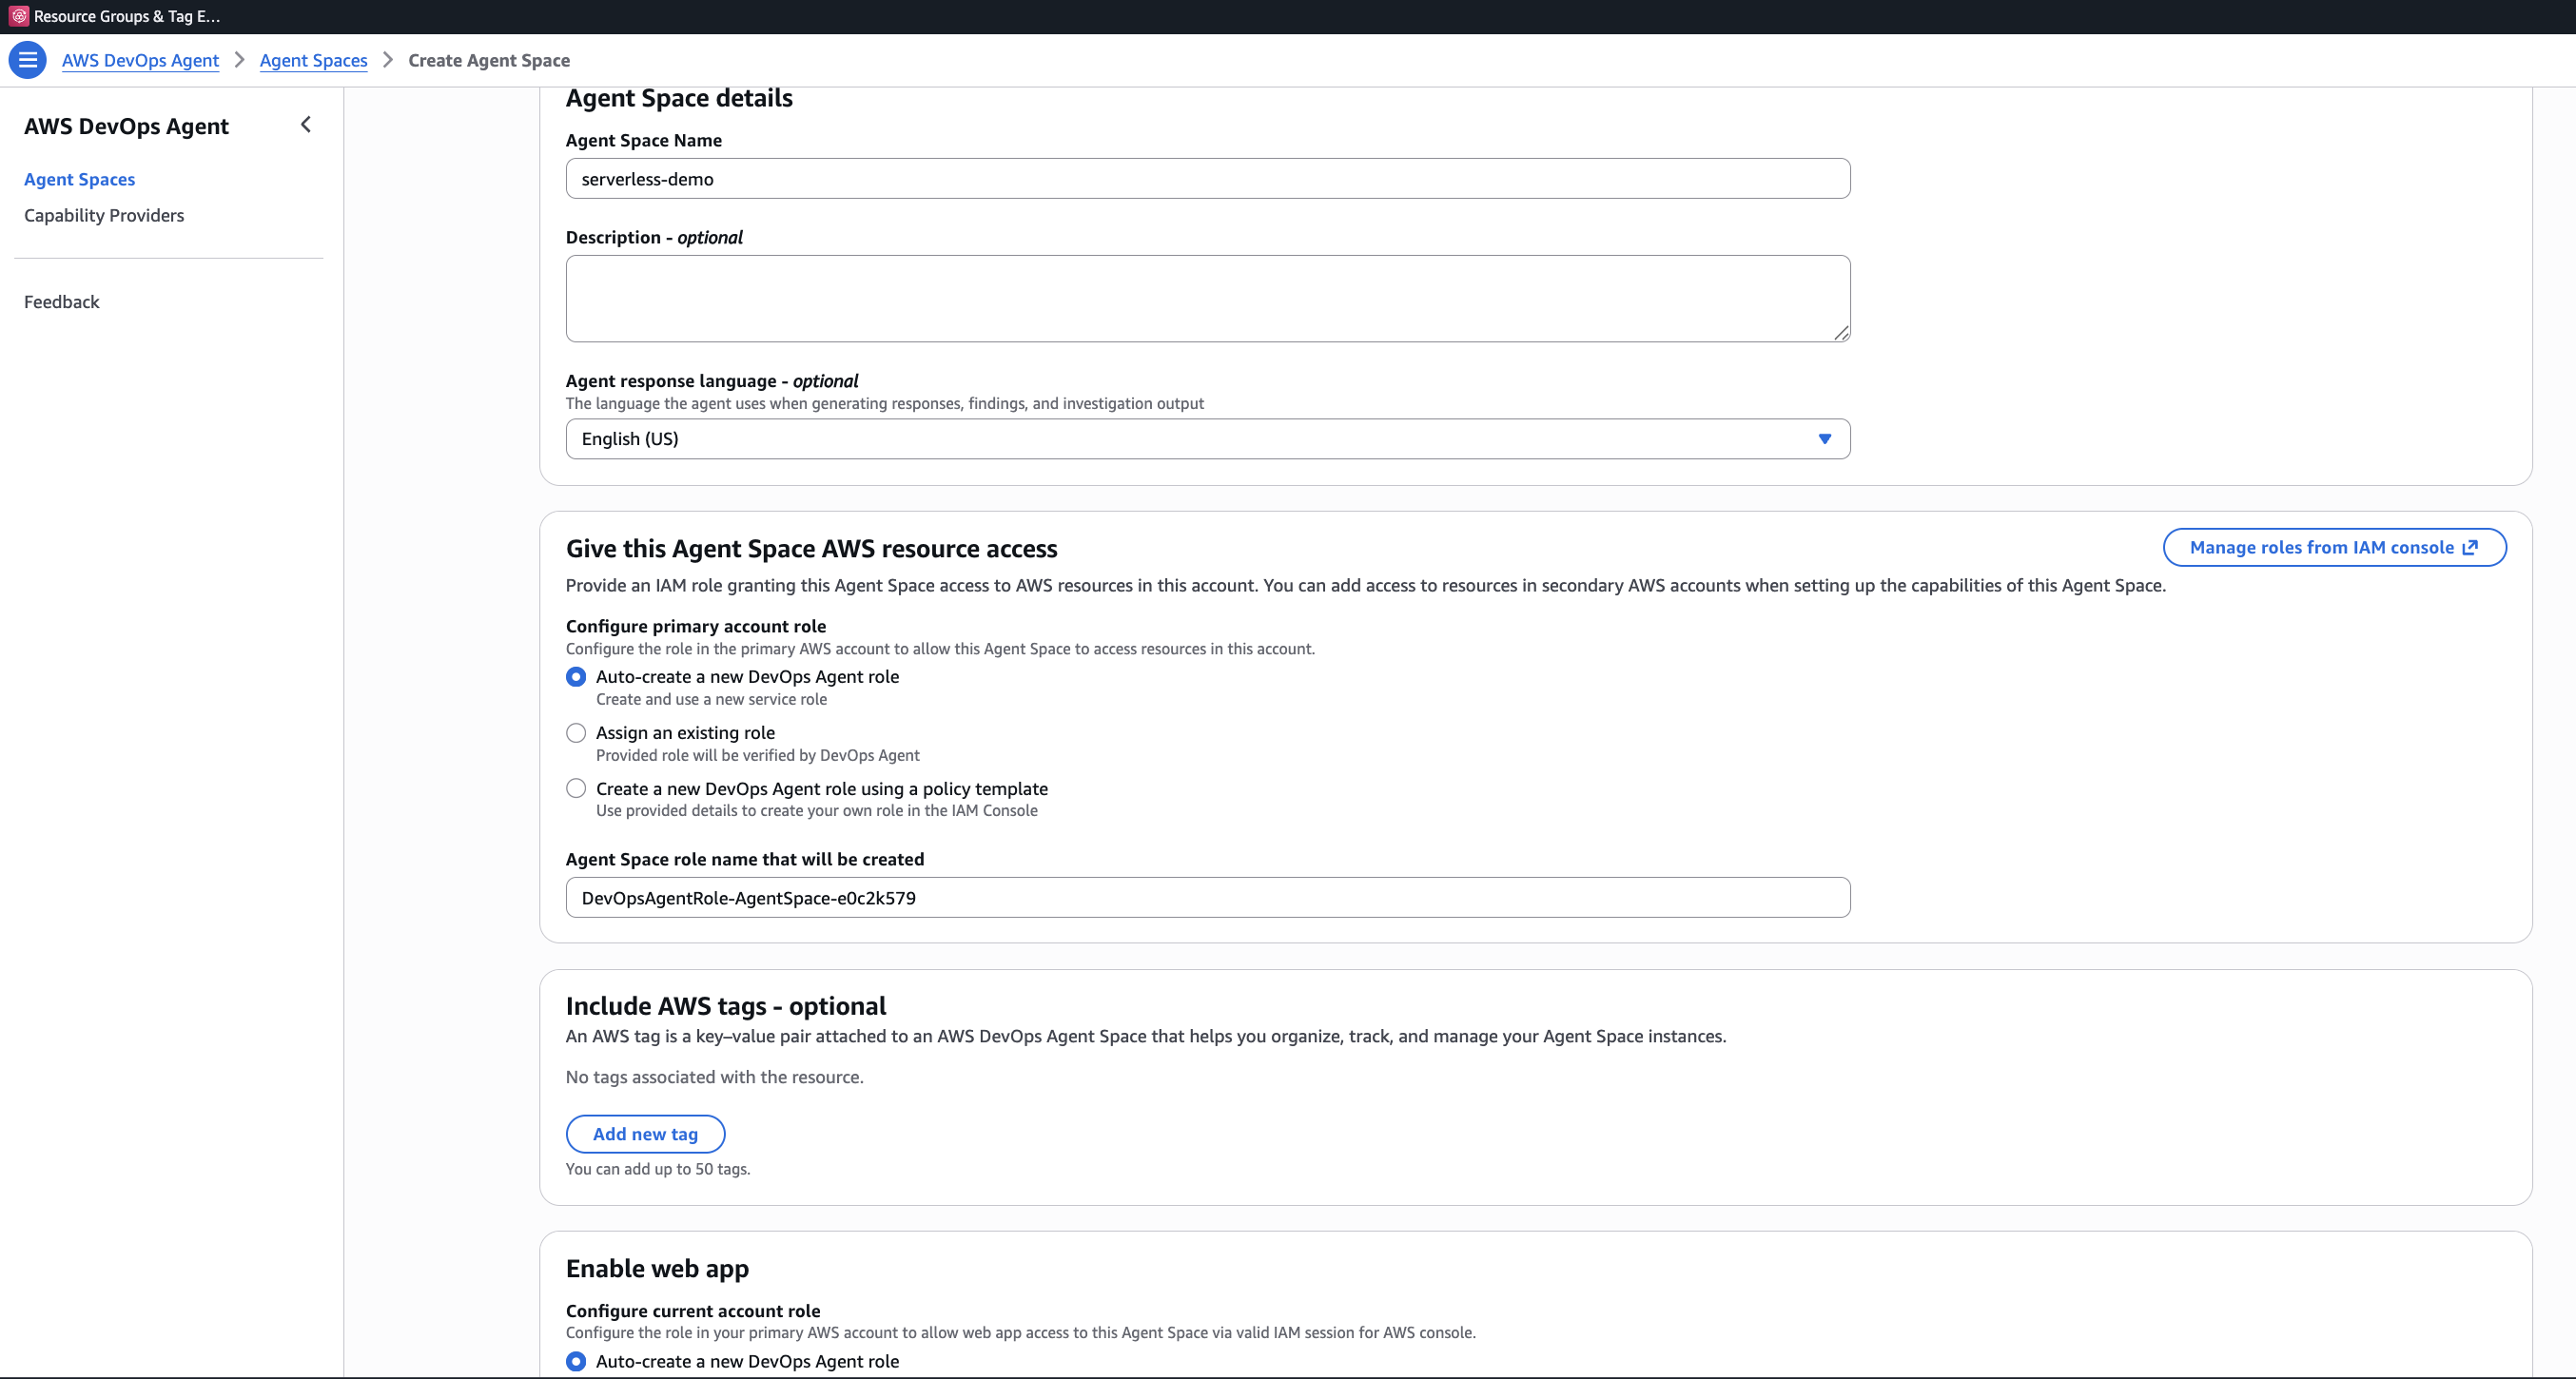
The IAM role uses the aidevops:* namespace and trusts the aidevops.amazonaws.com service principal. It is read-only by design. The agent cannot modify your resources.
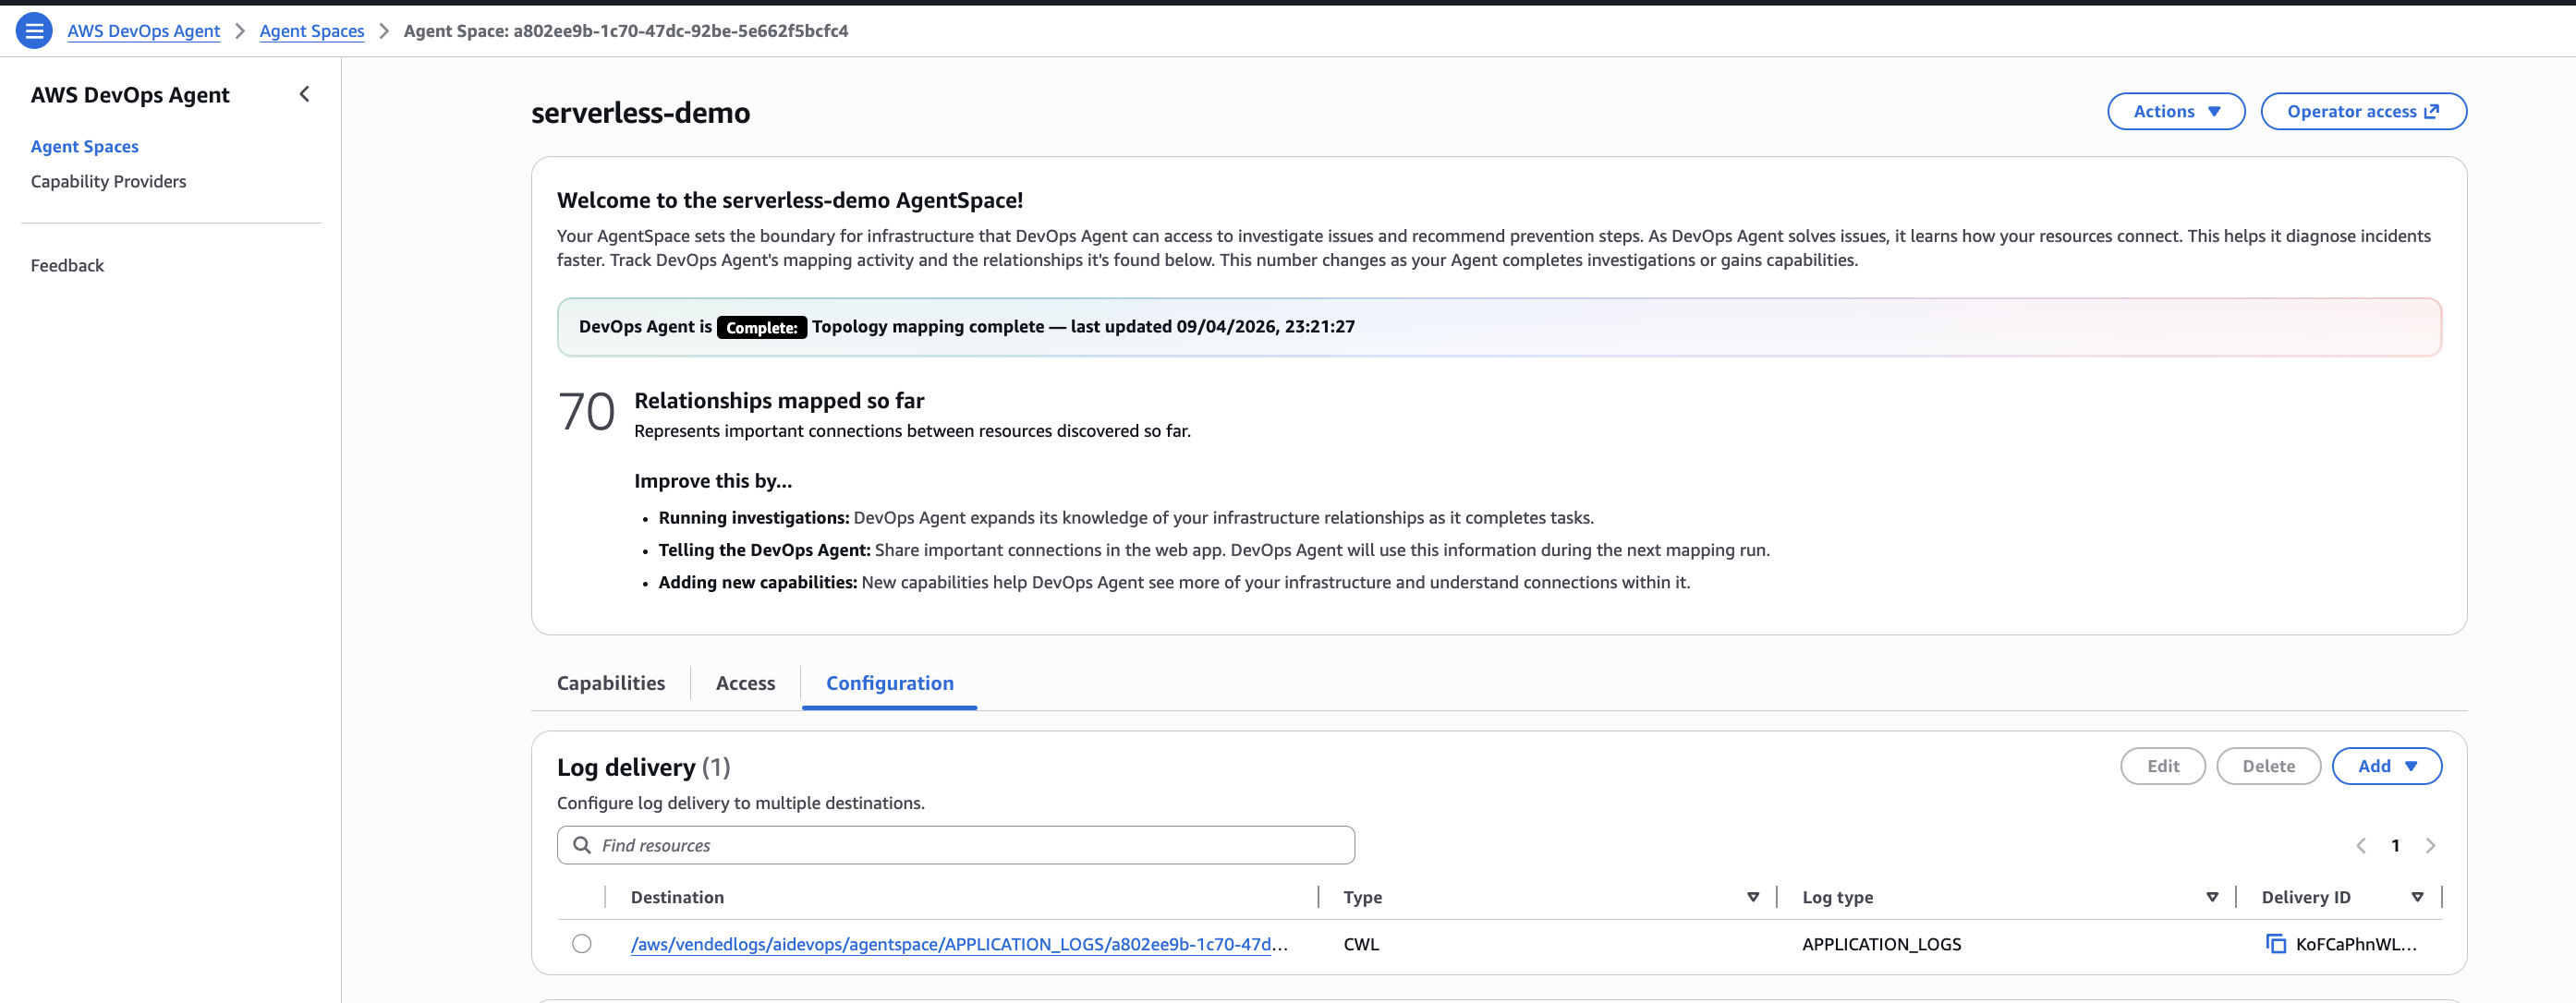
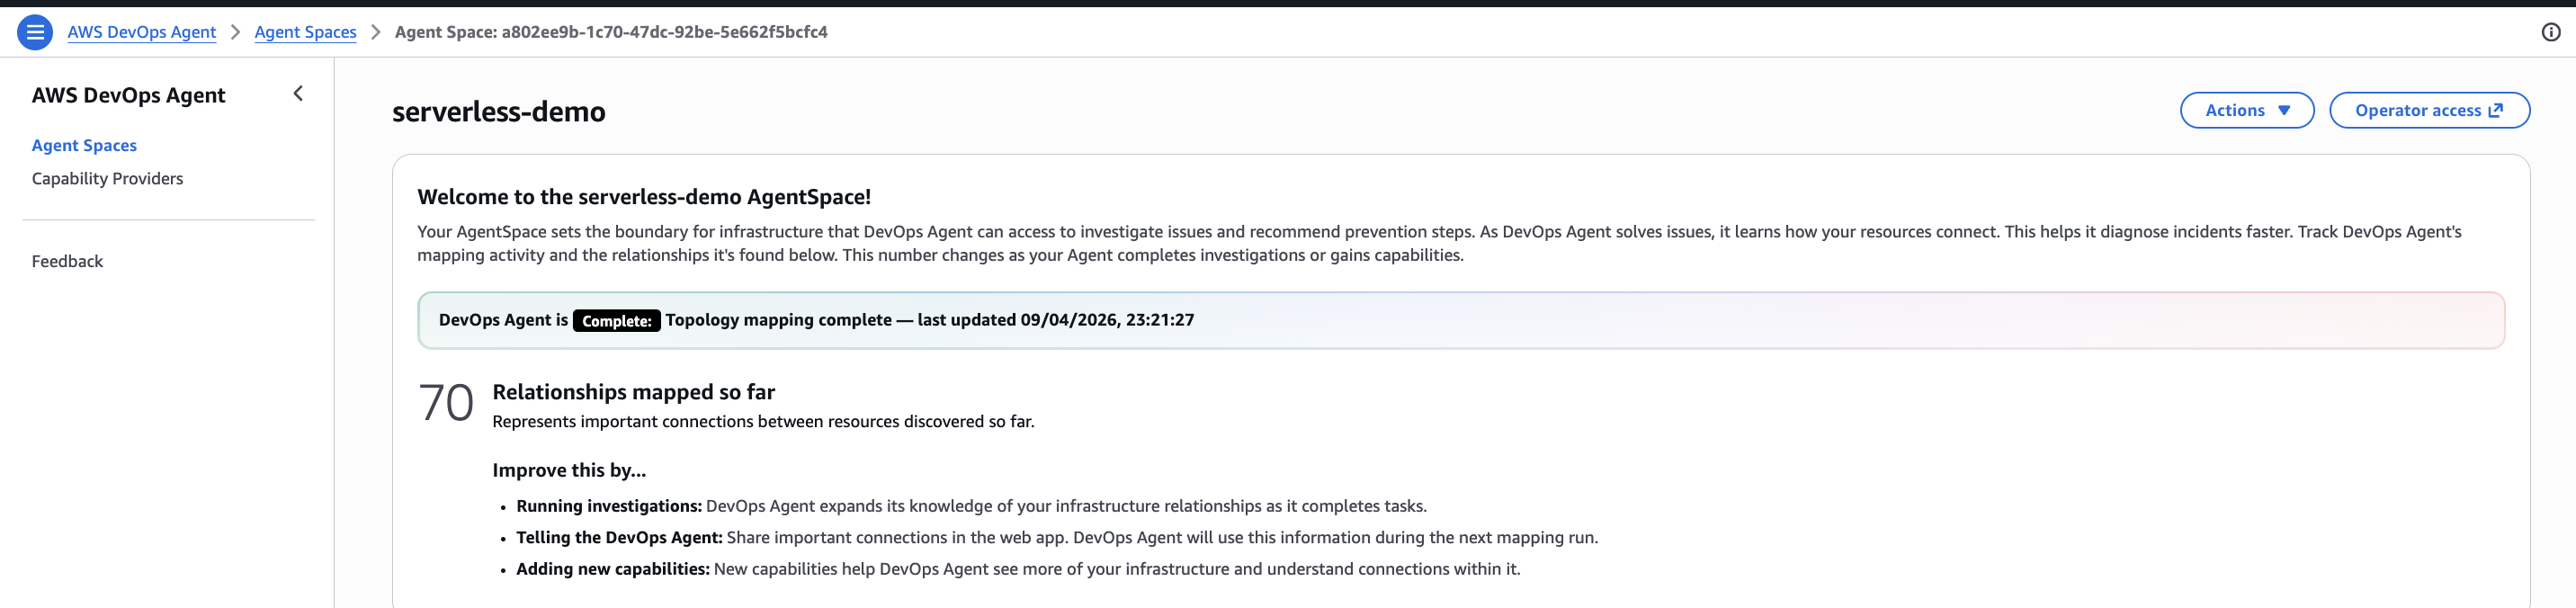
Step 3: Agent Space Configuration
Once the Agent Space is created, you land on its dashboard. The agent immediately starts mapping your infrastructure. In my case, it found 70 relationships within minutes, discovering resources and how they connect to each other.
The Configuration tab lets you set up log delivery destinations and fine-tune the agent’s behavior. The Capabilities tab is where you add third-party integrations. For this demo, CloudWatch is the only required integration, and it is enabled by default.
Optional integrations you can add under Capabilities:
- Secondary Sources: Other AWS Accounts, Azure Subscription
- Observability: Datadog, Dynatrace, Grafana, New Relic, Splunk
- CI/CD: GitHub, GitLab, Azure DevOps
- Ticketing/Chat: Slack, ServiceNow, PagerDuty
- Custom: Any system via MCP (Model Context Protocol) servers
Step 4: Tag Your Resources
DevOps Agent discovers your resources through two mechanisms: CloudFormation stack discovery and resource tags. For resources deployed outside CloudFormation, add the tag devopsagent=true to make them visible.
The CloudFormation template in this demo already includes tags on every resource:
Tags:
  - Key: devopsagent
    Value: "true"
  - Key: Project
    Value: !Ref ProjectName
That is it for setup. The agent is now watching your account.
The Demo: Debugging a Serverless Outage
Here is the plan: deploy a simple CRUD API, break it by starving DynamoDB of capacity, and see if DevOps Agent can trace the cascading failure back to the root cause.
Architecture
Client --> API Gateway --> Lambda --> DynamoDB
                                        |
CloudWatch Alarms <-- CloudWatch Metrics
         |
AWS DevOps Agent (investigates)
The stack includes a CloudWatch dashboard and three alarms that will fire during the chaos experiment:
- Lambda errors: Triggers when the function errors 5+ times in a minute
- API Gateway 5xx: Triggers when 5+ server errors occur in a minute
- DynamoDB throttles: Triggers on any write throttle event
Deploying the Workload
Clone the companion repository and deploy:
git clone https://github.com/fabiodouek/my2centsai-blog-samples.git
cd my2centsai-blog-samples/aws-devops-agent-demo
chmod +x scripts/*.sh chaos/*.sh
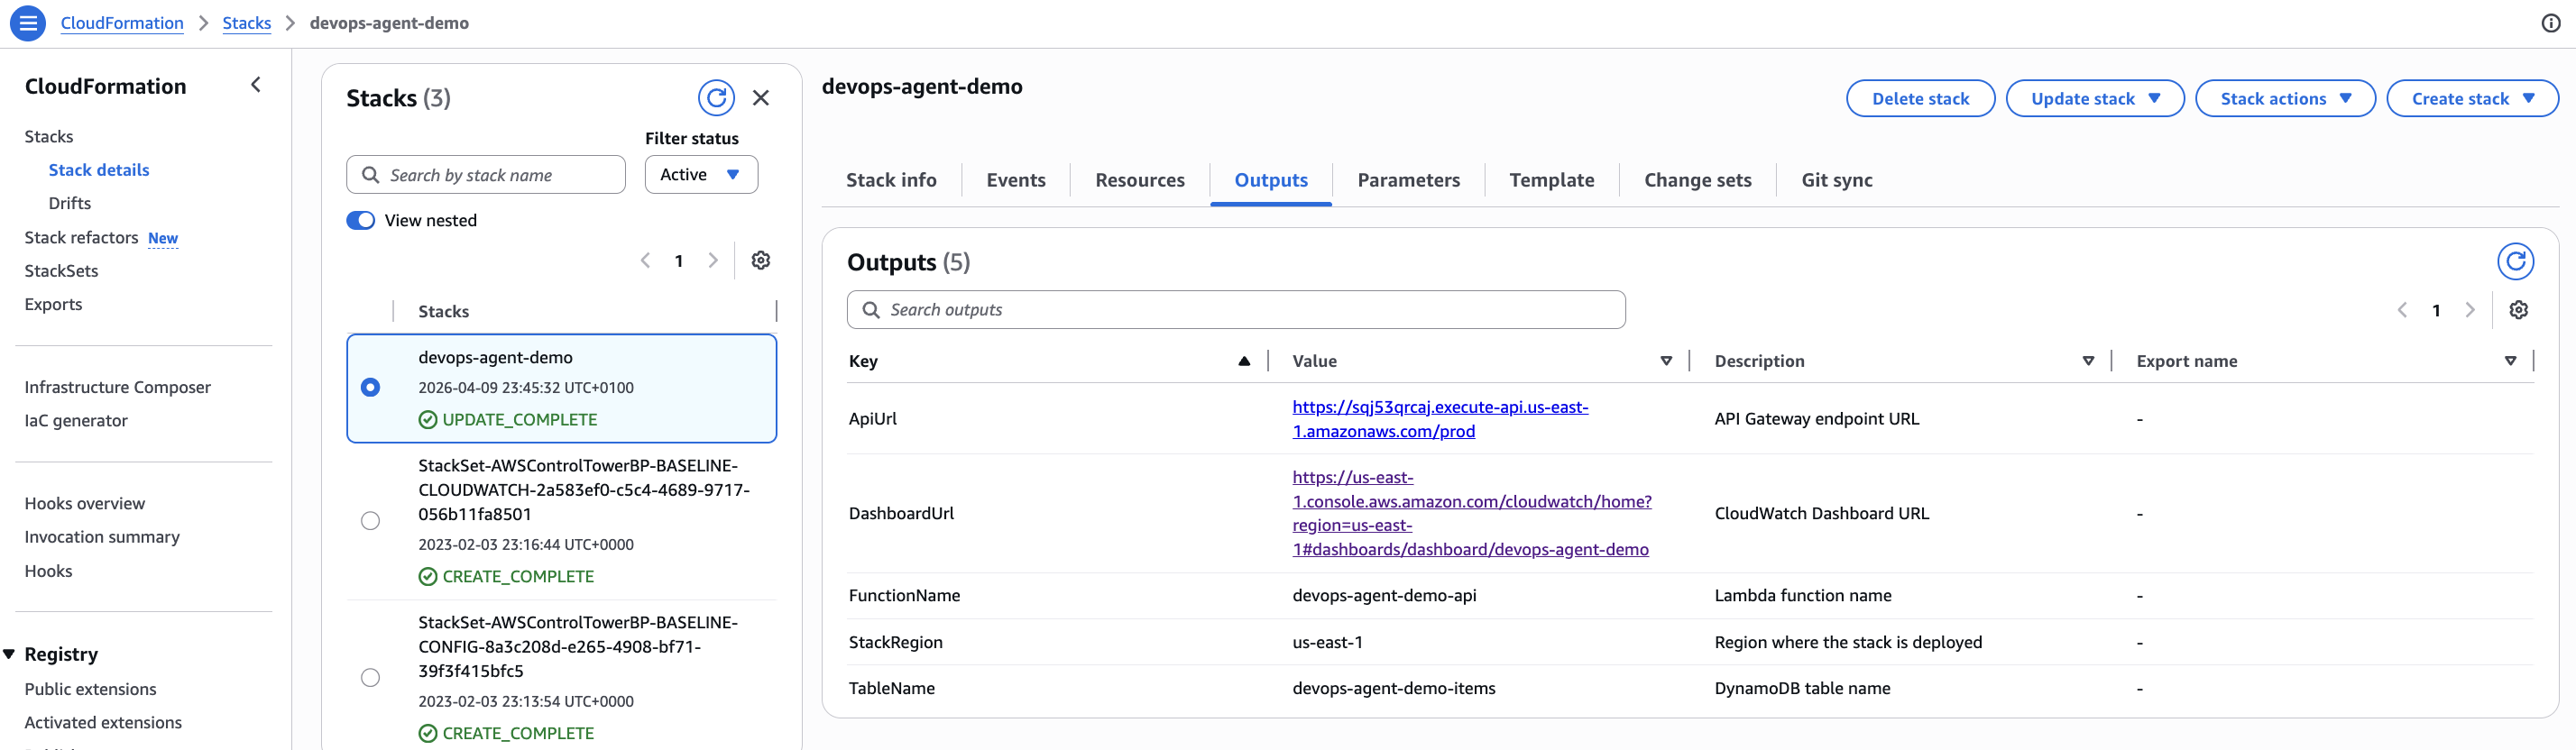
./scripts/deploy.sh devops-agent-demo us-east-1The CloudFormation stack creates:
- A DynamoDB table (
devops-agent-demo-items) in on-demand billing mode - A Lambda function (
devops-agent-demo-api) running Python 3.12 - An API Gateway REST API with a
/itemsCRUD endpoint - A CloudWatch dashboard with alarm status and metric graphs
- Three CloudWatch alarms watching for errors
Deployment takes about 2 minutes. The output gives you the API URL:
Testing the API
Verify the API works before breaking it:
./scripts/test-api.sh https://YOUR-API-ID.execute-api.us-east-1.amazonaws.com/prodThe script runs through the full CRUD cycle: health check, create item, list items, get item, delete item. Every call should return a 200.
{
    "status": "healthy",
    "timestamp": 1744214400
}
The Lambda function is a simple item store. Nothing fancy, just enough to generate CloudWatch metrics and be clearly broken when DynamoDB stops cooperating:
def create_item(body):
    if not body.get("name"):
        return response(400, {"error": "Missing required field: name"})

    item = {
        "id": str(uuid.uuid4()),
        "name": body["name"],
        "description": body.get("description", ""),
        "created_at": int(time.time()),
    }
    table.put_item(Item=item)
    return response(201, item)
Breaking It: The Capacity Starvation Script
Now for the chaos. The script does two things:
- Switches DynamoDB from on-demand to provisioned with 1 RCU / 1 WCU. This is the equivalent of turning a highway into a single-lane dirt road. Any meaningful traffic will exceed the capacity.
- Blasts 1,000 POST requests at the API. Each request tries to write an item to DynamoDB. With only 1 write capacity unit, most of these will fail with
ProvisionedThroughputExceededException. Why 1,000? DynamoDB retains 300 seconds of unused capacity as burst credits, so a smaller burst may be absorbed without triggering throttles.
./chaos/capacity-starvation.sh \
  https://YOUR-API-ID.execute-api.us-east-1.amazonaws.com/prod
The script output shows the progression:
============================================
  CHAOS: DynamoDB Capacity Starvation
============================================

Target API:    https://abc123.execute-api.us-east-1.amazonaws.com/prod
Target Table:  devops-agent-demo-items

[1/4] Recording current table configuration...
  Current billing mode: PAY_PER_REQUEST

[2/4] Switching to PROVISIONED mode with 1 RCU / 1 WCU...
  Table is ACTIVE with 1 RCU / 1 WCU

[3/4] Blasting 1000 requests at the API...
  Sent 20 / 1000 requests...
  Sent 40 / 1000 requests...
  ...

[4/4] Chaos injection complete.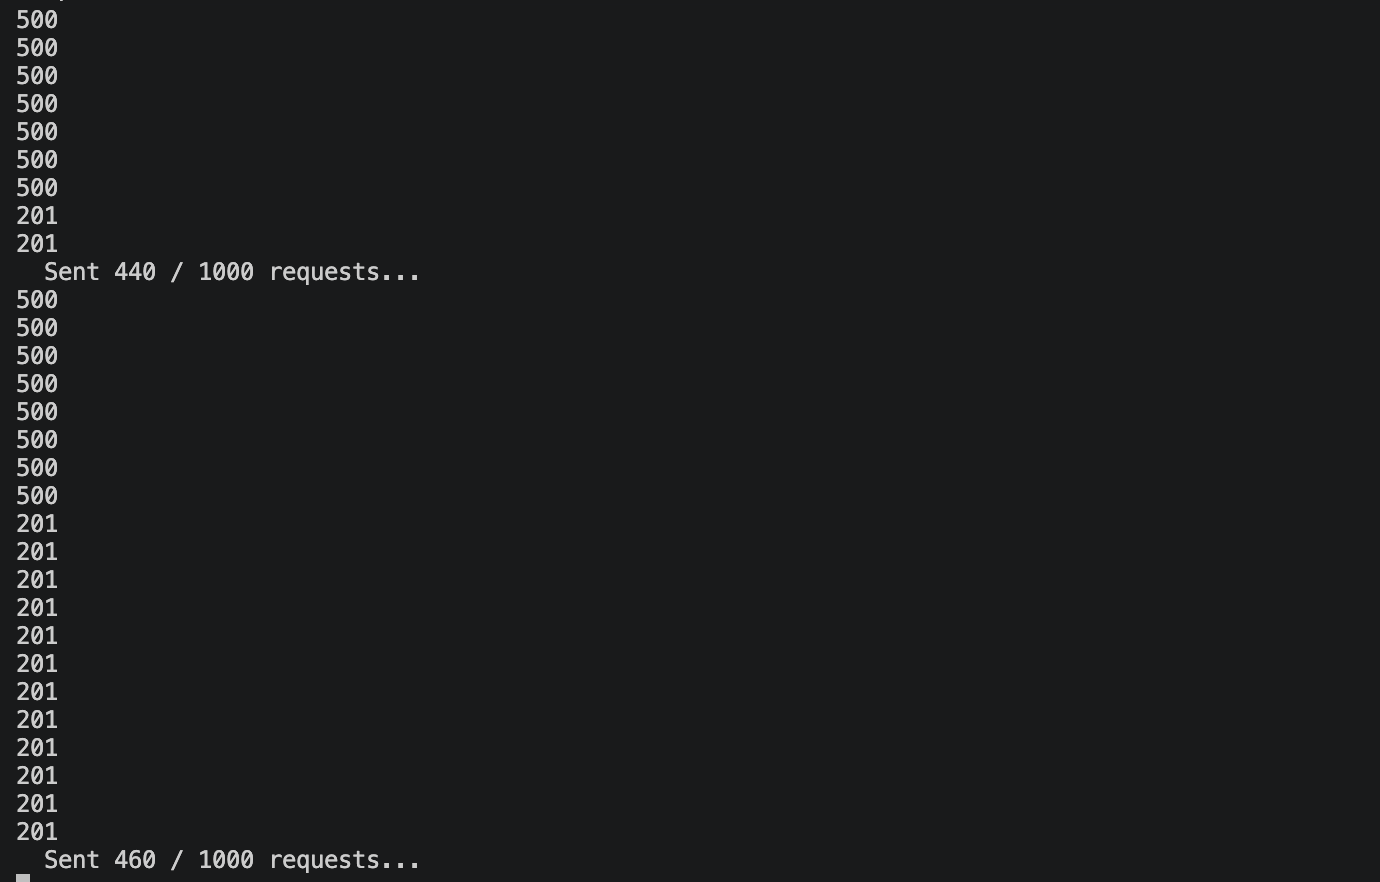
The output shows HTTP status codes for each request. A 201 means the write succeeded, either from remaining burst credits or the single provisioned WCU. A 500 means DynamoDB rejected the write with ProvisionedThroughputExceededException and the Lambda function returned an internal server error. You can see the pattern: mostly 500s with occasional 201s sneaking through, since 1 WCU allows roughly one successful write per second.
Here is what the script looks like under the hood. The key is the aws dynamodb update-table call that switches billing modes:
# Switch to provisioned with minimal capacity
aws dynamodb update-table \
  --table-name "$TABLE_NAME" \
  --billing-mode PROVISIONED \
  --provisioned-throughput ReadCapacityUnits=1,WriteCapacityUnits=1
This is a realistic scenario. Misconfigured auto-scaling, an accidental capacity change during a cost optimization sprint, or a Terraform apply that overrides on-demand with provisioned settings. I have seen all of these in production.
Within a minute or two, the cascading failure is visible in the CloudWatch console:
- DynamoDB:
WriteThrottleEventsspikes from 0 to dozens per minute - Lambda: The function returns 500 responses as DynamoDB rejects writes with
ProvisionedThroughputExceededException - API Gateway:
5XXErrorcount climbs as the 500s propagate to clients
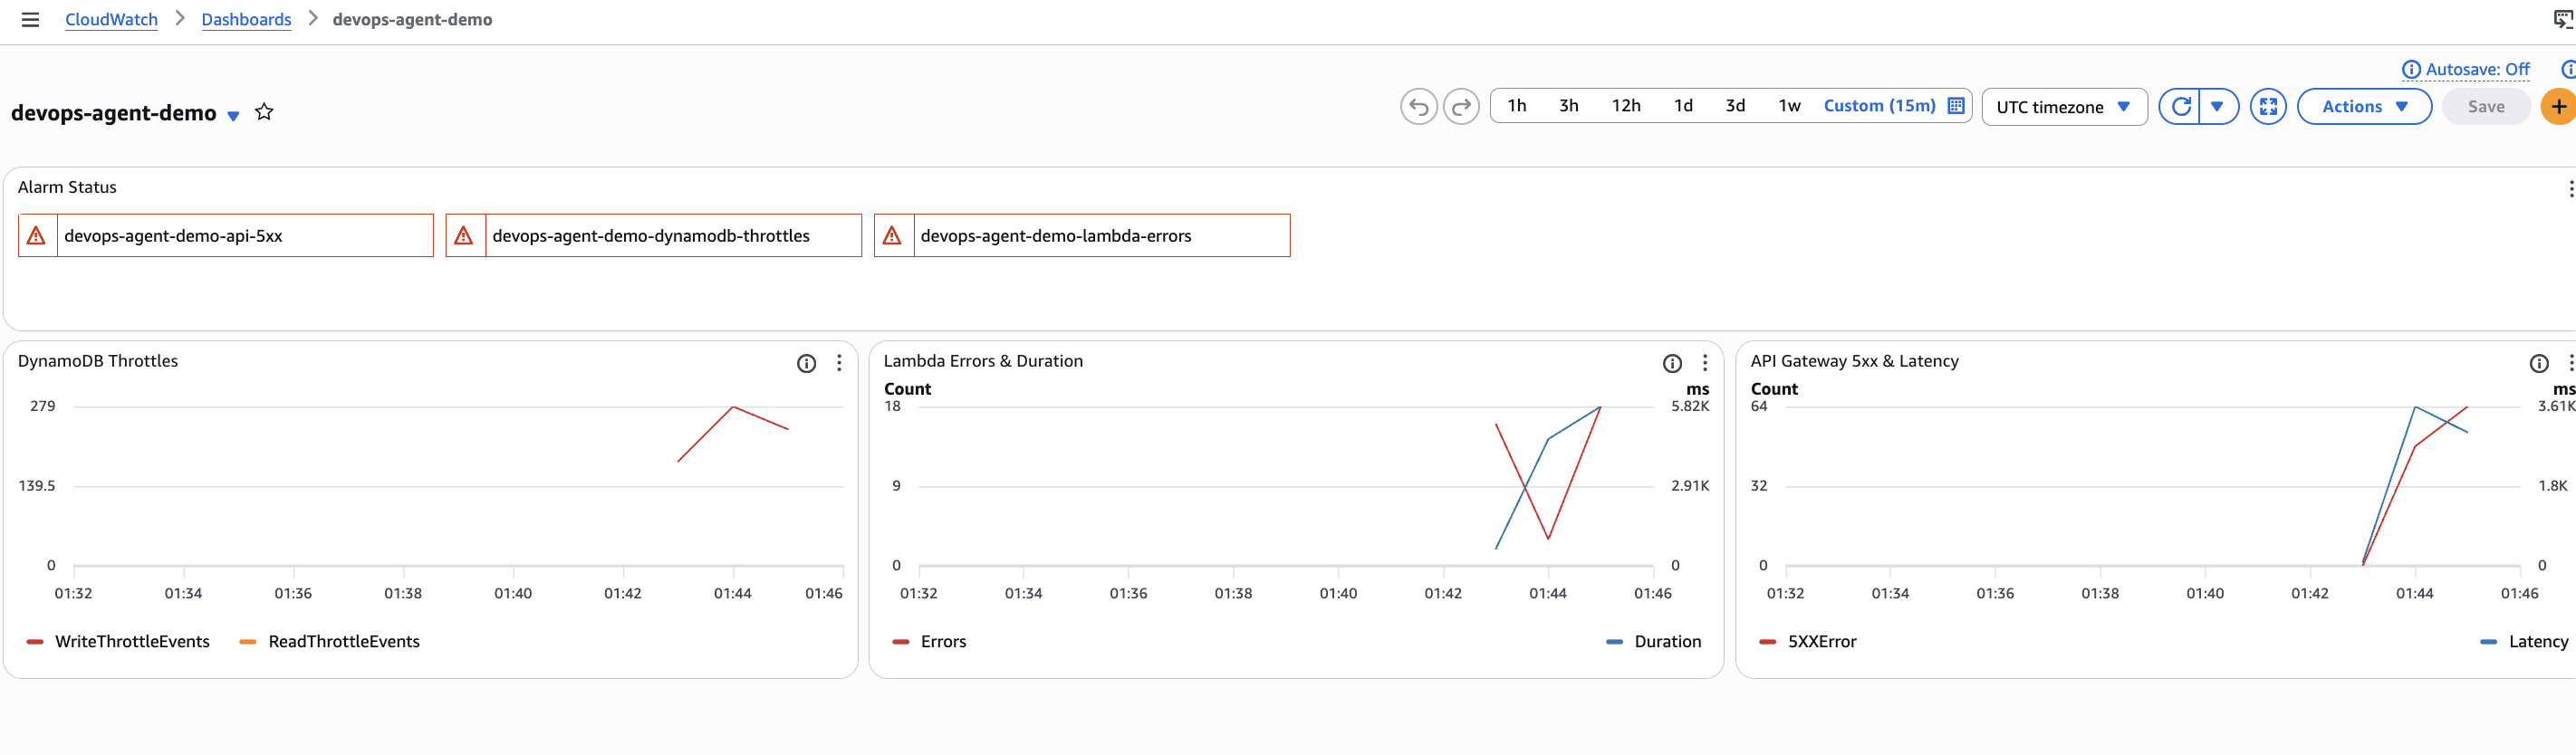
The dashboard tells the full story. At the top, all three alarms are in ALARM state (red). The DynamoDB Throttles graph on the left shows a sharp spike in WriteThrottleEvents, peaking at 279 in a single minute. The Lambda Errors & Duration graph in the middle shows the errors climbing as DynamoDB rejects writes, with a corresponding jump in function duration as the SDK retries before failing. The API Gateway 5xx & Latency graph on the right shows the 5xx errors reaching clients, with latency spiking as requests back up behind the throttled DynamoDB calls.
This is the cascading failure pattern: DynamoDB throttles propagate up through Lambda to API Gateway, and each layer adds its own latency and error metrics. The CloudWatch alarms fire, which is what triggers the DevOps Agent investigation.
Triggering DevOps Agent
There are multiple ways to start an investigation:
- Automatic: DevOps Agent monitors your CloudWatch alarms and can start investigations automatically when alarms fire (if configured).
- Console: From the Agent Space dashboard, click the Operator access button in the top right corner. This opens the DevOps Agent web app where you can start investigations and interact with the agent.
- CLI: Use the AWS CLI to start an investigation programmatically.
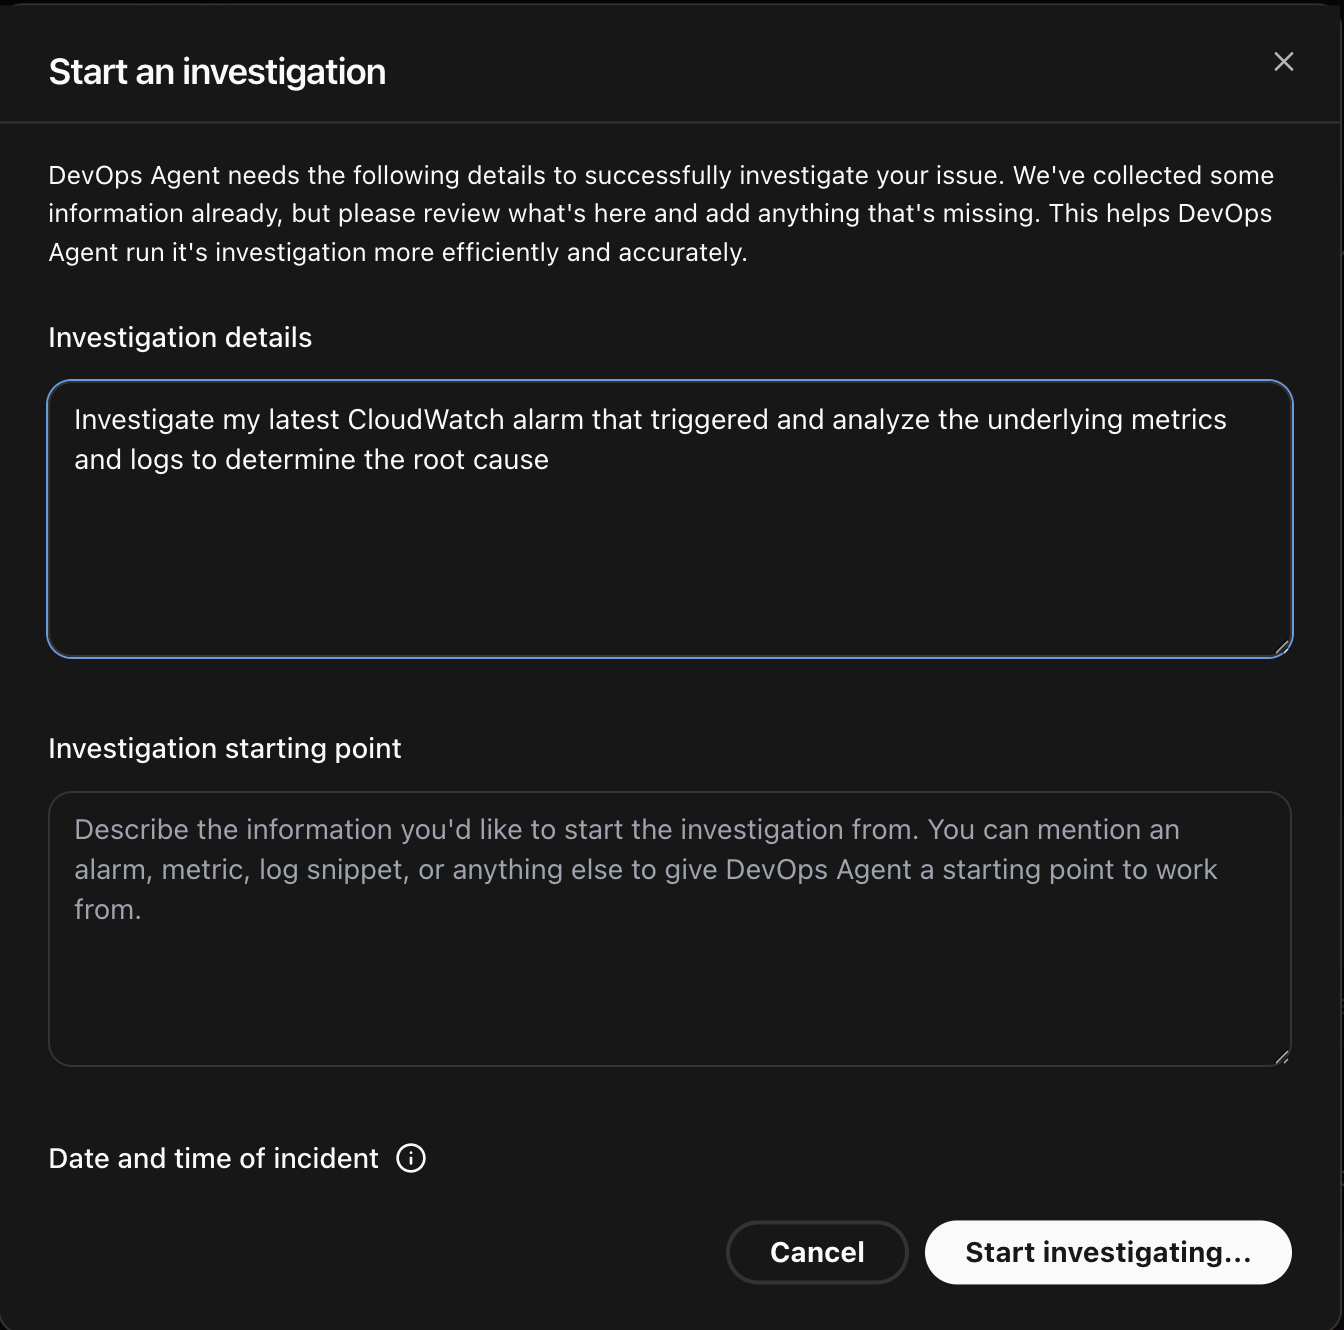
For this demo, I clicked Operator access, which opens the Incident Response Dashboard. The left panel is a chat interface where you can interact with the agent directly. The main panel shows a Start an investigation form with suggested prompts like “Latest alarm,” “High CPU usage,” and “Error rate spike.” Below that is a list of past investigations and a daily investigation frequency chart.
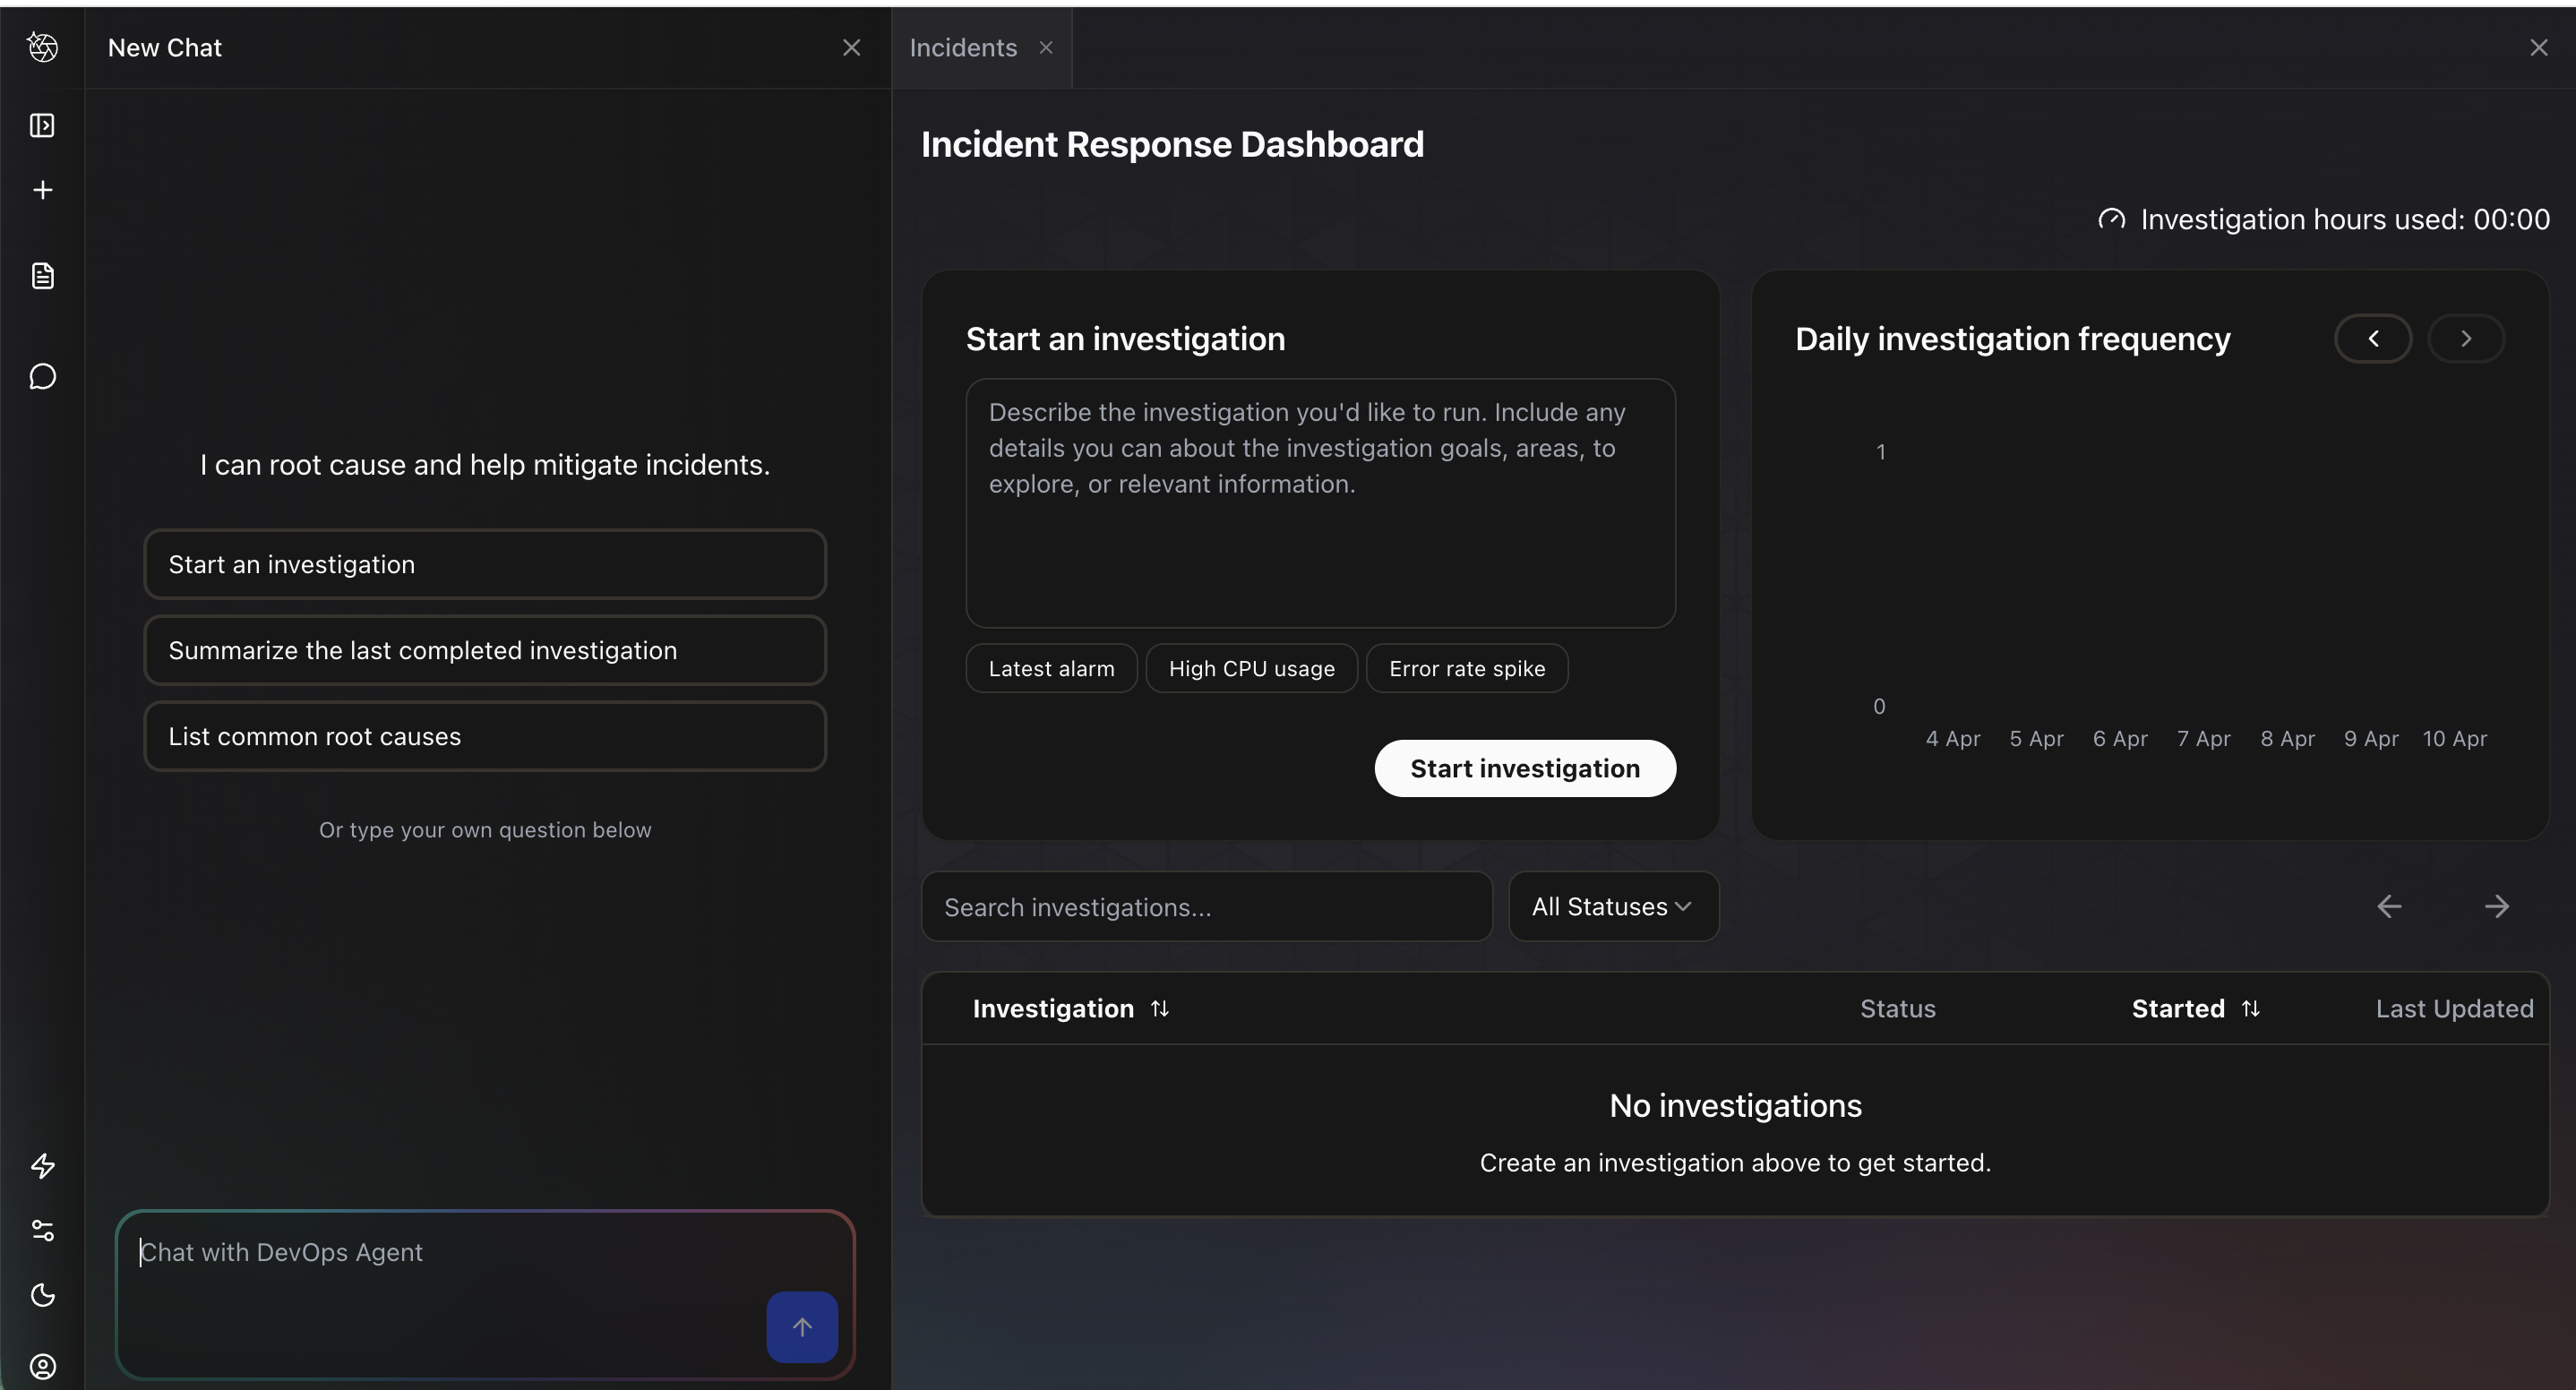
I clicked Start an investigation, which opens a dialog with two fields: Investigation details where you describe the problem, and Investigation starting point where you can optionally point the agent to a specific alarm, metric, or log snippet. I entered “Investigate my latest CloudWatch alarm that triggered and analyze the underlying metrics and logs to determine the root cause” and clicked Start investigating.
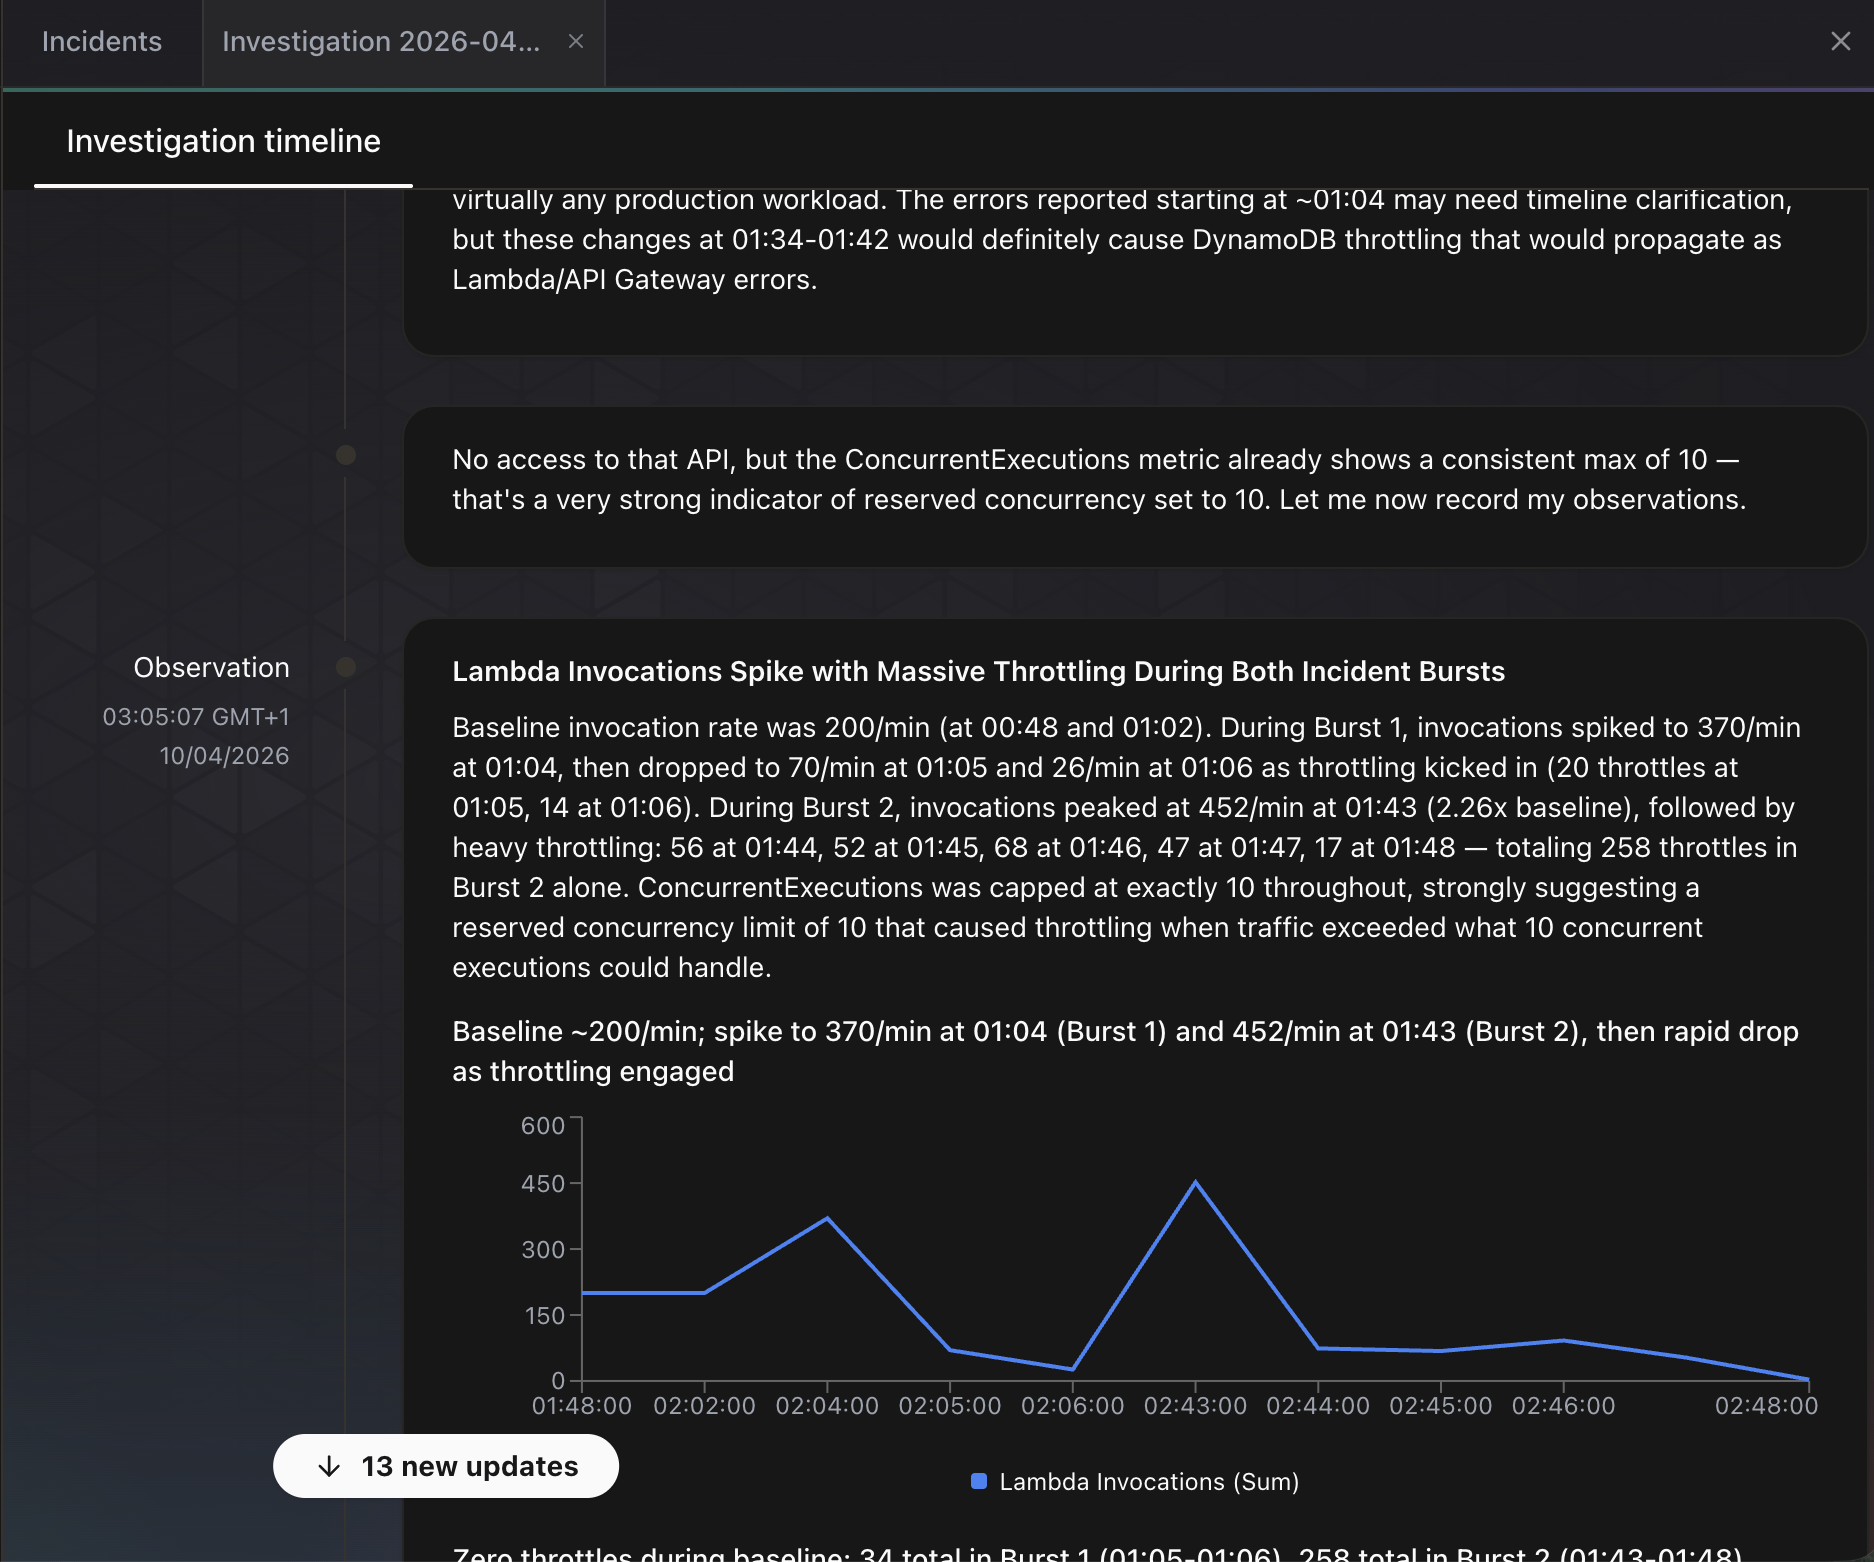
The agent immediately begins working. The investigation timeline updates in real time as it posts observations. In the screenshot below, the agent has already identified two burst patterns in Lambda invocations, noting that invocations spiked from a baseline of 200/min to 370/min and 452/min during the chaos injection. It spotted that ConcurrentExecutions was capped at exactly 10 throughout, suggesting a reserved concurrency limit. It also correlated the timing of DynamoDB throttling with the Lambda error spikes and noted that these changes “would definitely cause DynamoDB throttling that would propagate as Lambda/API Gateway errors.”
The agent even generated an inline chart of Lambda invocations over time, showing the two traffic bursts and the subsequent drop as throttling kicked in.
What DevOps Agent Found
The investigation took approximately 6 minutes. Here is the root cause analysis:
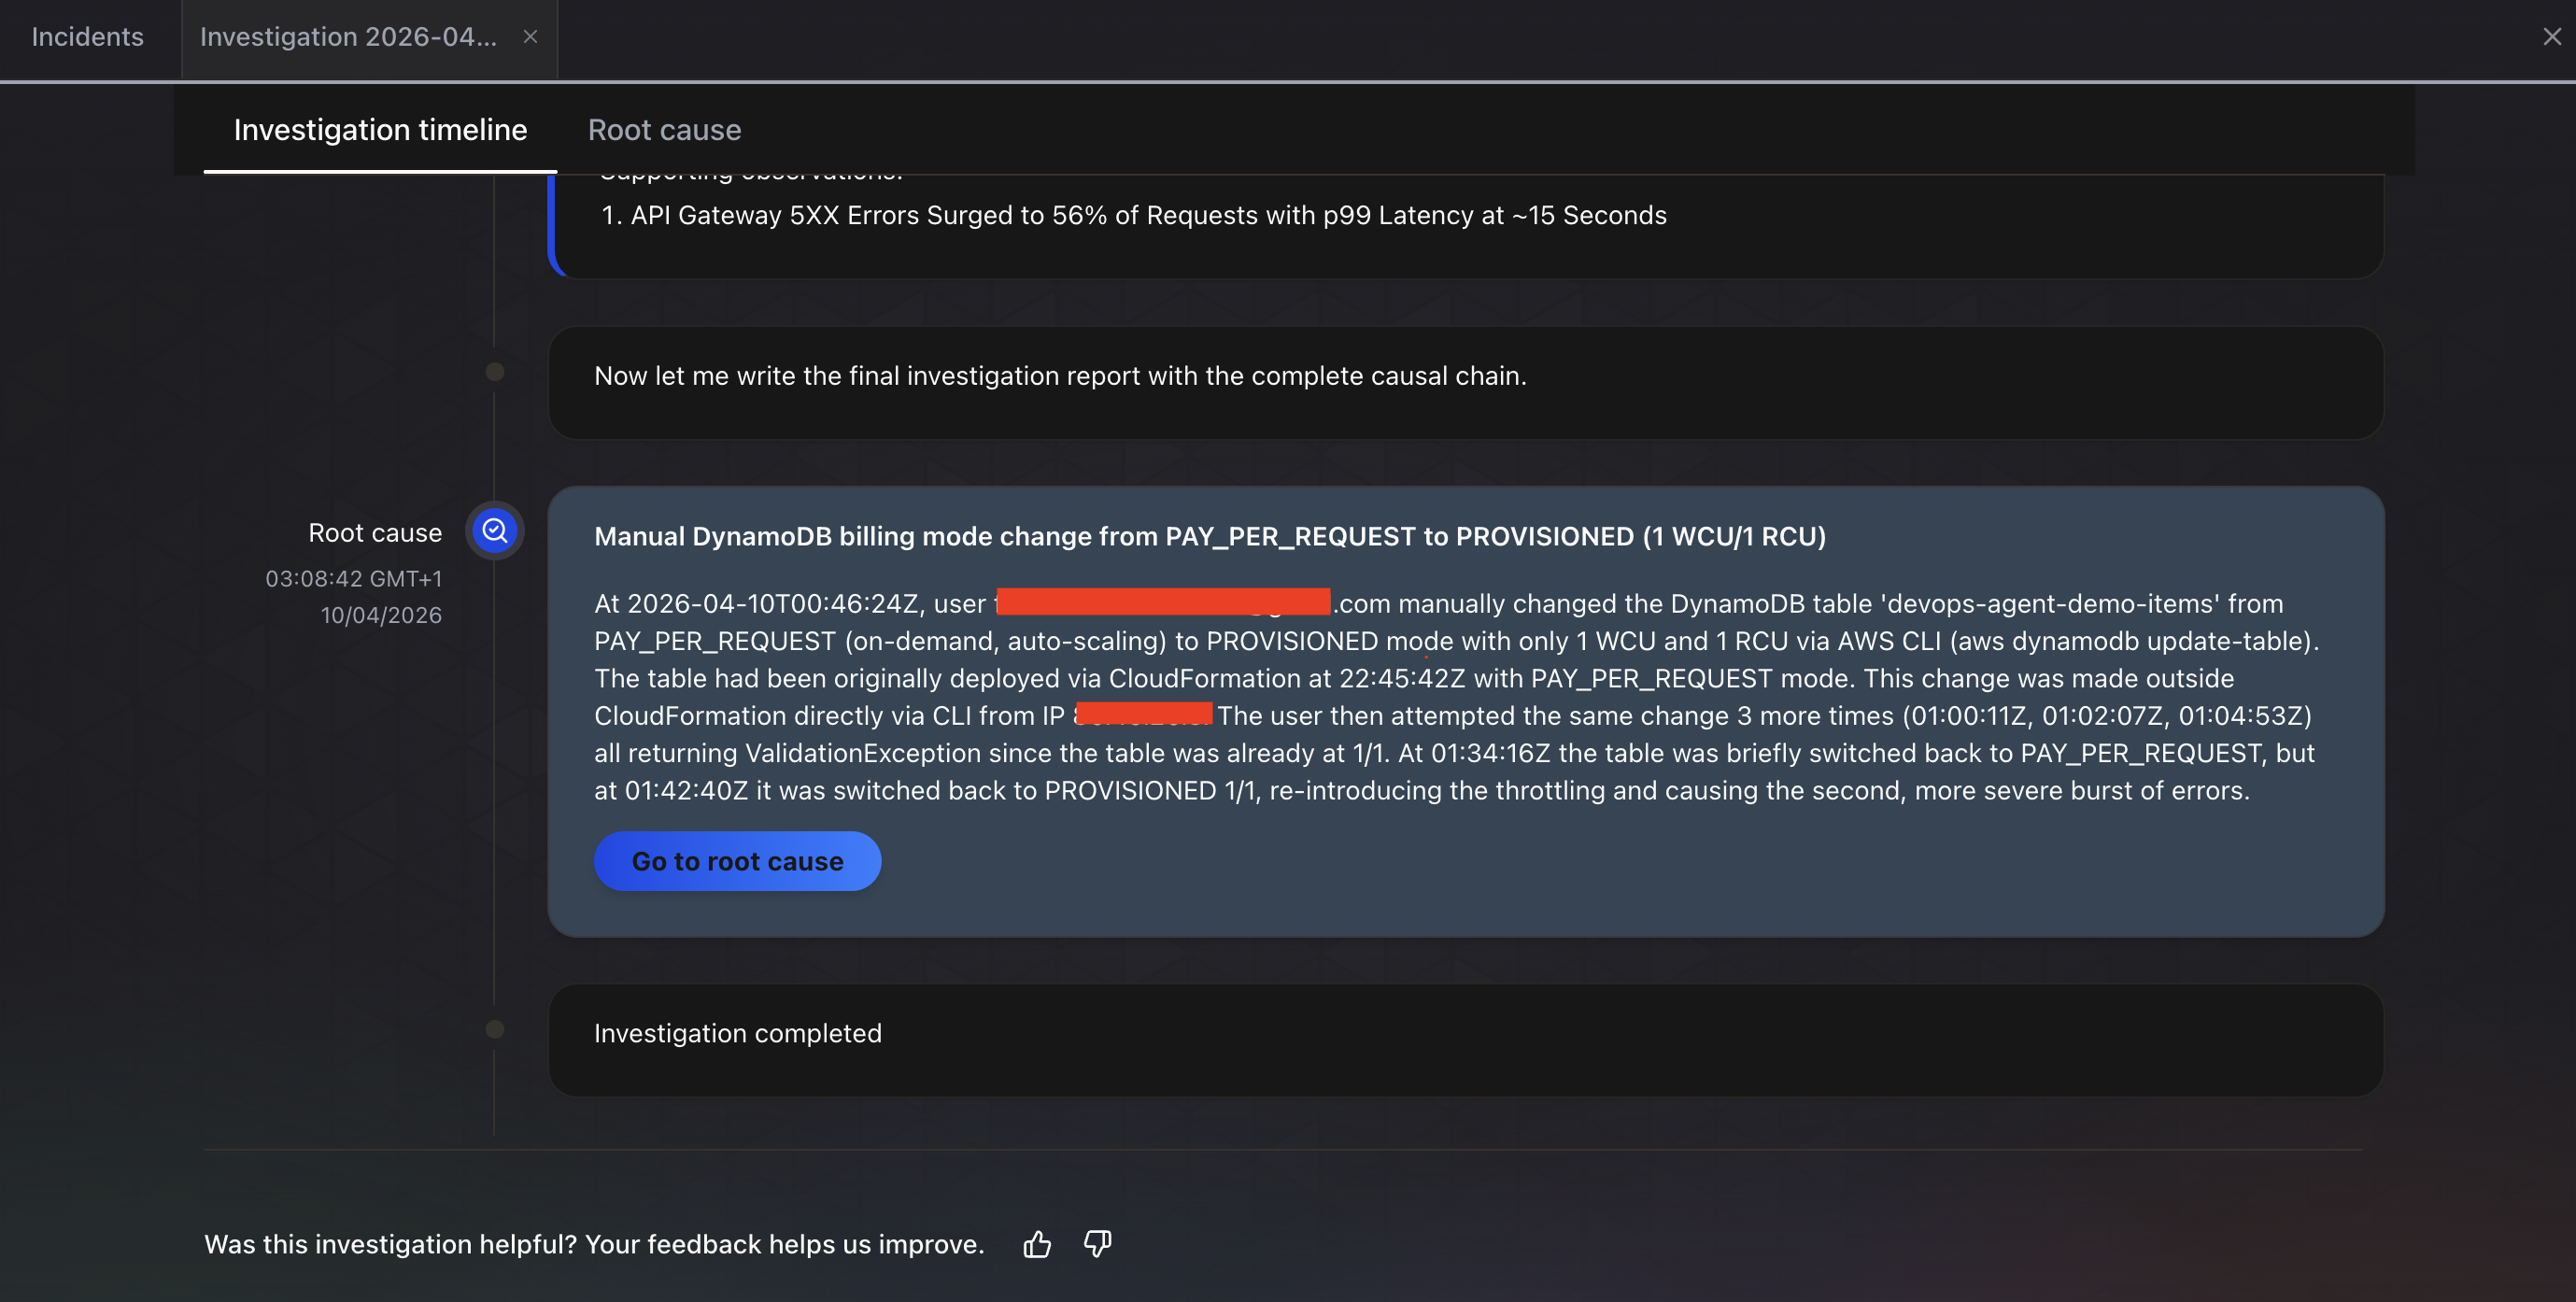
The investigation completed in about 6 minutes. The Root cause tab shows the final finding: “Manual DynamoDB billing mode change from PAY_PER_REQUEST to PROVISIONED (1 WCU/1 RCU).” The agent identified:
- Root cause: A user manually changed the DynamoDB table
devops-agent-demo-itemsfrom PAY_PER_REQUEST (on-demand, auto-scaling) to PROVISIONED mode with only 1 WCU and 1 RCU via the AWS CLI (aws dynamodb update-table) - Impact chain: API Gateway 5xx errors surged to 56% of requests with p99 latency at approximately 15 seconds
- Configuration history: The agent traced the full timeline, noting the table was originally deployed via CloudFormation with PAY_PER_REQUEST mode, then changed outside CloudFormation directly via CLI
- Multiple attempts detected: The agent even noticed multiple
update-tablecalls, some returningValidationExceptionbecause the table was already at 1/1, and that the table was briefly switched back to PAY_PER_REQUEST before being set to PROVISIONED again, re-introducing the throttling
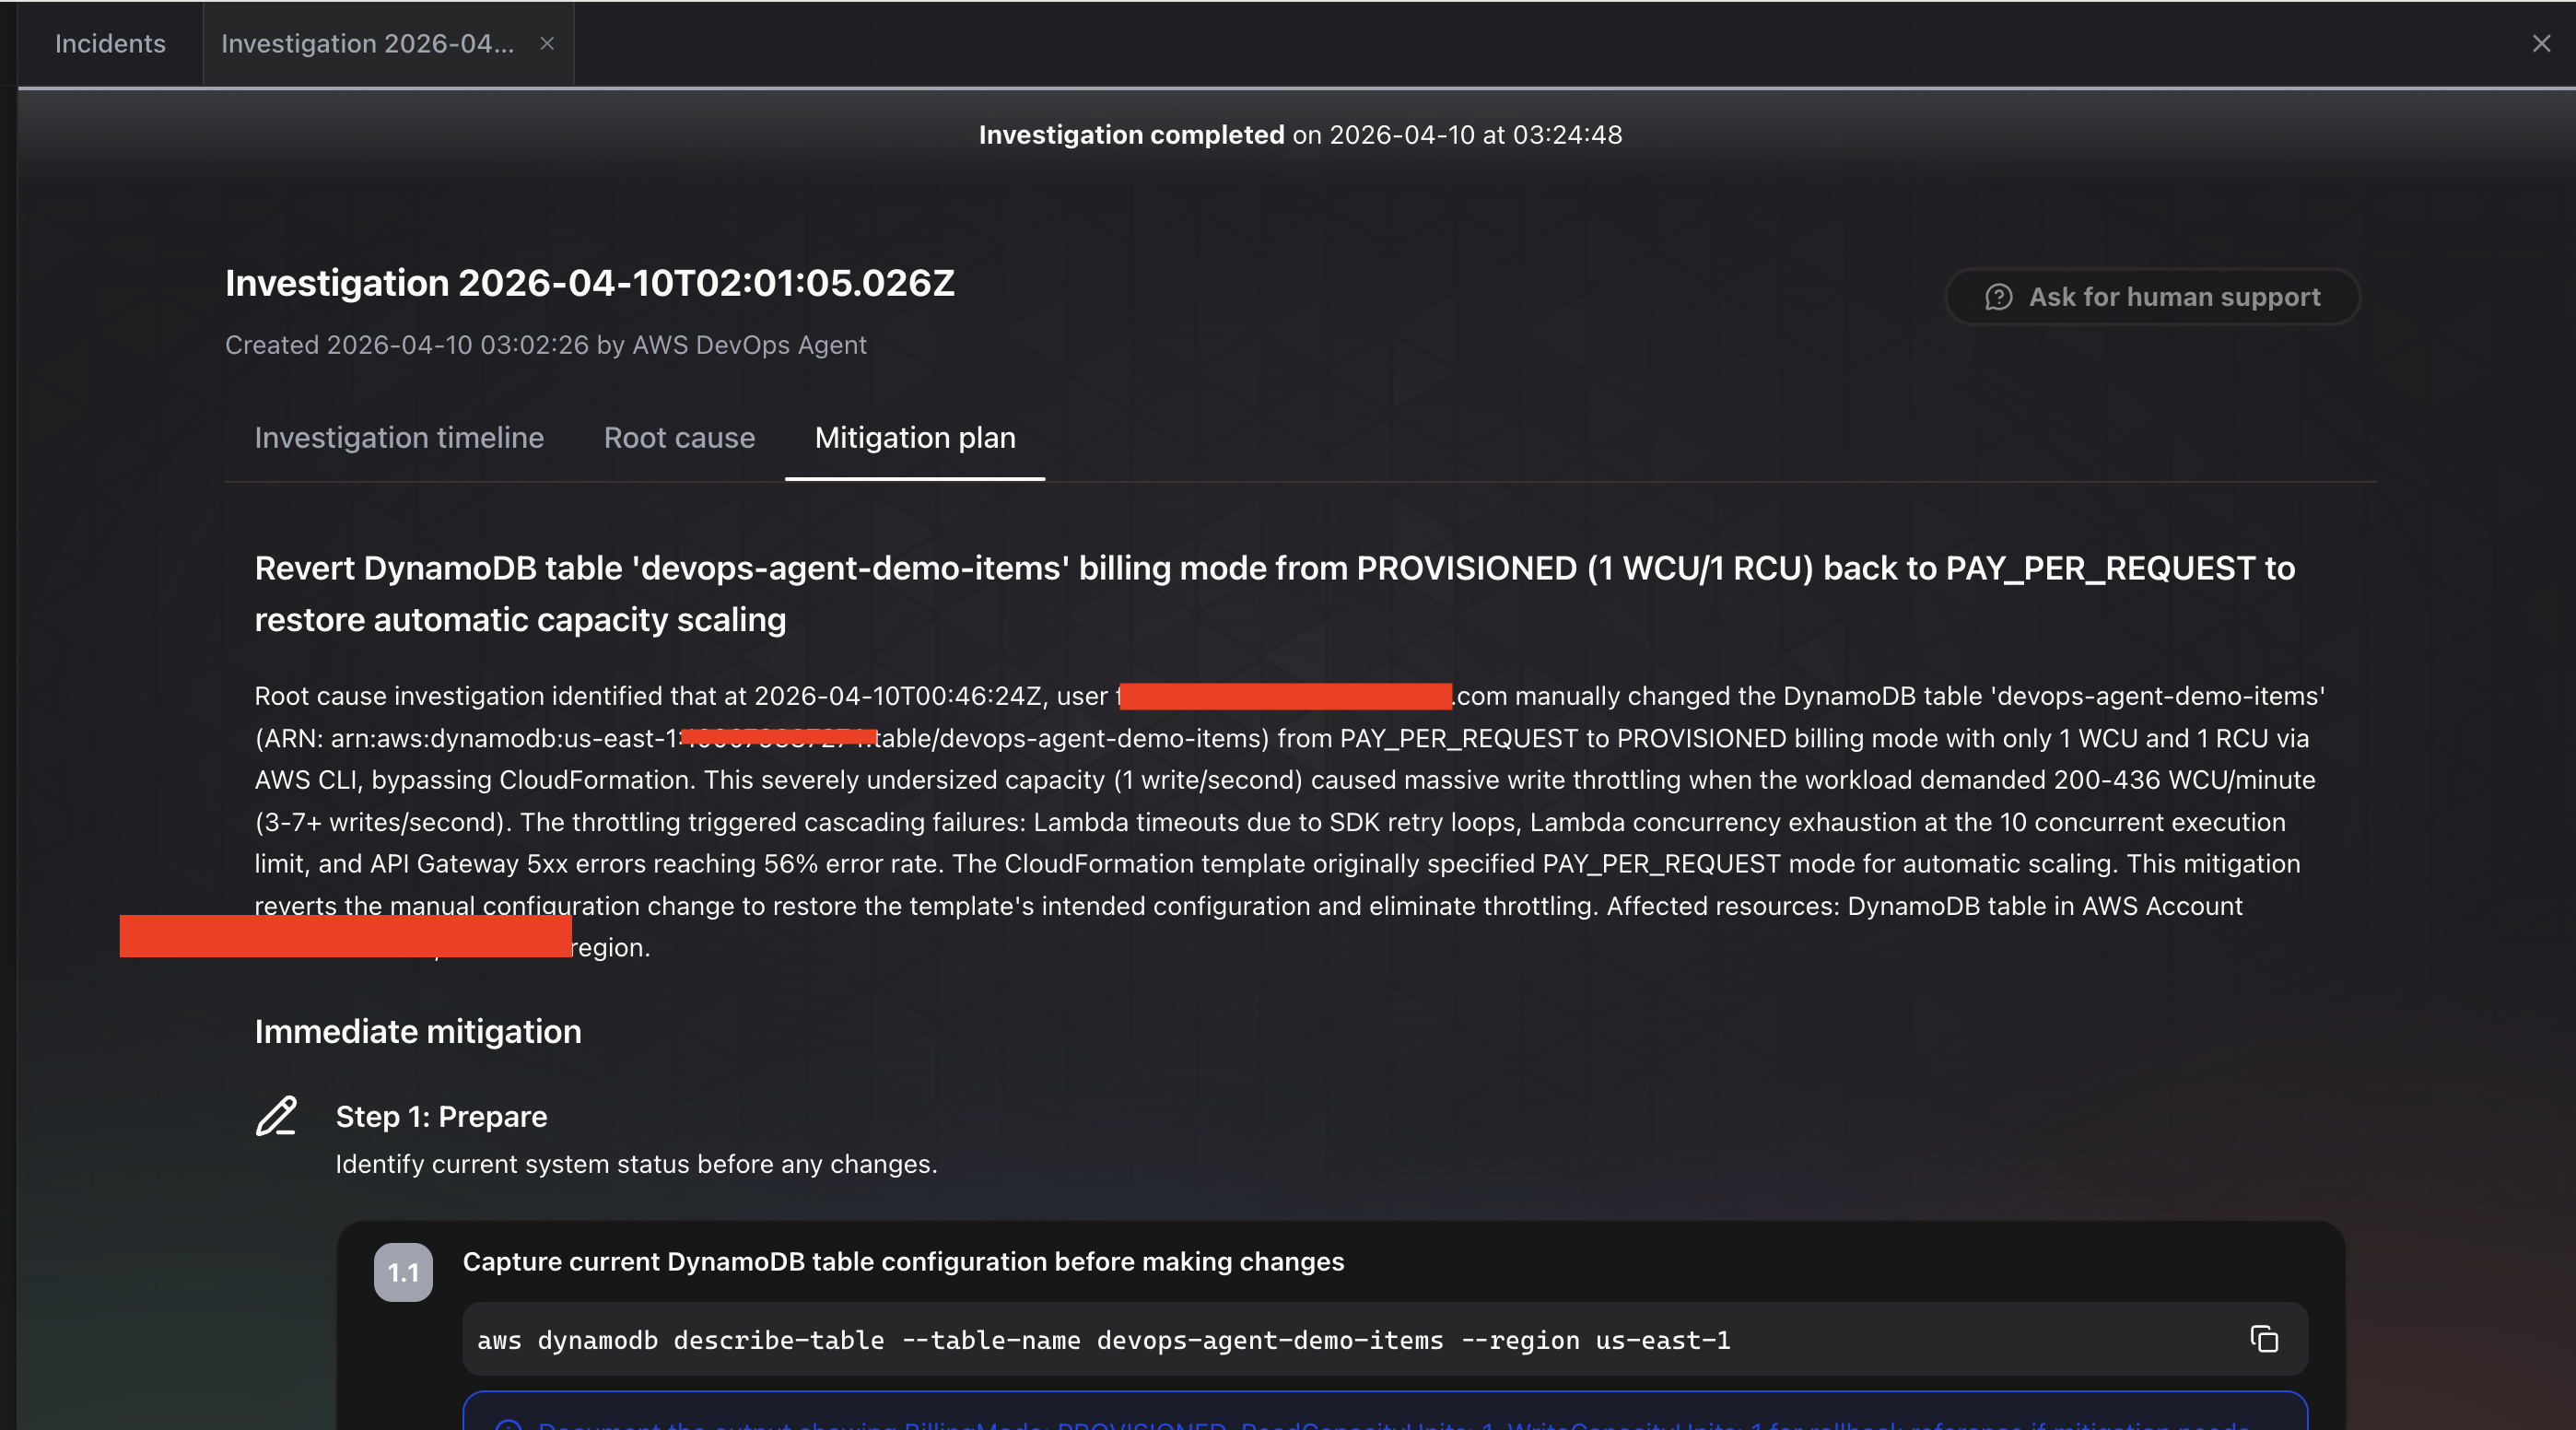
The Mitigation plan tab goes further. It provides a step-by-step remediation plan, starting with “Step 1: Prepare” to check the current table configuration before making changes. It even provides the exact CLI command to run: aws dynamodb describe-table --table-name devops-agent-demo-items --region us-east-1. The recommendation is to revert the table from PROVISIONED (1 WCU/1 RCU) back to PAY_PER_REQUEST to restore automatic capacity scaling. It notes that the CloudFormation template originally specified PAY_PER_REQUEST mode, so this mitigation reverts the manual configuration change to restore the template’s intended configuration.
This is exactly what happened. The agent traced the entire chain correctly: API errors to Lambda failures to DynamoDB throttling to a manual billing mode change made via the CLI. It did not just identify the symptom (errors). It identified the root cause (a configuration change made outside CloudFormation), explained the full impact chain (throttling caused Lambda failures, SDK retry loops, concurrency exhaustion, and 56% API Gateway 5xx error rate), and recommended the specific fix with runnable commands.
Restoring the Table
After the investigation, restore the DynamoDB table:
./chaos/restore.shThis switches the table back to on-demand billing mode. The alarms should clear within a few minutes as the backlog of throttled requests drains.
Investigation Cost
The investigation ran for approximately 6 minutes, or 360 agent-seconds.
Cost: 360 x $0.0083 = $2.99
Plus a small amount for CloudWatch Logs Insights queries during the investigation. Total cost for this demo: under $4.
For comparison, manually investigating this issue would involve:
- Opening CloudWatch, checking which alarms fired (2 minutes)
- Navigating to the DynamoDB console, checking table metrics (3 minutes)
- Looking at the Lambda function logs for error patterns (5 minutes)
- Checking DynamoDB table configuration to spot the capacity change (3 minutes)
- Correlating the timeline of the capacity change with the error onset (5 minutes)
An experienced SRE could do this in about 15 to 20 minutes. A less experienced engineer might take 45 minutes or more, especially if they do not immediately think to check the DynamoDB billing configuration. DevOps Agent did it in 6 minutes for $3.
Pricing
DevOps Agent charges $0.0083 per agent-second across all activities: investigations, evaluations, and chat. That translates to roughly $0.50 per minute or $29.88 per hour of active agent work. You only pay for active computation, not idle time.
Here is what real investigations cost in practice:
| Scenario | Duration | Cost |
|---|---|---|
| Quick investigation (DynamoDB throttling) | ~6 minutes | ~$3.00 |
| Moderate investigation (multi-service) | ~10 minutes | ~$5.00 |
| Complex investigation (cross-account) | ~30 minutes | ~$14.94 |
| Monthly: small team, 10 investigations | ~80 minutes total | ~$40 |
| Monthly: active team, 80 investigations + chat | ~19 hours total | ~$568 |
For comparison, a manual P1 investigation by an SRE typically takes 45 to 60 minutes. At a fully loaded SRE cost of $150,000/year, that is roughly $75 per hour of engineering time. A 6-minute DevOps Agent investigation at $3 is a meaningful savings, if the diagnosis is accurate.
Free Trial
New customers get a 2-month free trial starting from their first operational task:
- Up to 10 Agent Spaces
- 20 hours of investigations per month
- 15 hours of evaluations per month
- 20 hours of on-demand SRE tasks per month
That is more than enough to run this demo and evaluate the tool thoroughly.
AWS Support Credits
This is where pricing gets interesting for existing AWS customers. Your monthly AWS Support charges convert into DevOps Agent credits:
| Support Plan | Credit Percentage |
|---|---|
| Unified Operations | 100% |
| Enterprise Support | 75% |
| Business Support+ | 30% |
If your Enterprise Support bill is $5,000/month, you get $3,750 in DevOps Agent credits. That covers significant usage before you pay anything additional. Credits expire monthly if unused.
Hidden Costs
The agent-second rate is not the complete picture. DevOps Agent queries CloudWatch Logs Insights, retrieves traces, and reads metrics during investigations. These underlying AWS service calls are billed at standard rates. For a serverless workload with modest log volume, the additional cost is negligible. For a large environment with terabytes of logs, it could add up. This is something to monitor in your first month.
Verdict
What Works
Root cause accuracy was impressive. In my test, the agent correctly traced API Gateway 5xx errors through Lambda to DynamoDB throttling, and identified the specific configuration change that caused it. AWS reports 94% root cause accuracy from preview customers. I cannot verify that number across all scenarios, but for this serverless workload, it got the diagnosis right.
Time to diagnosis is genuinely fast. Six minutes from investigation start to root cause, including log queries, metrics analysis, and change detection. The agent did not just point at the symptom (“DynamoDB is throttling”). It connected the dots to the billing mode change that caused the throttling.
Setup is minimal. Fifteen minutes to create an Agent Space, auto-create the IAM role, and start investigating. No agents to install, no sidecars, no configuration files. If you already use CloudWatch, DevOps Agent works out of the box.
Pricing is straightforward. Pay-per-second with no idle charges. A typical investigation costs $3 to $5. The AWS Support credit offset makes it effectively free for many Enterprise customers.
What Does Not Work
No auto-remediation. The agent tells you what to do but cannot do it. For my demo, the fix was a one-liner (aws dynamodb update-table --billing-mode PAY_PER_REQUEST). Having the agent just run it, with approval, would be more useful. AWS says autonomous remediation may come “when confidence is high enough,” but today it is recommend-only.
Investigation gaps are real. The best practices blog warns that “there will be many investigations the agent cannot continue” due to missing context, telemetry, or permissions. If your logs are sparse or your IAM permissions too narrow, the agent will report gaps instead of answers. This is honest and transparent, but it means the tool is only as good as your observability setup.
Limited regions. Six regions at GA. If your primary workloads run in ap-southeast-1 (Singapore) or sa-east-1 (Sao Paulo), you cannot use it yet. The agent can monitor resources in any region from a supported home region, but the Agent Space itself must live in one of the six.
Community engagement is low. I found zero substantive Reddit threads and near-zero Hacker News discussion about this tool. Most existing content is written by AWS Community Builders. Independent, critical evaluations are scarce. This could mean the tool has not reached the broader developer community yet, or it could mean it is solving a problem that only larger teams with on-call rotations feel acutely.
How It Compares
DevOps Agent is not a replacement for Datadog, Dynatrace, or PagerDuty. It integrates with all of them. The right mental model is: these tools collect data and alert you; DevOps Agent reasons about the data and tells you why.
| Tool | What It Does | Auto-Remediate | Pricing Model |
|---|---|---|---|
| AWS DevOps Agent | Autonomous investigation and root cause analysis | No (recommends) | $0.0083/agent-second |
| PagerDuty AIOps | Alert routing and noise reduction | No | $699-799/mo + per-user |
| Datadog Watchdog | Anomaly detection (passive) | Via Workflow Automation | Included with Datadog |
| Dynatrace Davis | Causal root cause analysis | Yes (self-healing) | Enterprise pricing (quote) |
Dynatrace Davis is the closest competitor in terms of depth. It offers deterministic causal analysis with self-healing workflows. But it requires full platform commitment and enterprise-level pricing. DevOps Agent is lighter: you can add it to your existing CloudWatch setup in 15 minutes and pay per investigation.
Datadog Watchdog is a passive intelligence layer. It surfaces anomalies but does not investigate autonomously. You still need to click through dashboards and connect the dots yourself. DevOps Agent does the connecting for you.
PagerDuty is an incident management platform, not an investigation tool. Its SRE Agent (expected EA Q2 2026) will add diagnostic capabilities, but today PagerDuty manages the incident lifecycle while DevOps Agent does the analysis.
Who Should Use It
Yes: Teams running significant AWS workloads with on-call rotations. If you spend more than 10 hours per month on incident investigation, the math works out. Enterprise Support customers get 75% of their support charges as DevOps Agent credits, making it effectively included.
Maybe: Small teams with simple architectures. If you have 3 Lambda functions and rarely get paged, the free trial is worth trying, but you may not need an always-on investigation agent.
Not yet: Teams primarily on GCP. DevOps Agent supports AWS and Azure, but not Google Cloud. Teams in unsupported regions should wait for expansion.
The Bigger Picture
What struck me most is that DevOps Agent is not trying to replace your monitoring stack. It sits on top of whatever you already have (CloudWatch, Datadog, Dynatrace, Splunk) and adds reasoning. It is the layer between “something is wrong” and “here is specifically why and how to fix it.” That positioning is smart because it does not require ripping out existing tools. The risk is low because you can evaluate it on a single incident before committing.
The 94% accuracy claim from AWS is hard to verify independently. I got a correct diagnosis on my test, but that was a clean scenario with a single, clear root cause. Real production incidents are messier: multiple things break simultaneously, logs are incomplete, and the root cause might span services owned by different teams. How the agent handles those scenarios is the real test, and nobody has published independent benchmarks yet.
For $3 per investigation, it is worth trying on your next incident and comparing the agent’s analysis to what your team finds manually. If it saves 30 minutes of SRE time even half the time, it pays for itself.
Cleaning Up
When you are done with the demo, delete everything:
./scripts/cleanup.sh devops-agent-demo us-east-1This removes the CloudFormation stack and all its resources. You can also delete the Agent Space from the DevOps Agent console if you no longer need it.